KnowxBox Documentation
| Site: | KnowxBox |
| Course: | KnowxBox |
| Book: | KnowxBox Documentation |
| Printed by: | |
| Date: | Saturday, 27 July 2024, 12:41 PM |
1. About KnowxBox
What is KnwoxBox?
KnowxBox is a ready-to-use Learning Management System that helps in upskilling. You can sign up as an Organisation Manager or as an individual. KnowxBox provides also you with a library of ready-made courses.- As an individual, you can buy the licenses and access the courses.
- As an Organisation Manager, you can create departments, add/manage users, add/manage your own courses, enroll users in courses, view reports, add your logo/branding for your users and offcourse you can buy licenses for existing KnowxBox courses/library and assign the license to your other users.
With KnowxBox LMS, you're in charge. Customize and expand your learning system to match your organization's needs with its various benefits.
Benefits
- Simple and User-Friendly Interface
- Customizable Personalized Dashboard
- Easy User Management and Course Management
- Interactive reports
- Library of 100s of Behavioral Training Courses
- Add any kind of training courses for your learners like compliance and onboarding, etc
- Make our corporate LMS your own
SMART LMS
We can ensure effective learning outcomes and a clear path to success.
- Specific: Clearly defined and focused learning platform.
- Measurable: Training that can be quantified and tracked to assess progress by analyzing the reports.
- Achievable: The user can achieve their goals within the given resources and constraints by using LMS’s training.
- Relevant: Provide a user-friendly platform that aligns with the learners' needs and the overall learning objectives.
- Time-Bound: The user can set a timeframe or deadline for completion.
1.1. User Types
For us, learners are the assets and we provide them with a great learning experience. In KnowxBox LMS, learners are known as users because they are using the platform. There are two types of users: one is an organisation user, and the other is an individual user. However, in an organisation there are again two types of users. One is the course educator who creates the course, and the other is an organisation employee who can take the course and view their progress.
So, there are a total of four types of users in KnowxBox LMS.
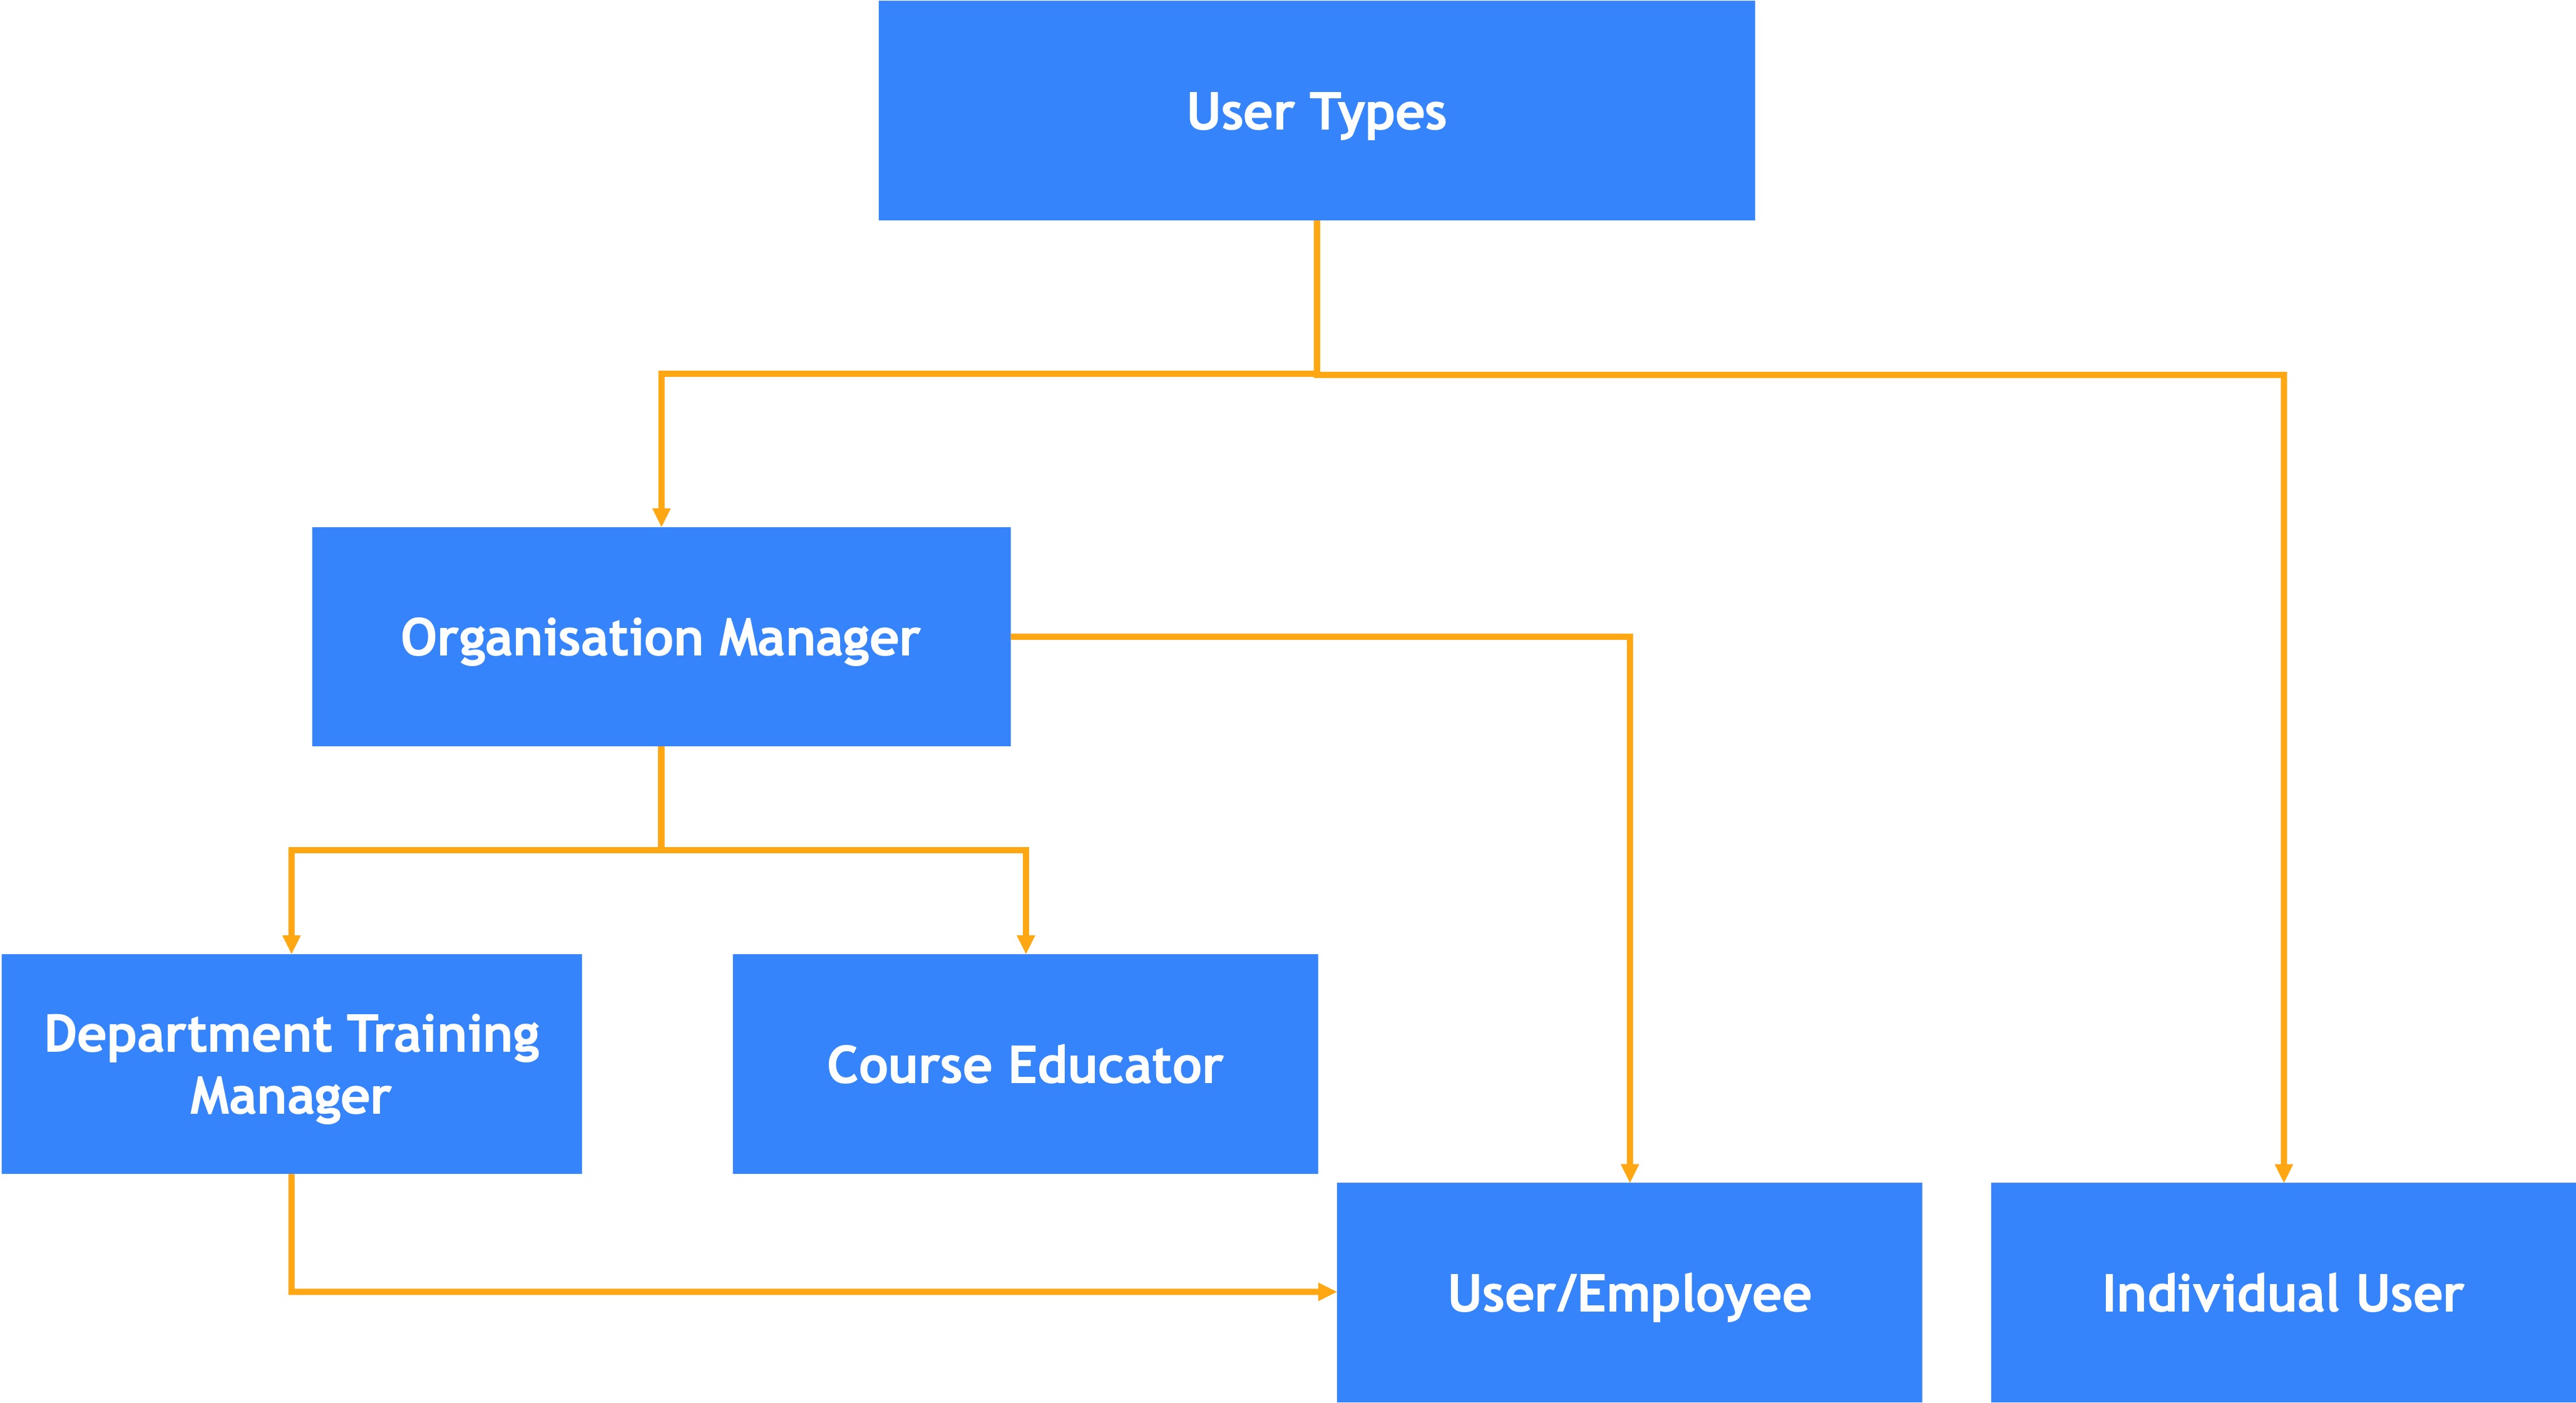
About Organisation User
- Organisation Managers have full access to KnowxBox LMS for the course, user management, customization, and more.
- Course Educators can edit the courses' content.
- Department Training Managers can see and manage the users of their own department.
- Organisation User/Employee can see only their assigned courses and progress.
About Individual User
- Users can access the courses they have purchased on KnowxBox LMS.
- Downloadable certificates are available upon course completion.
- Track and visualize course progress at any time.
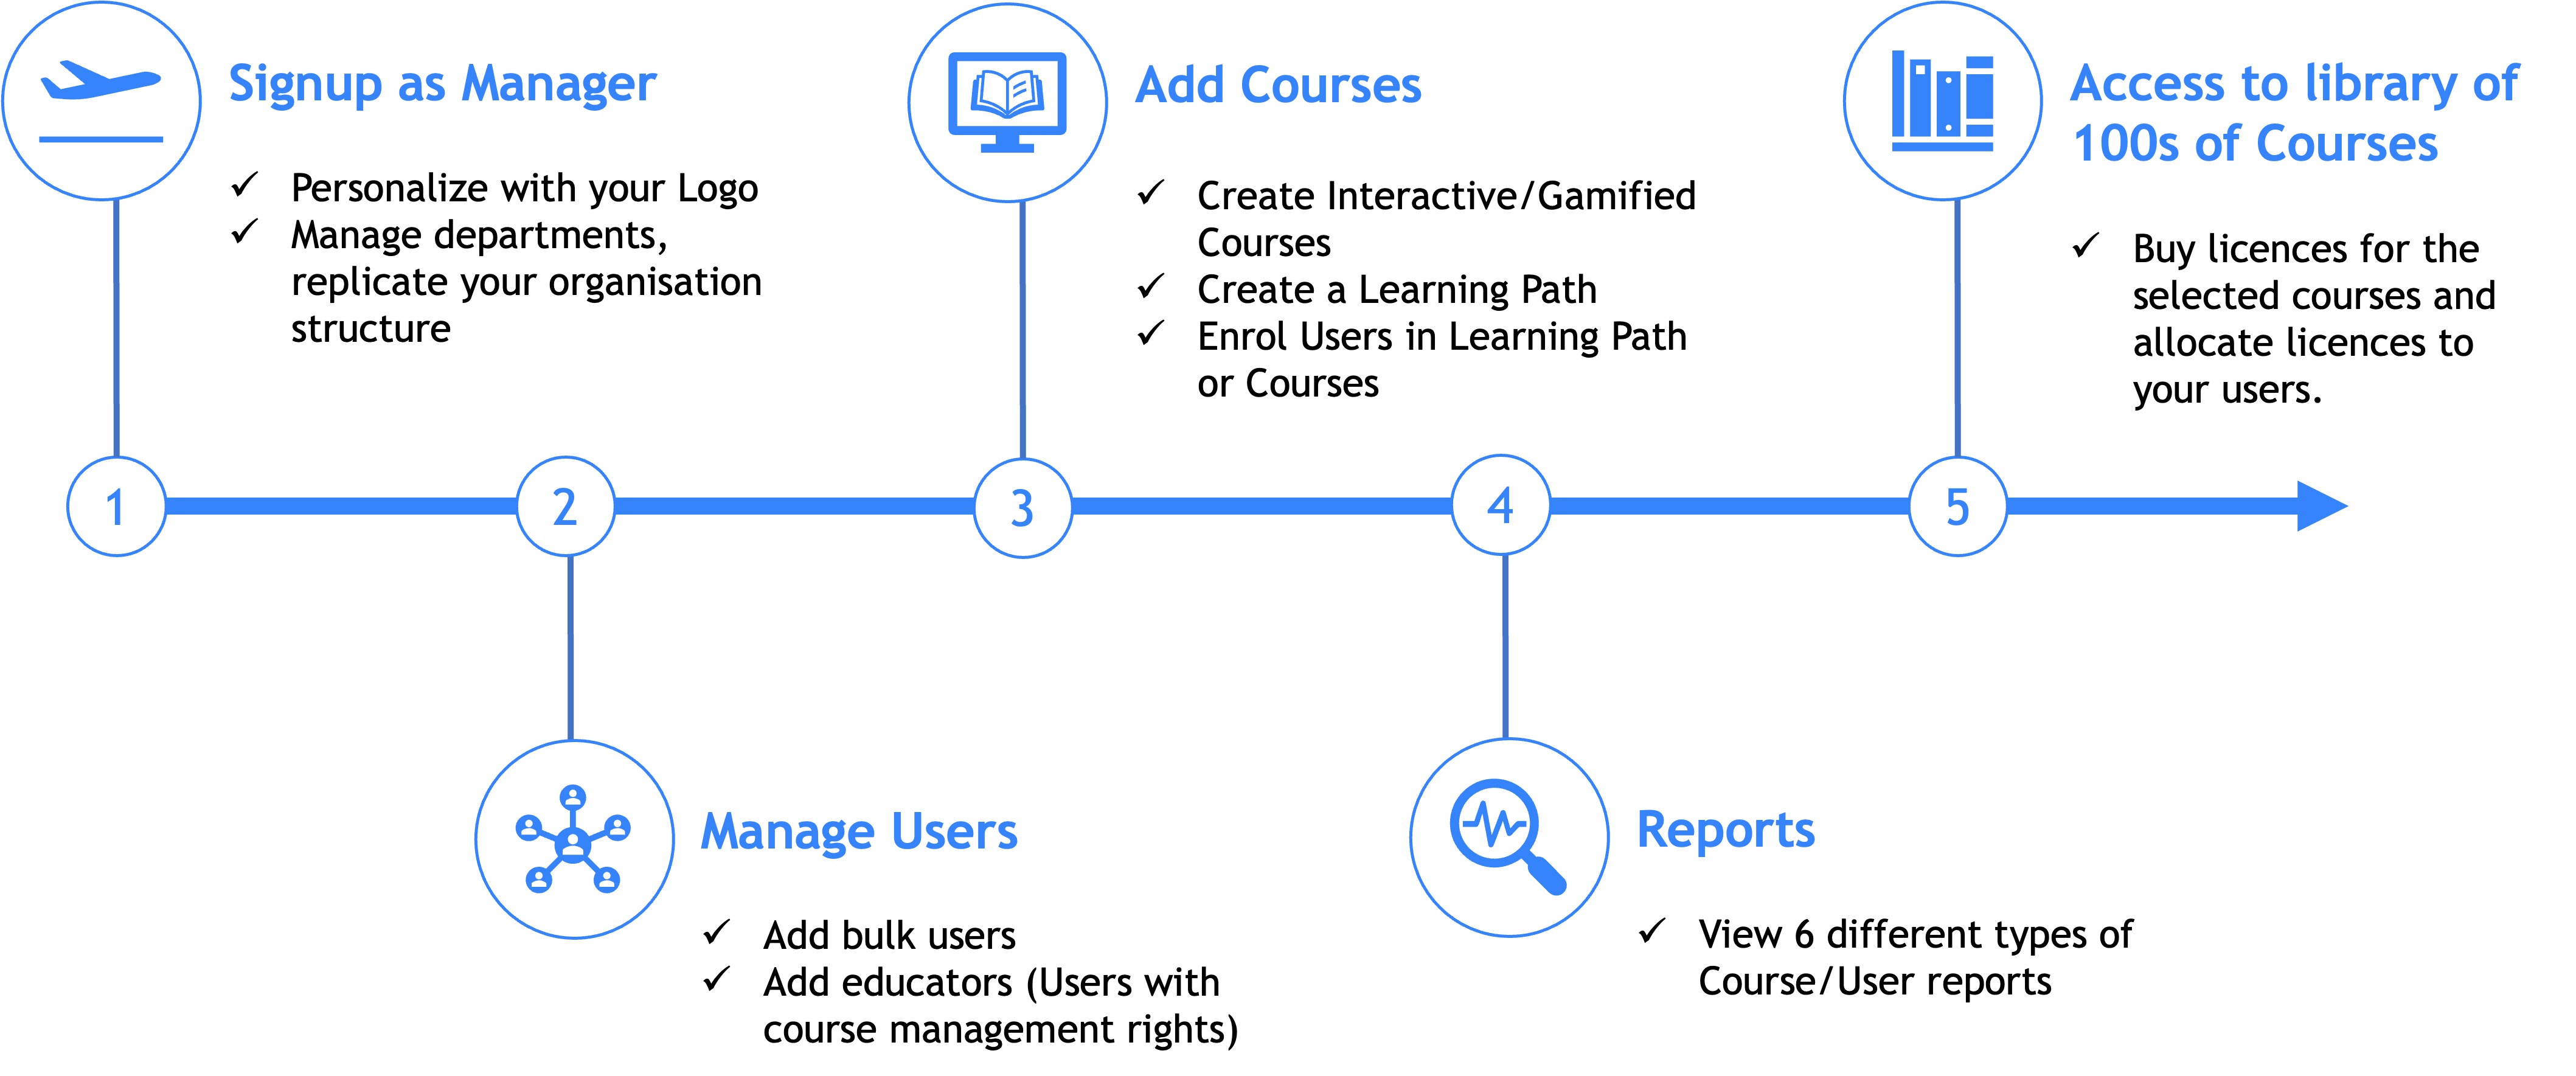
1.2. User Journey
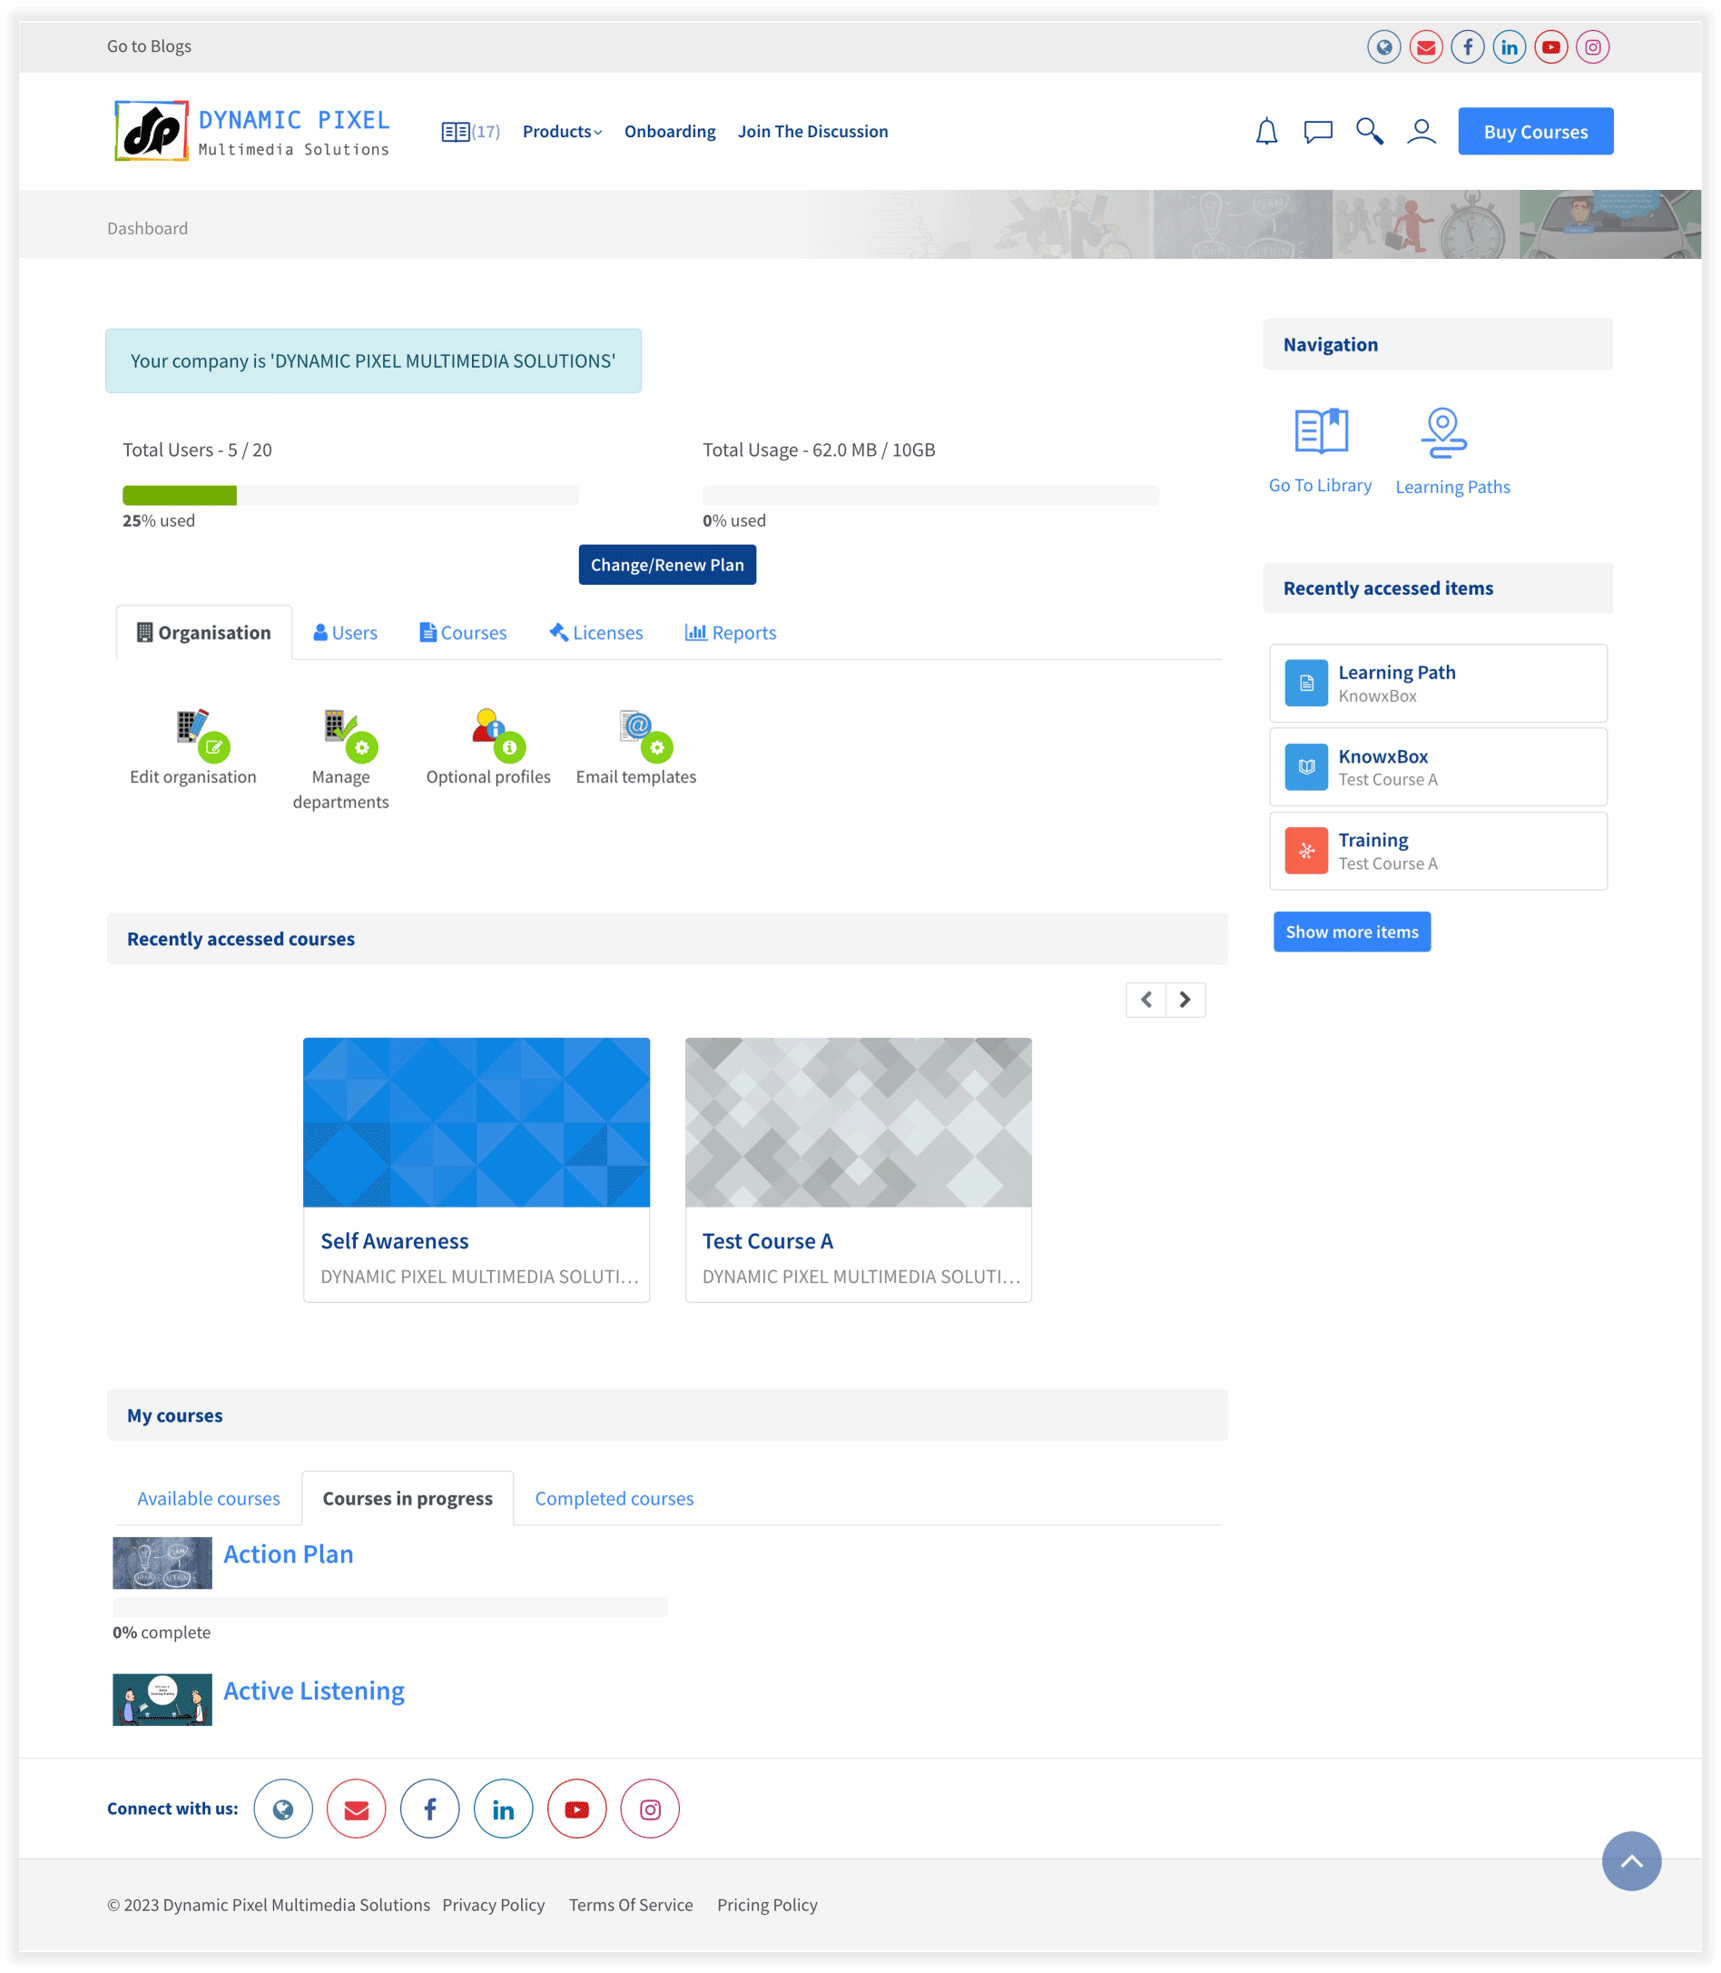
1.3. Snapshots of Dashboard for Manager and User
A. Dashboard for Manager
The manager has access to the maximum features of LMS. The following are the features that manager can access:
- Customize the appearance of the Dashboard for other organisation users like:
- Change/Update Logo
- Change/Update the background image for the login page
- Customize the Menu
- Add/Manage Users
- Create/Manage departments
- Manage User Enrolments
- View all types of reports
- Design courses in various formats
- Manage Courses
- Create/Manage Learning Paths
- Change/renew Subscription plan
- Track the progress of assigned courses
- Buy the available courses' licenses from the library for themselves and for other users
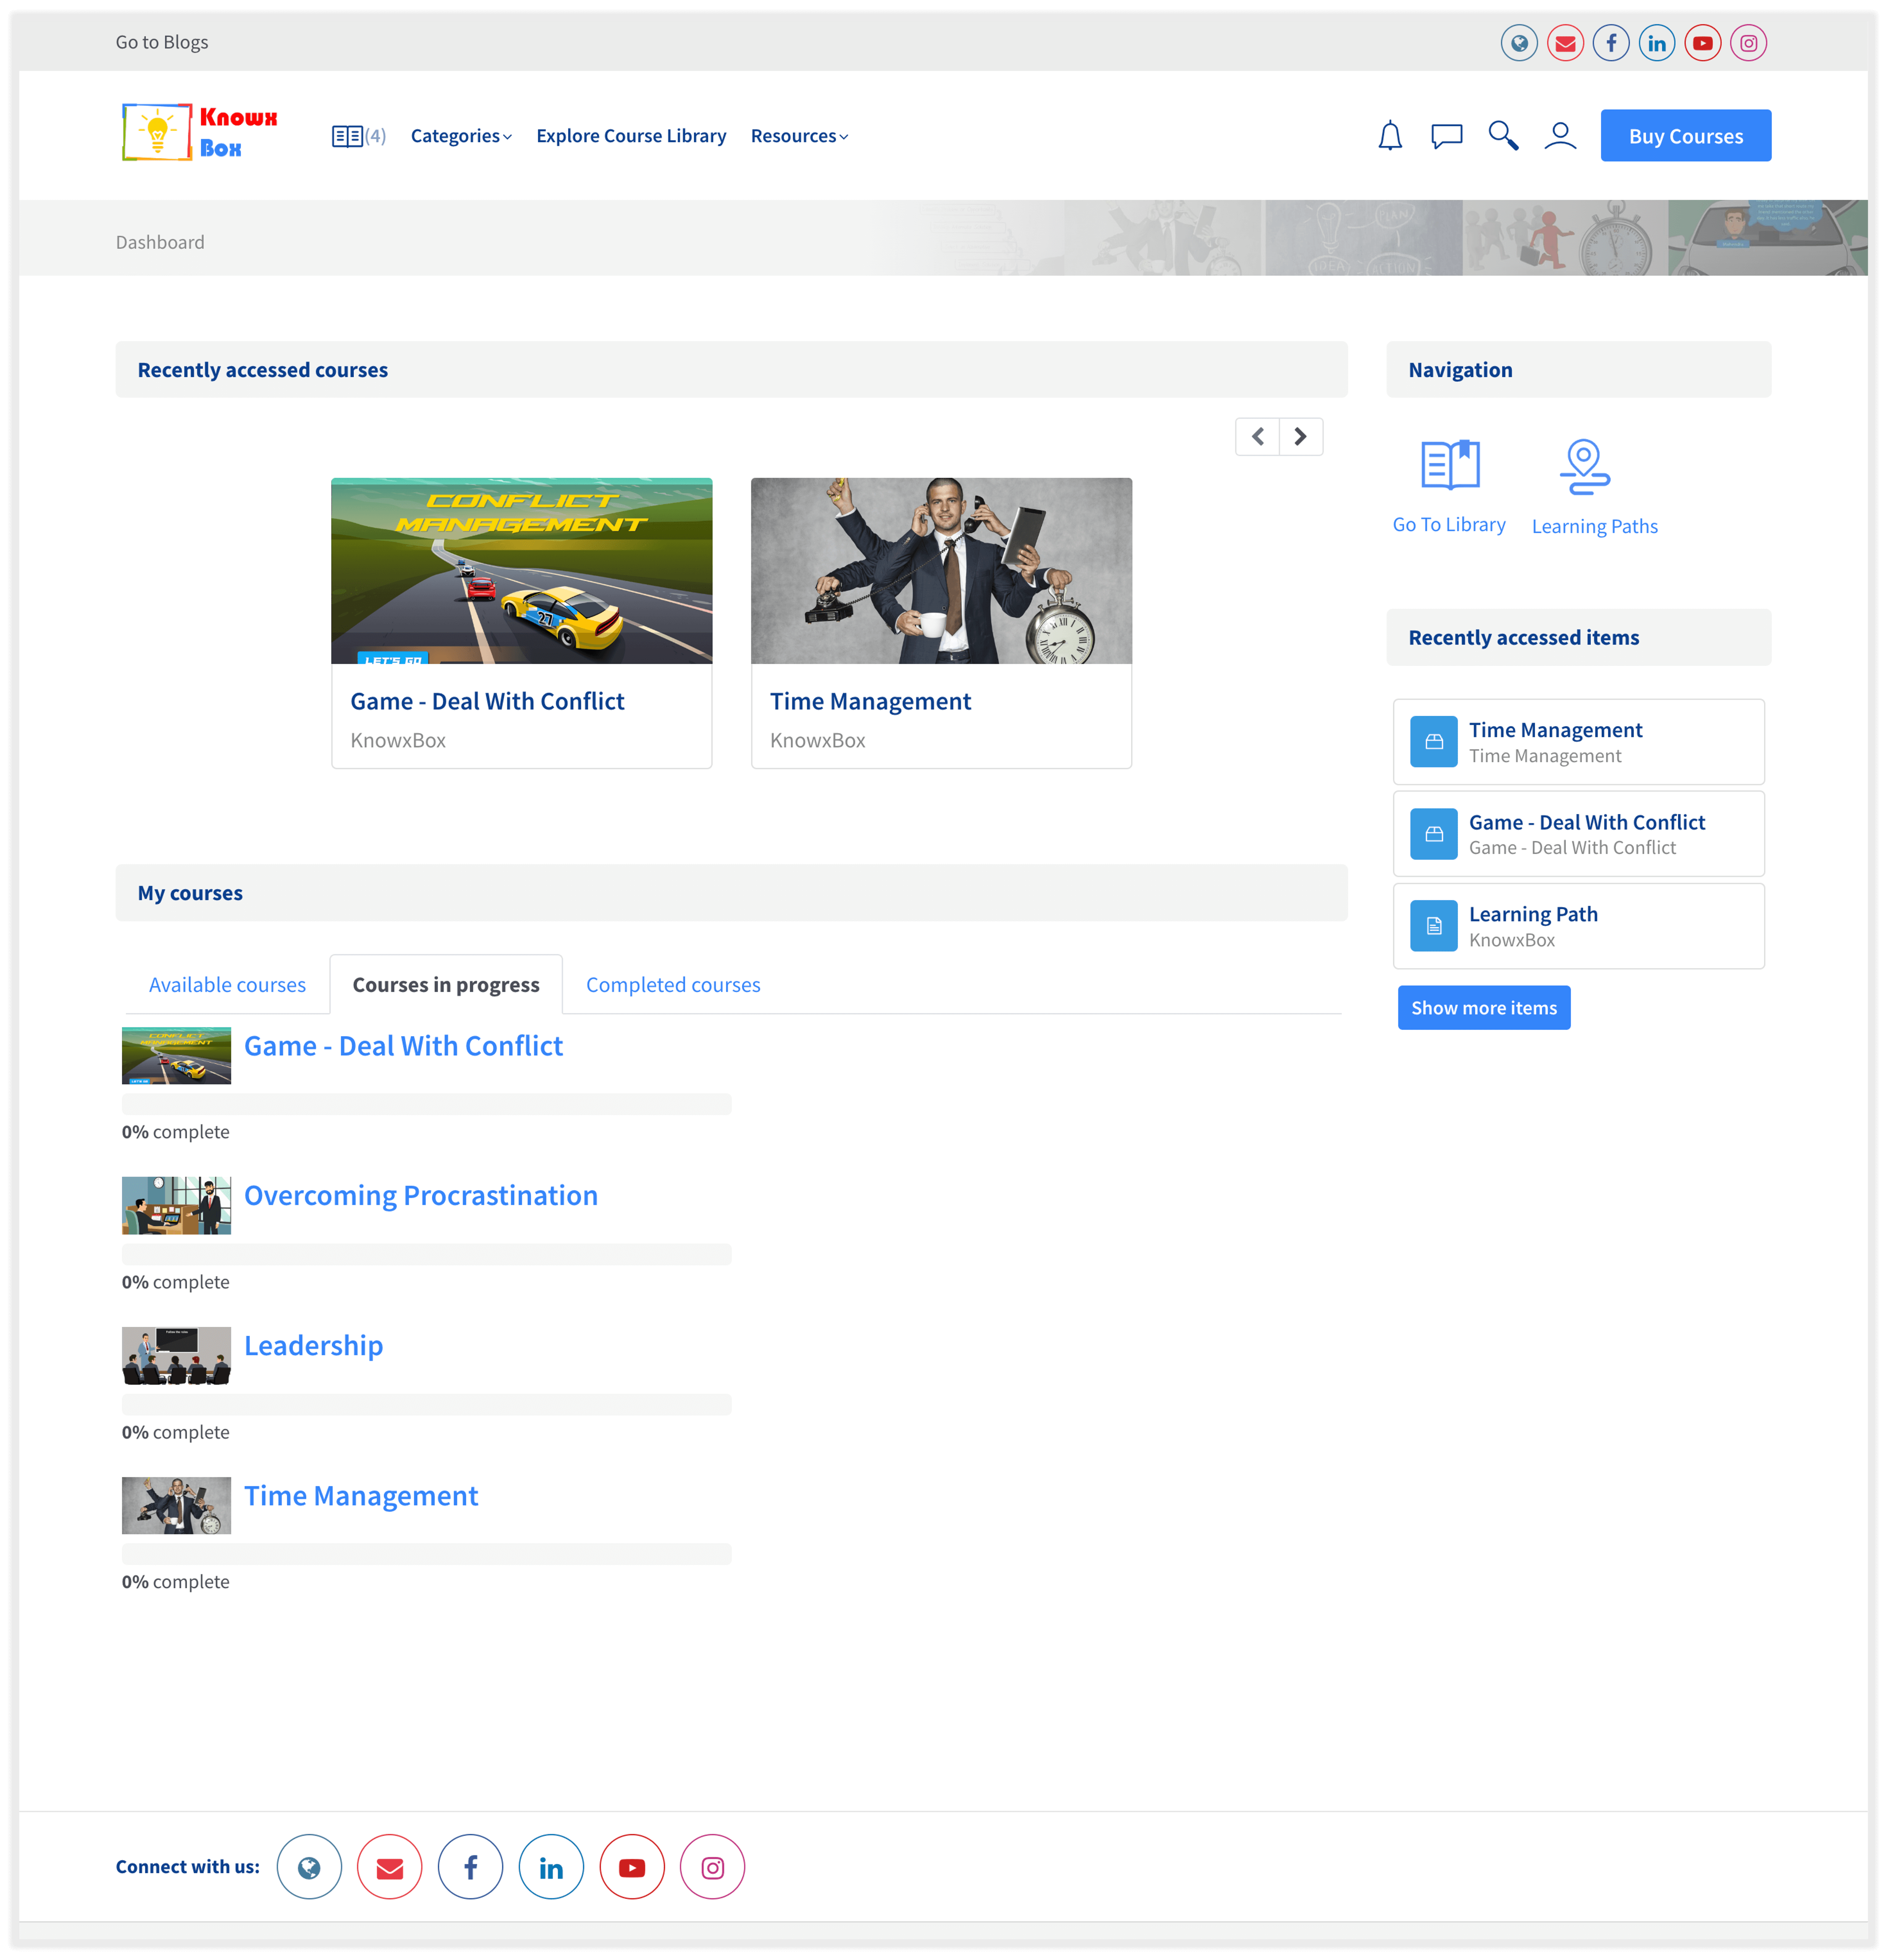
B. Dashboard for User
The user can be an employee of an organisation or individual. The user can access the following features:
- Track the progress of assigned courses
- Search for available courses
- View their completed courses
- View and edit their profile
- Buy the available courses' licenses from the library for themselves
2. Features of KnowxBox
- Personalise KnowxBox - Craft an LMS that suits your needs by personalising its features according to your preferences.
- Customised Login Page – Infuse your brand's essence: Logo, background, menu – all uniquely you.

- Manage Organisation Structure – Empower complete organisational control: manage departments, assign users, and customize profiles with unique fields.
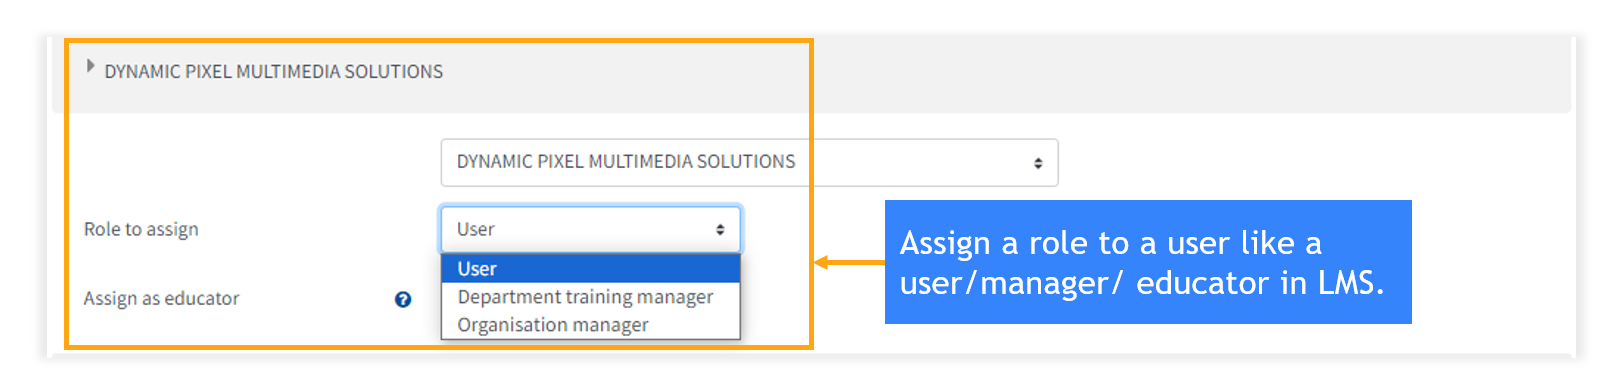
- Role Management– Manage your organisation roles like the organisation Manager oversees users, courses, and reports; Users access courses; Course Educators edit their created courses.
- Course Management- Empower course creation with diverse formats, track progress, gamify, manage enrollment, and forge custom learning paths through easy uploads.
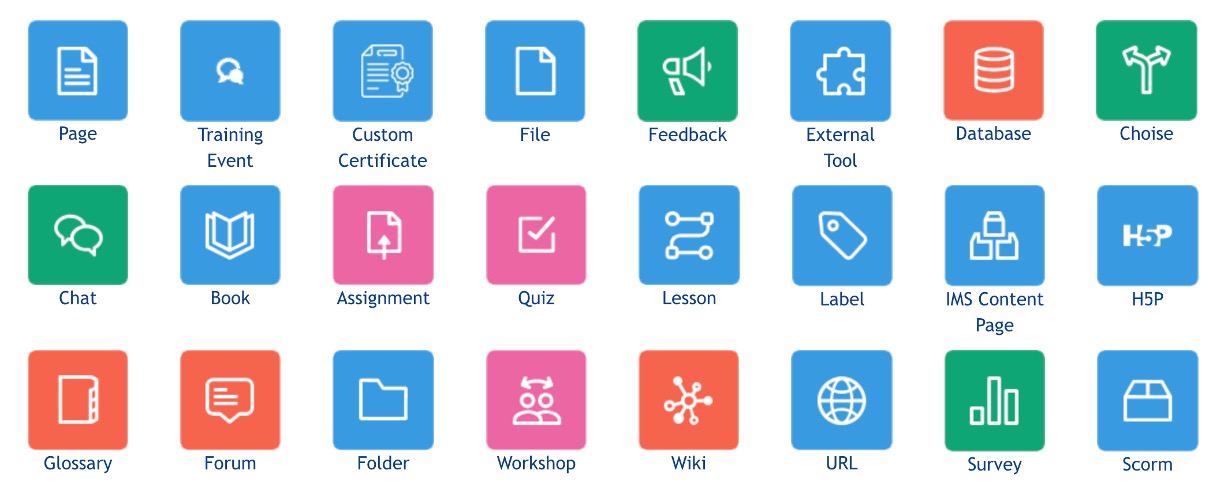
- Course Components – Leverage a versatile array of components including assignments, chats, certificates, databases, feedback, forums, glossaries, interactive H5P elements, lessons, quizzes, SCORM packages, surveys, workshops, as well as content elements like books, files, folders, HTML, pages, and URLs, and even IMS Content packages.
- Reports- Generate comprehensive reports including attendance, course/monthly completions, user log-ins, user records, and license allocations.
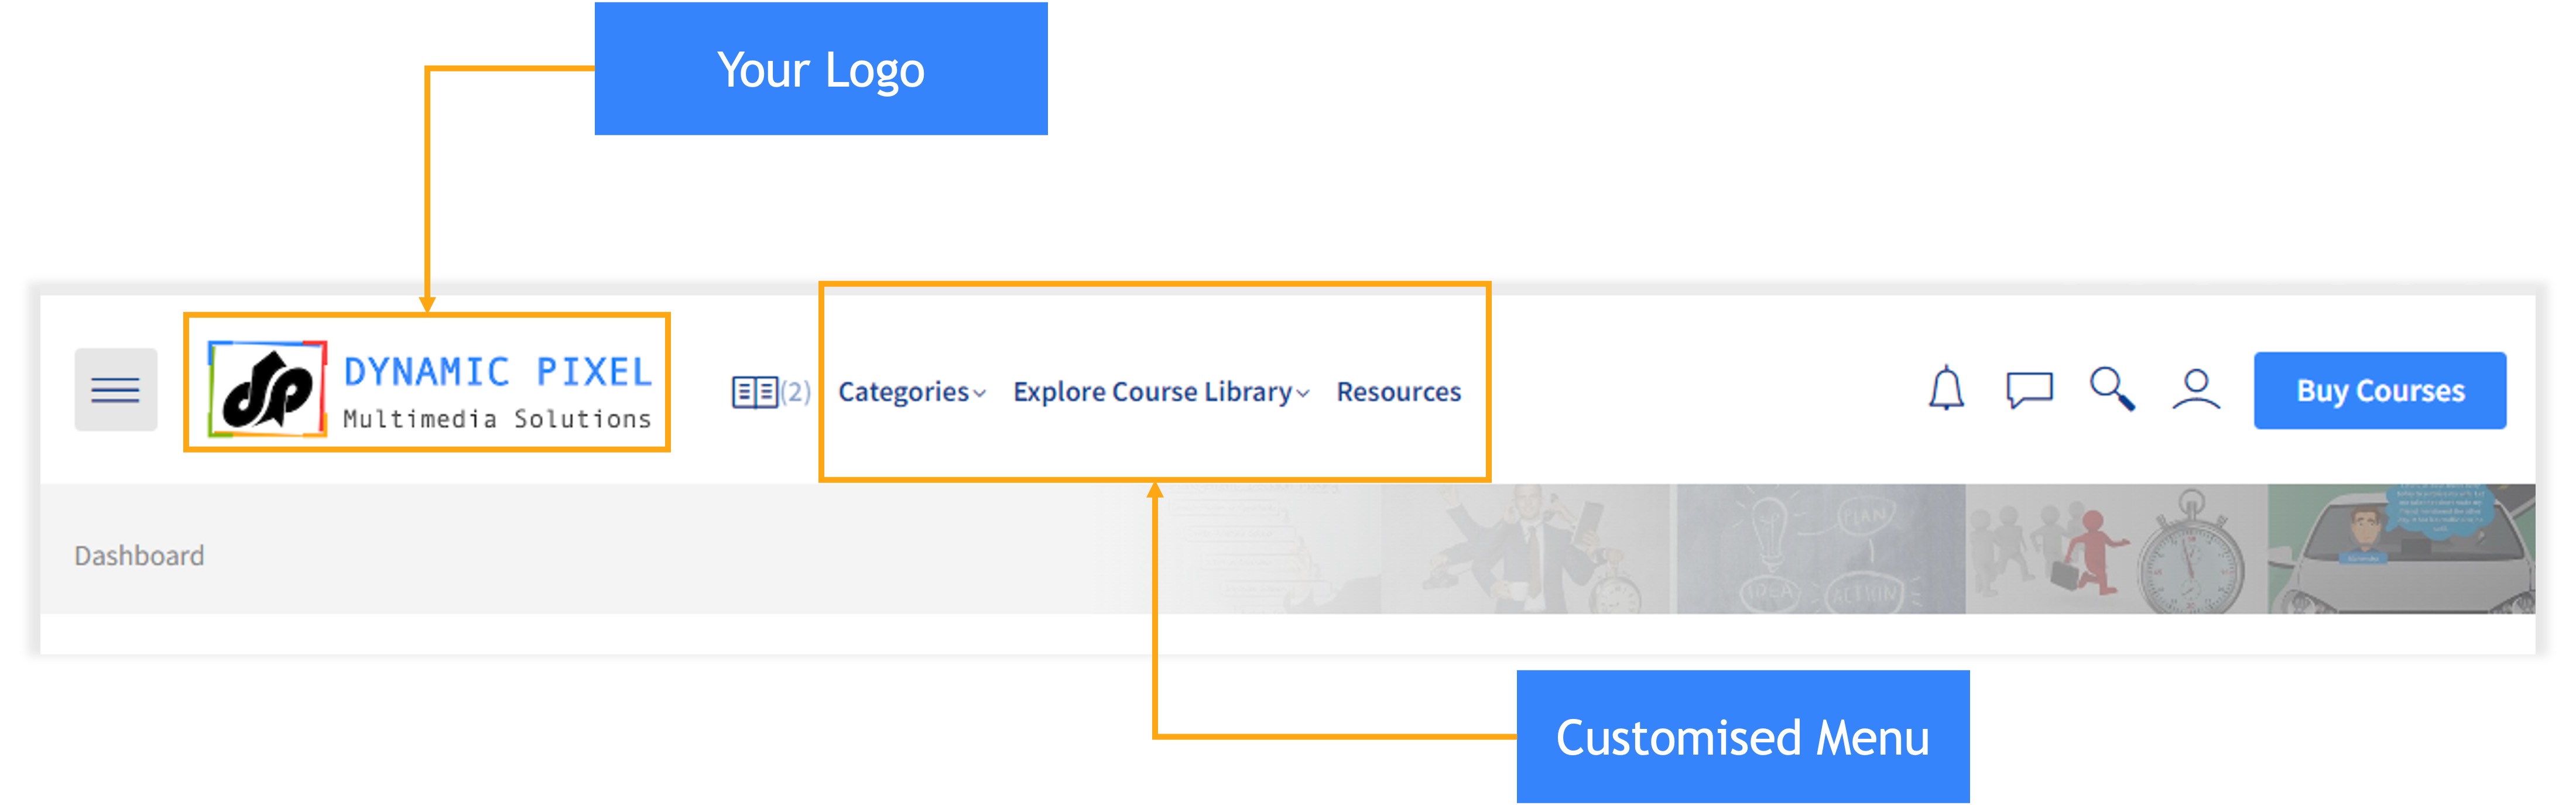
2.1. Personalize KnowxBox for Your Employees
In KnowxBox LMS, the Organisation Manager can edit and add the following details:
- Name of the organisation, address, GSTIN, etc
- Add or update the organisation logo
- Insert any background image for the company login page
- Customize menu items for all organisation users.
Follow the below steps to Personalise and Customise the Dashboard
2.2. Manage Organisation Structure
The KnowxBox LMS platform offers robust administrative control and customization options. It allows organizations to structure themselves effectively to support their business processes. This platform is for medium- to large-sized organizations where managing user roles, departments, and customized data is crucial for smooth operations. Empower complete organizational control by:
- Having control over organizational details
- Creating and managing departments
- Assigning users to different departments
- Adding custom fields in users’ profile fields, like employee ID, etc.
A. Manage Departments
Dashboard < Organisations < Manage Departments

In Knowxbox LMS, you are able to add departments like:
- The parent department is the company’s name.
- You can add child departments, which show under parent departments.
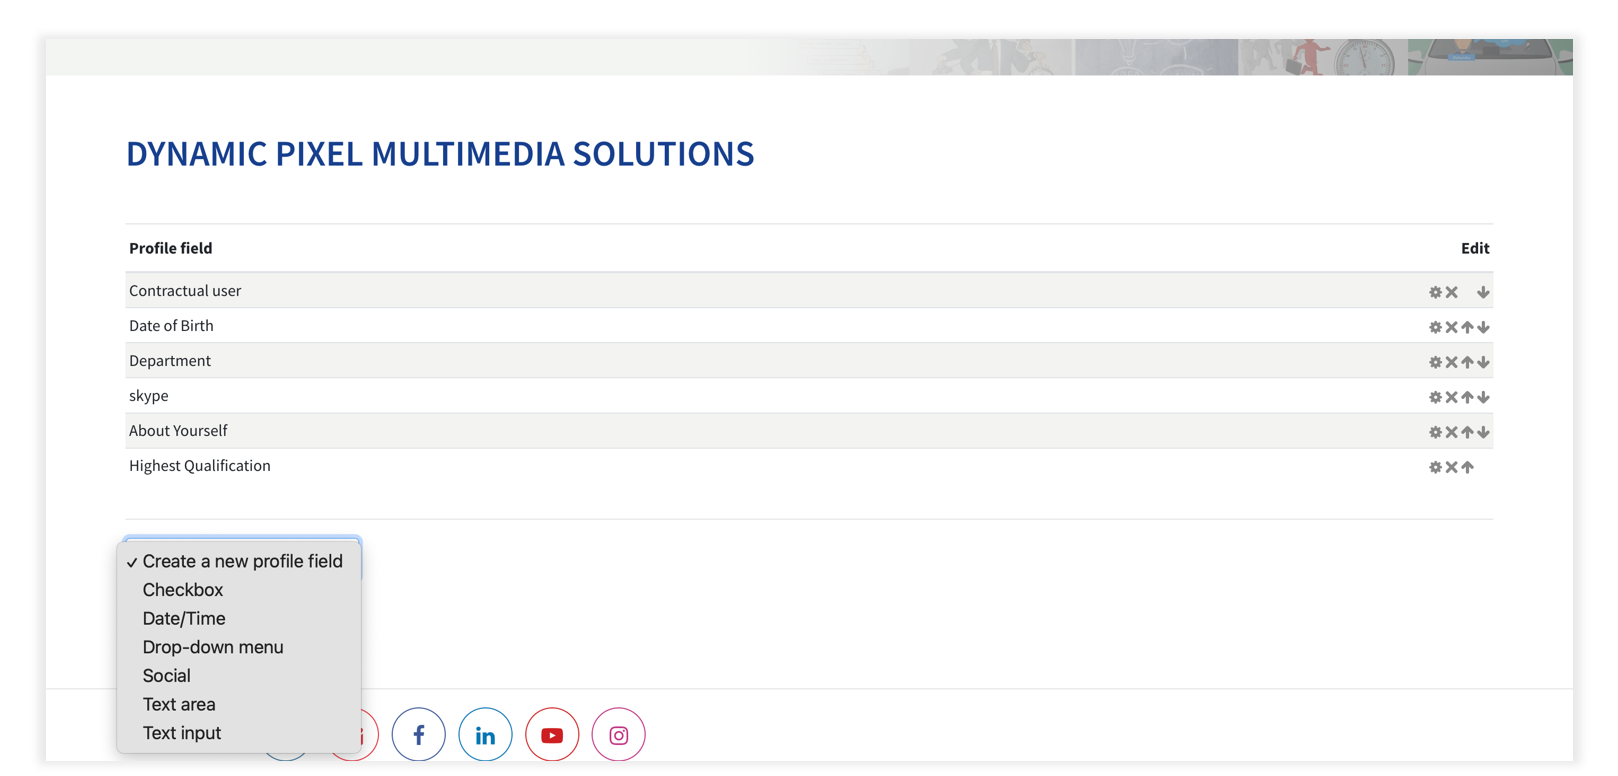
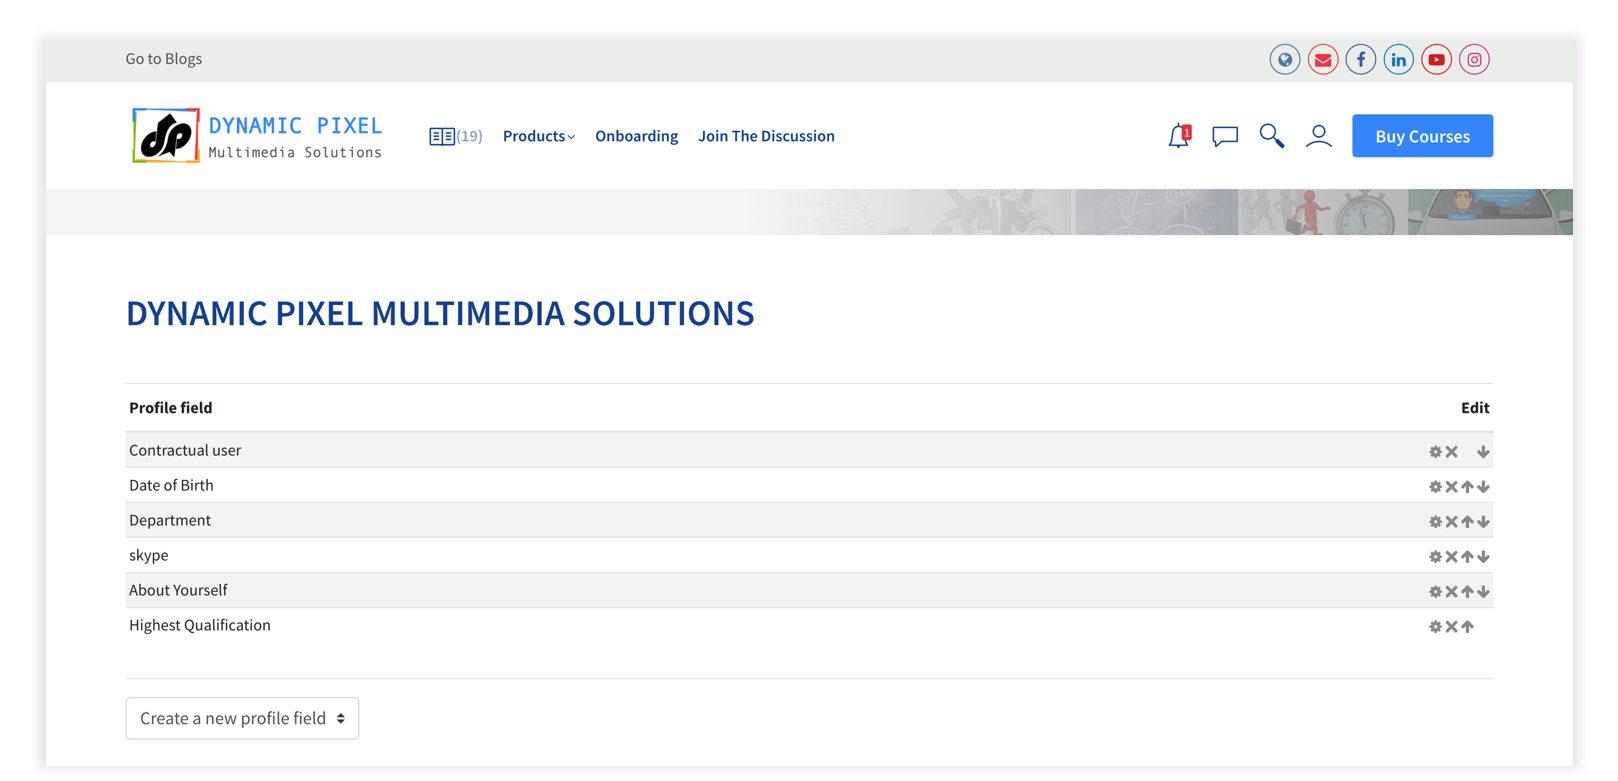
B. Optional Profile
Dashboard < Companies < Manage Departments
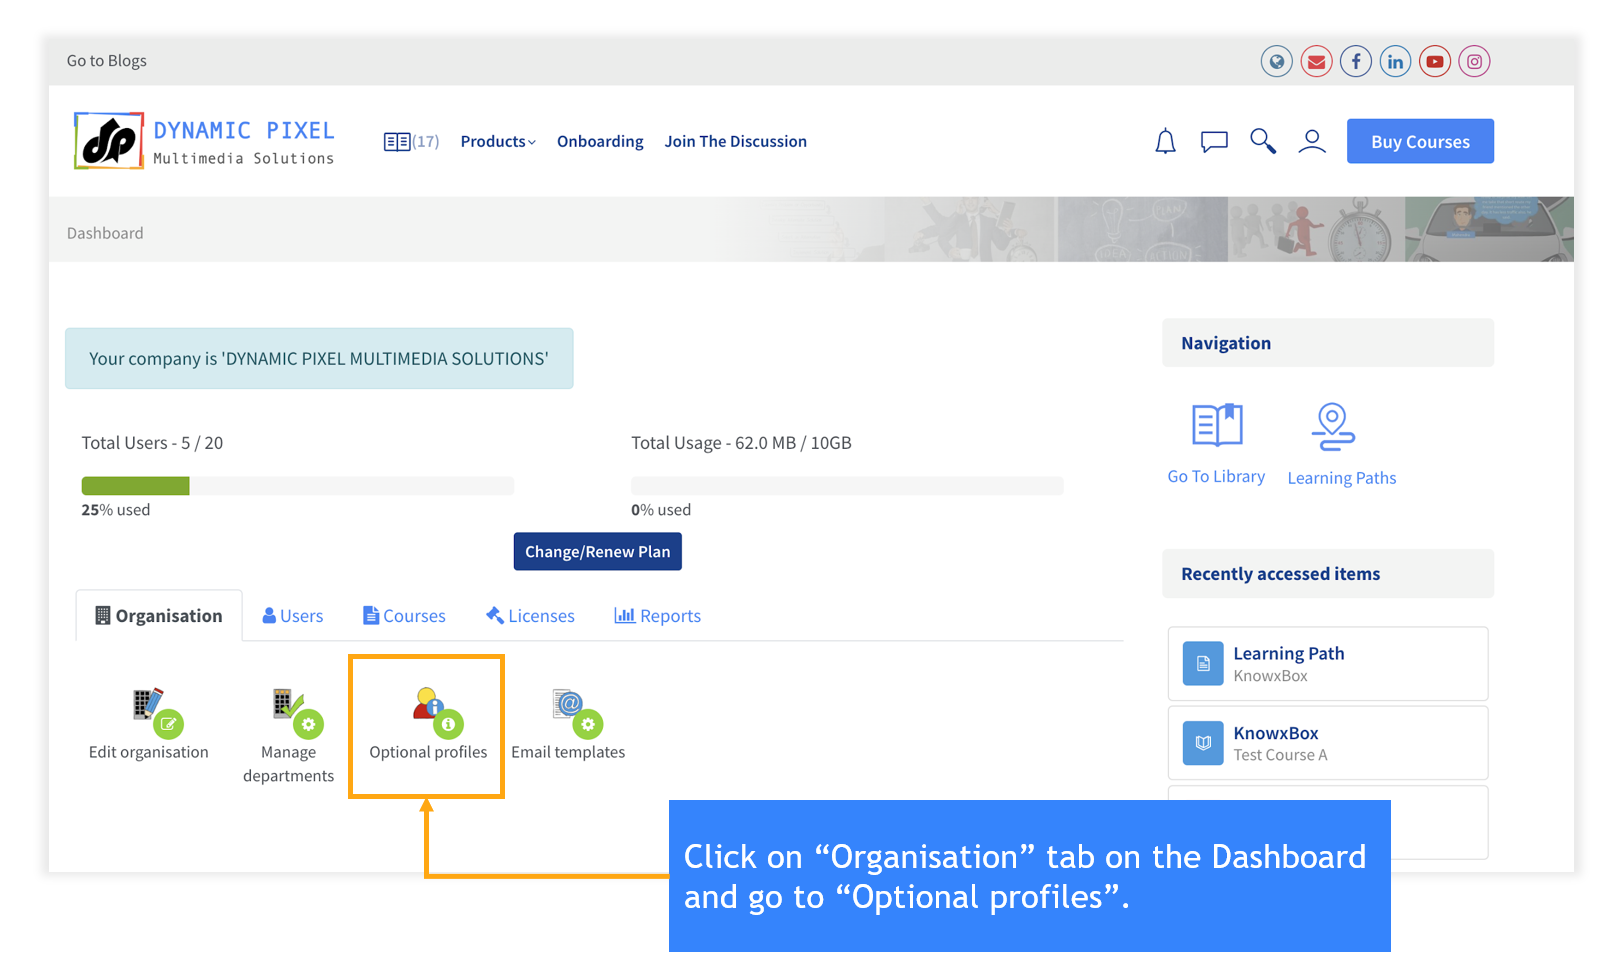
In KnowxBox LMS, the LMS administrator can customize user details:
- Date/Time can be inserted.
- Insert any Drop-down menu according to the needs.
- Any required social email id field.
- Text area and text input field can be added.
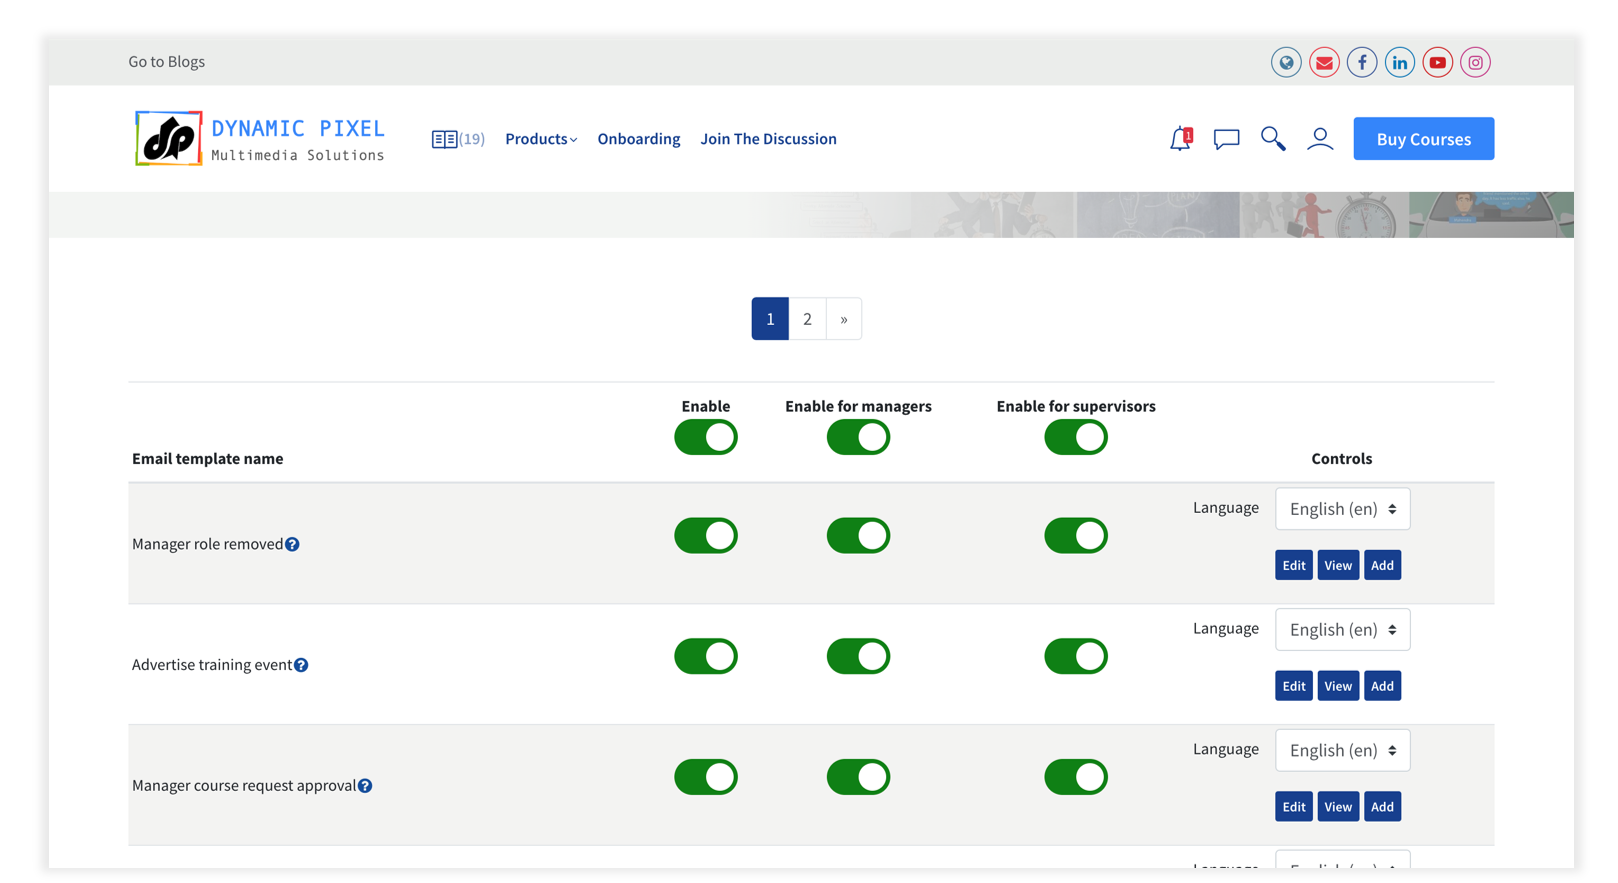
C. Email Templates
Dashboard < Companies < Email Templates
- Training expiry warning
- Training approval request
- User course completion
- User account created
- User Password change
2.3. User and Role Management
- Create and Manage Users
- Bulk User creation
- Download User Reports
- Organisation Manager – Can manage a complete organisation like – managing users, managing courses, view reports, etc.
- User – Can access the course as a student.
- Course Educator – Can edit course content for the courses created by them.
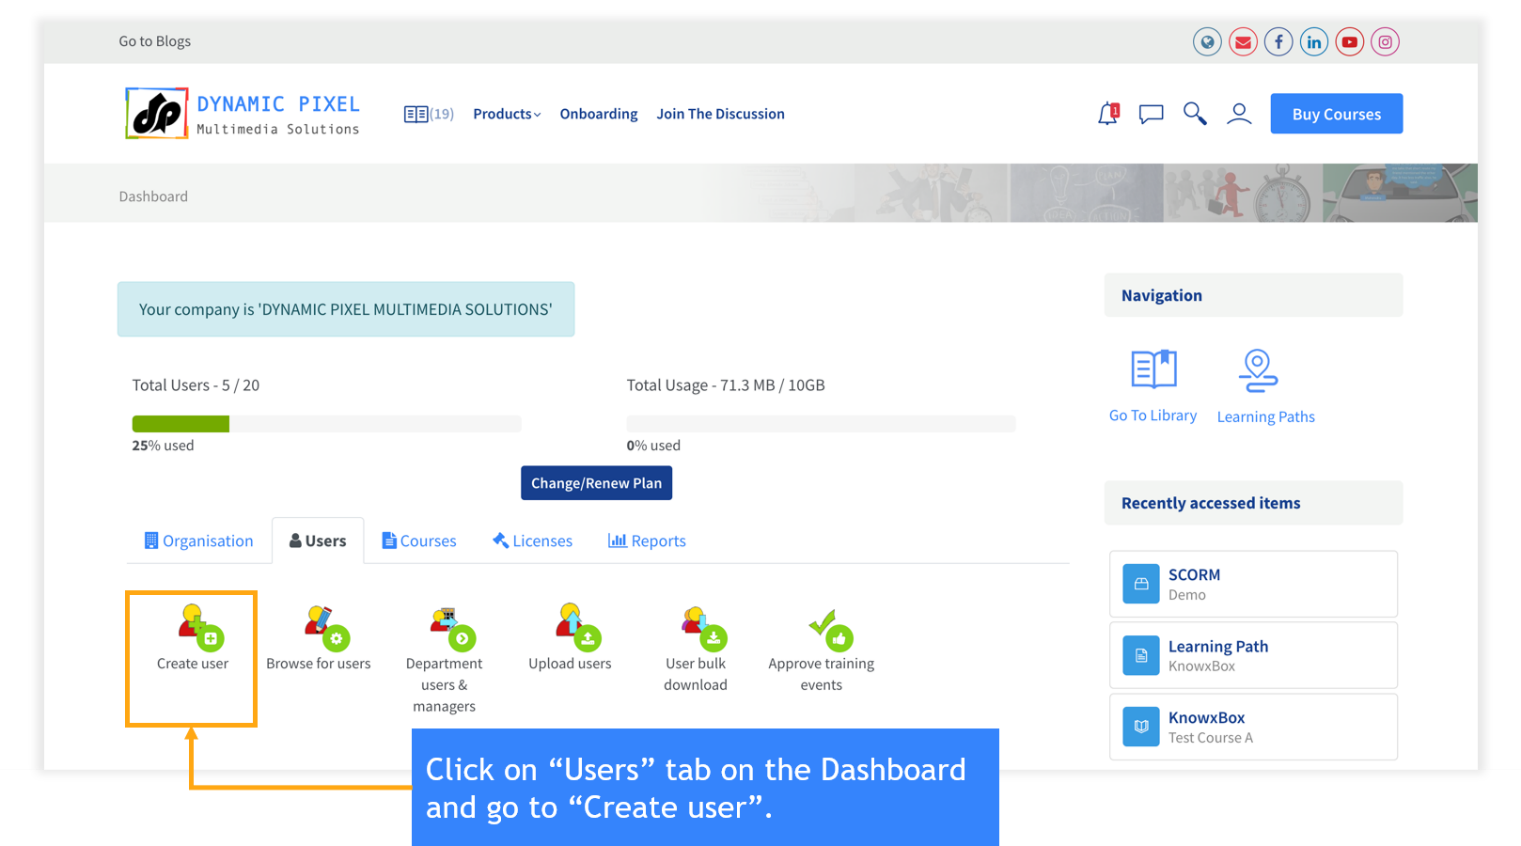
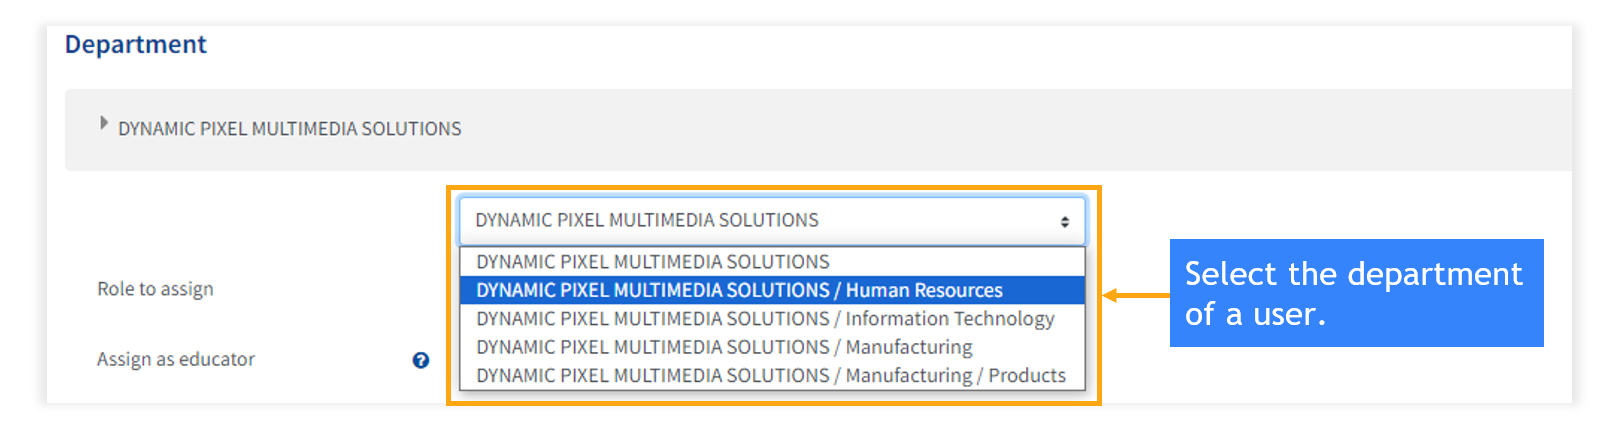
A. Create User
Dashboard < Users < Create user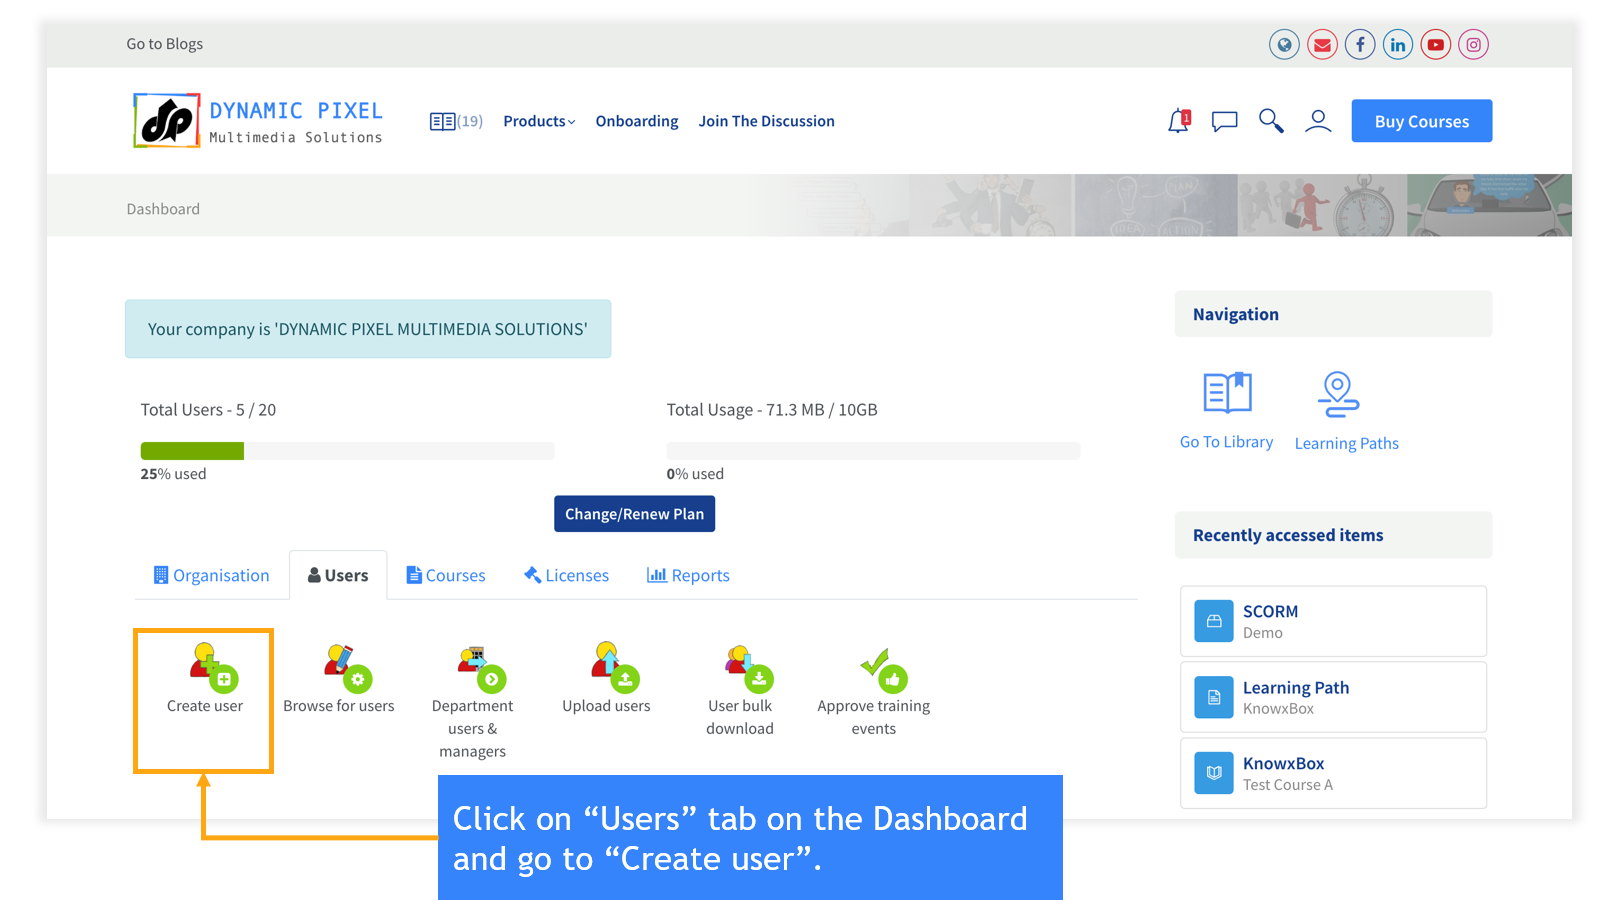
In KnowxBox LMS, the organization manager is able to create and edit the user’s learner account. The password can be sent to the user’s email.
B. Browse for user
Dashboard < Users < Browse for user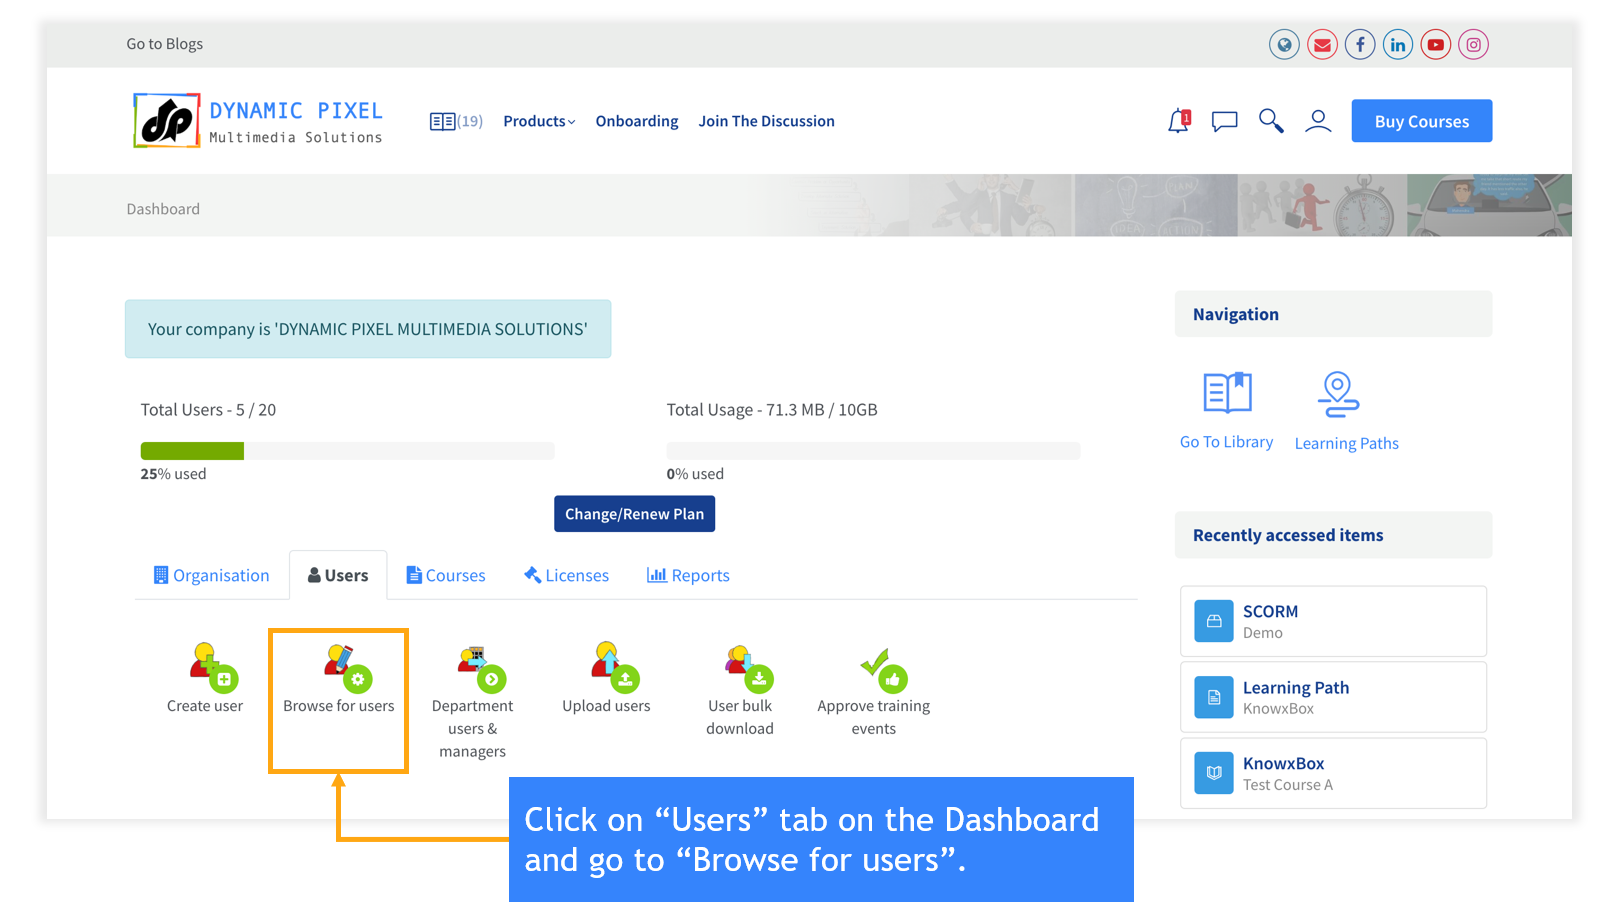
- You are able to view all the users with their role and department in the one go or alphabet wise.
- You can search any user by adding details in the “User search field”.
- It helps you to maintain your data in the LMS.
- The organization manager can “enroll or unenroll” the user in any course.
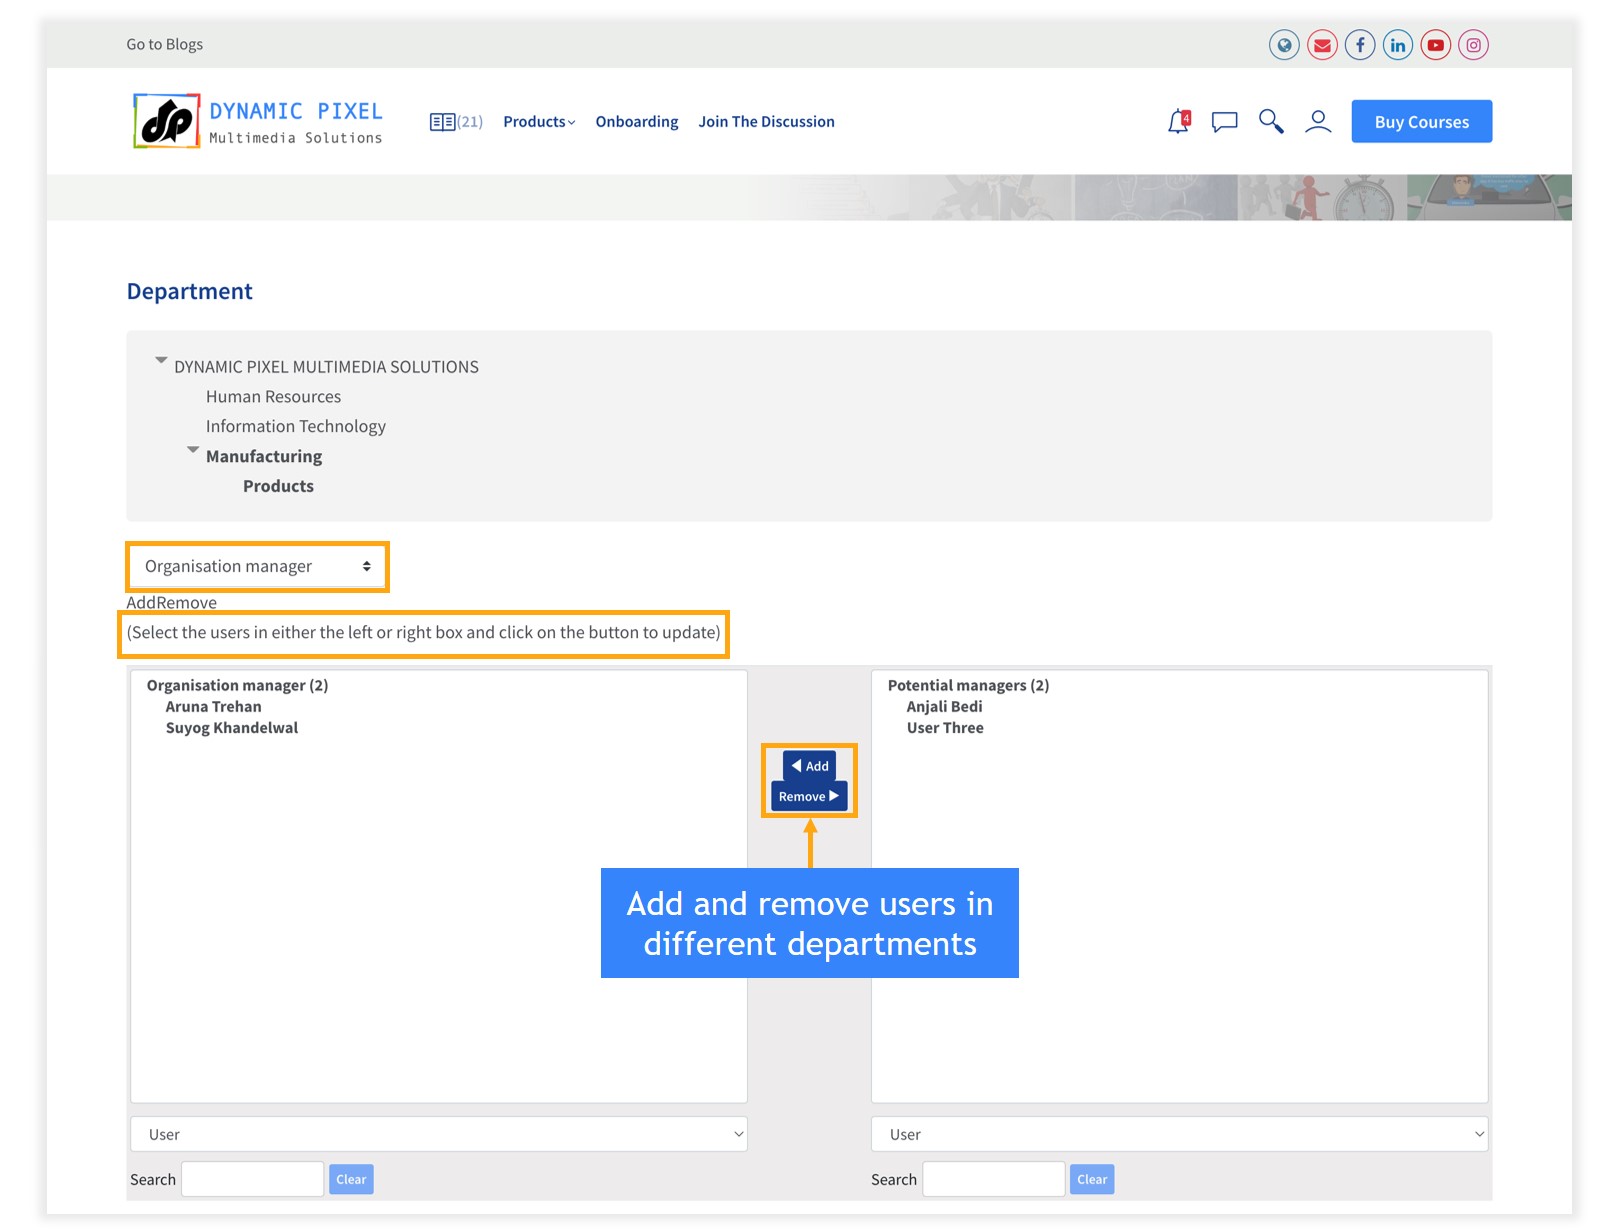
C. Department Users and Managers
Dashboard < Users < Department users and managers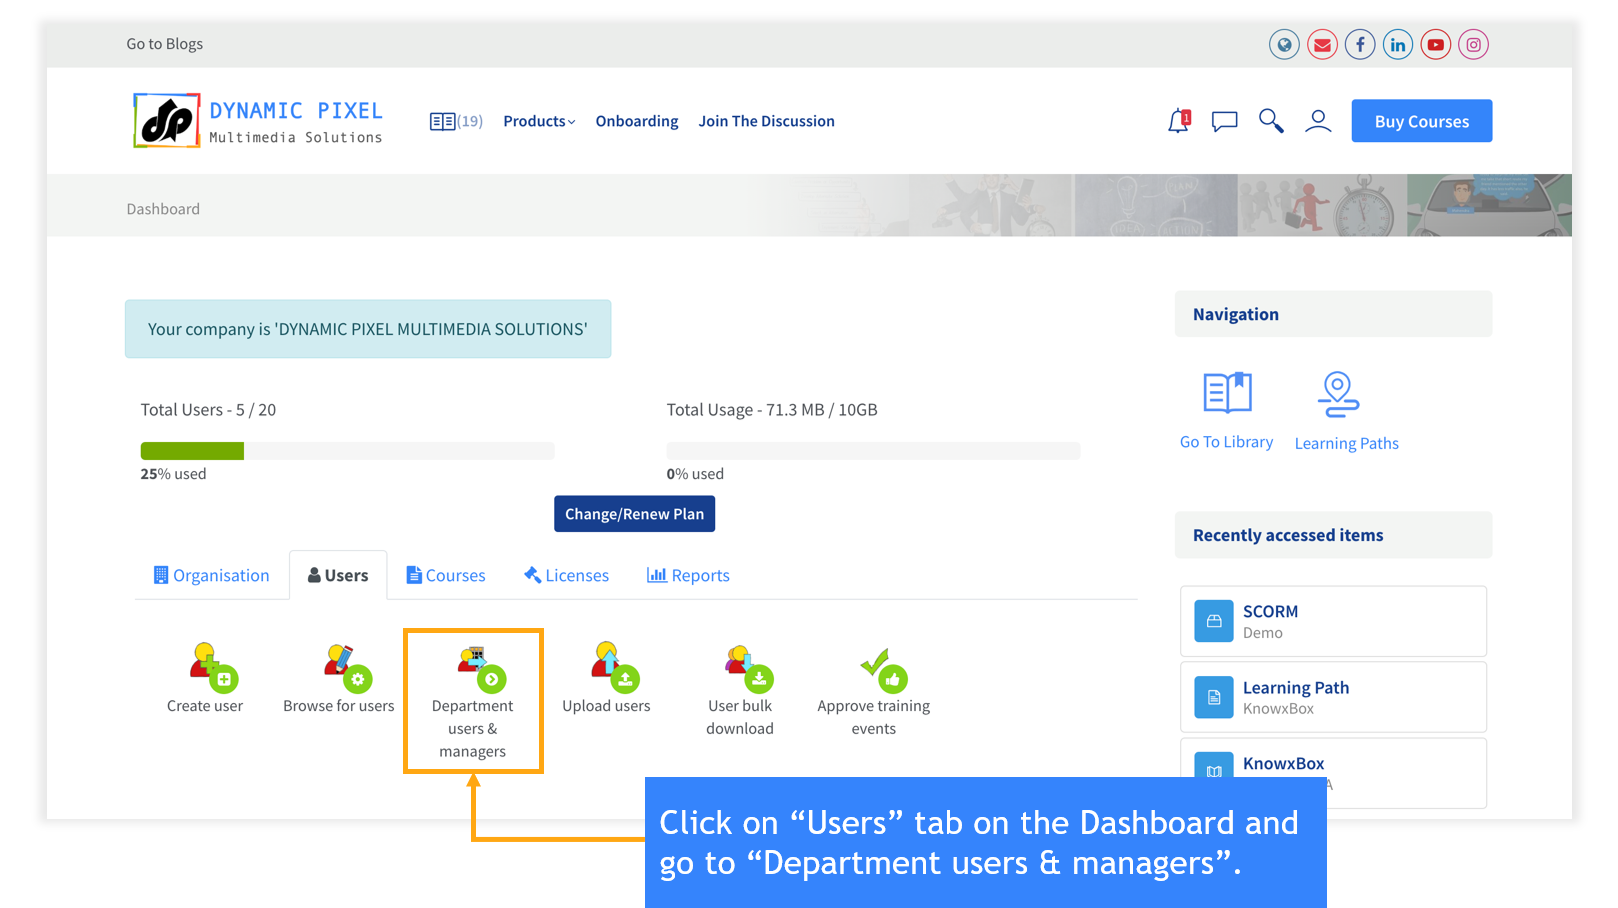
-
View your employees department wise.
-
The organization manager can “Add or remove” the user in any department.
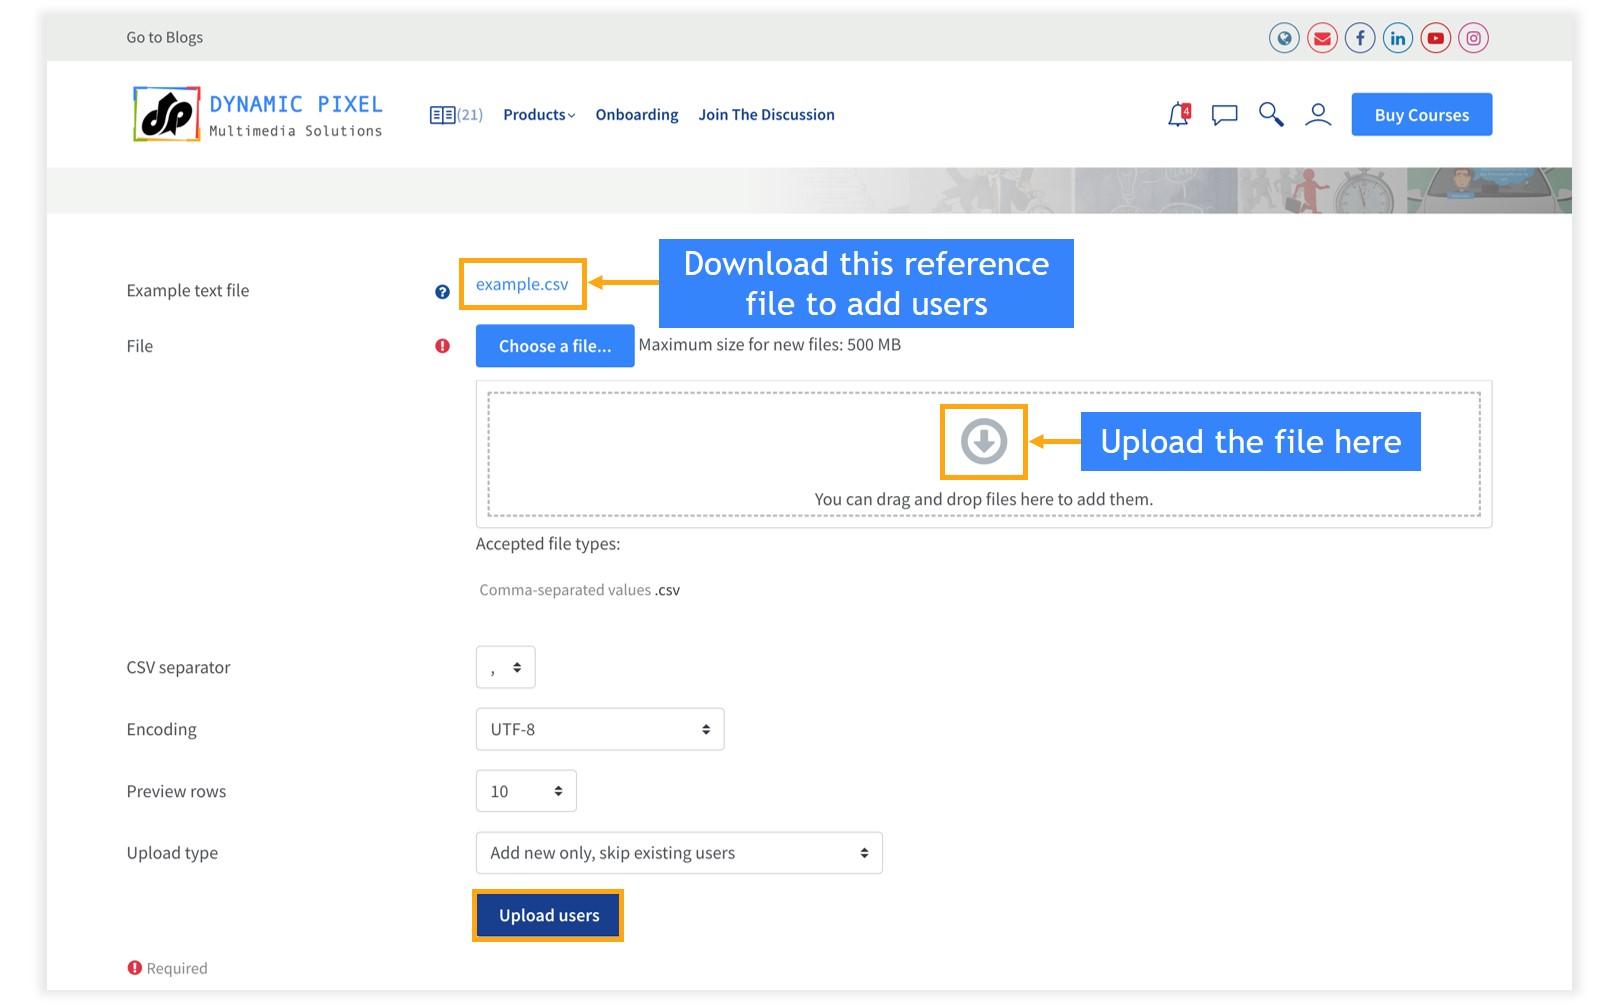
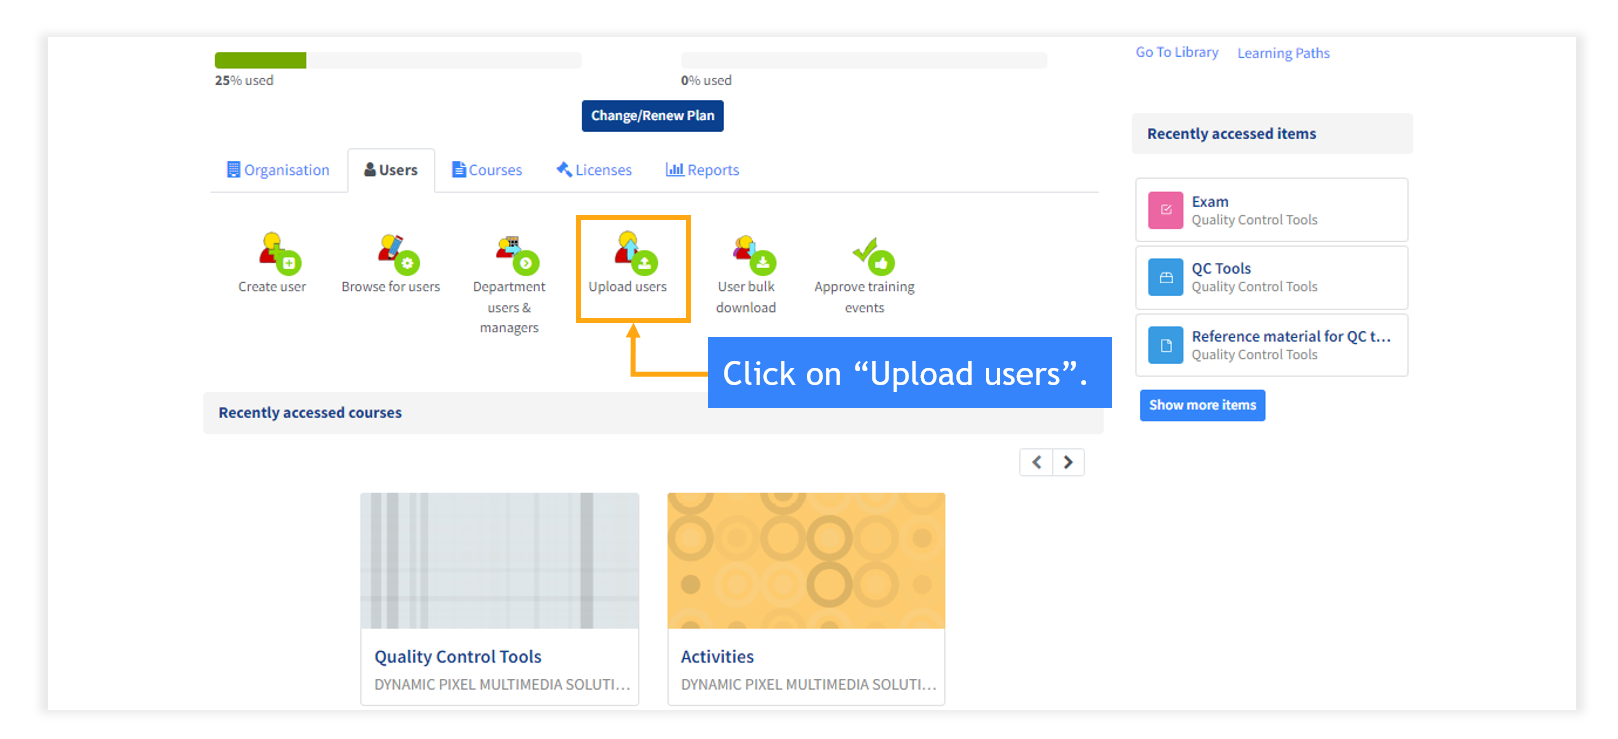
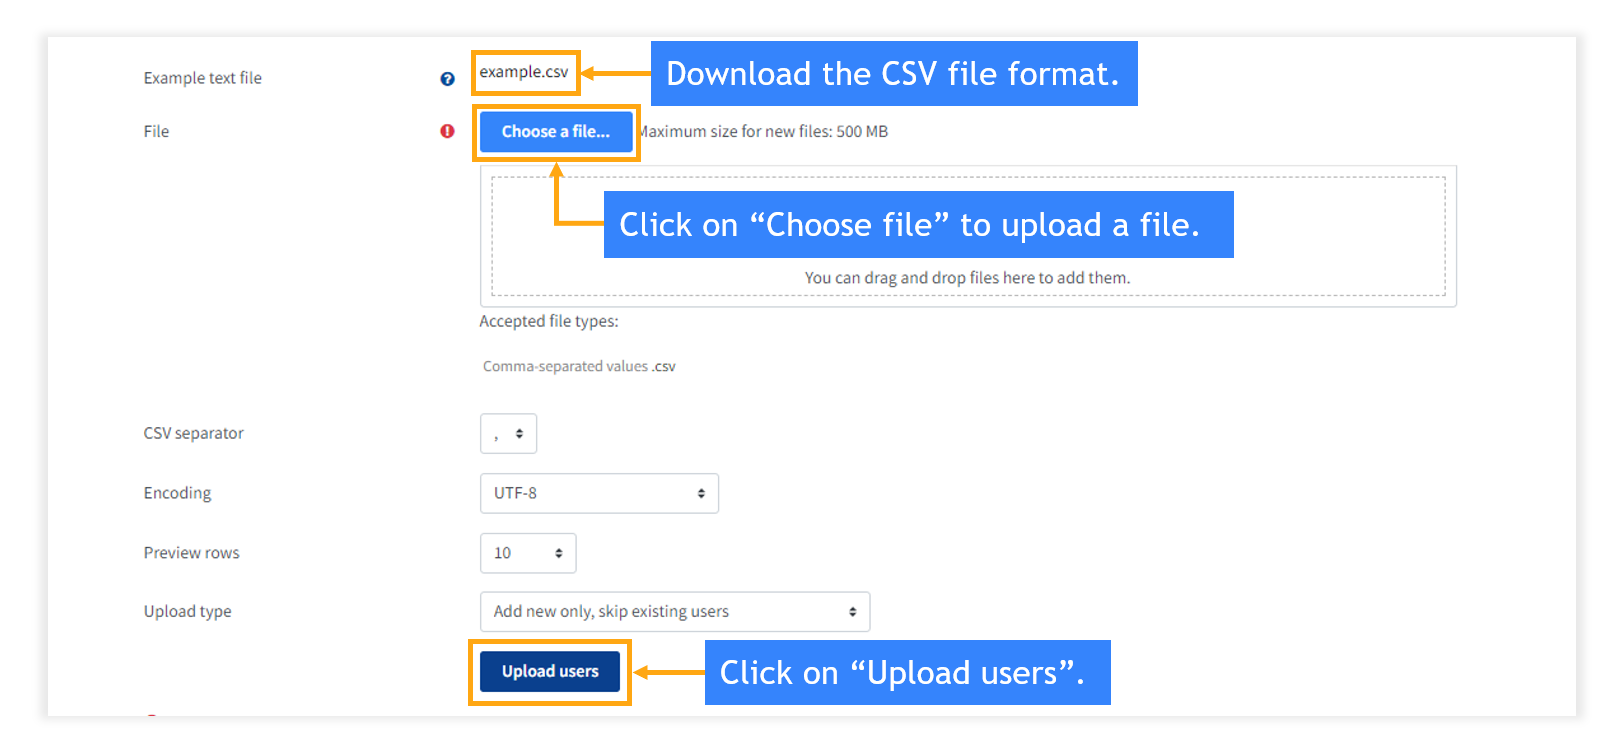
D. Upload Users
Dashboard < Users < Upload users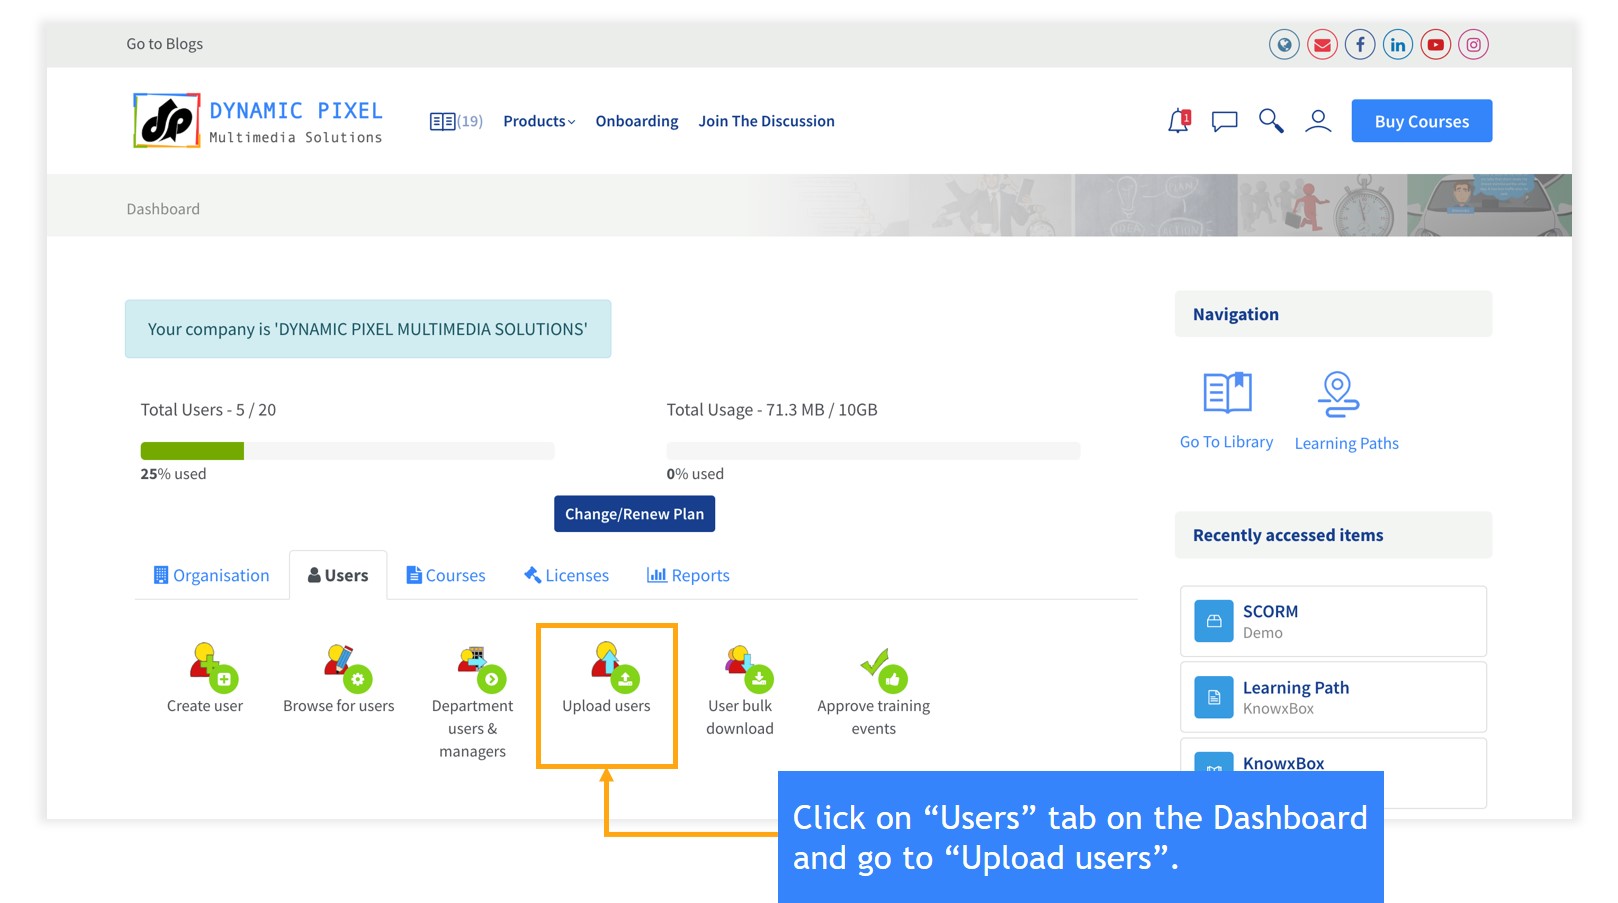
-
The organization manager can upload the users in one go by uploading an excel (csv.) file.
Note: Only csv. format is acceptable.
E. User Bulk Download
Dashboard < Users < User bulk download
- .csv
- .ods
- .xlsx
3. System Administration
Let us explore the following features of the KnowxBox LMS:- Add a User
- Create a Course
- Add content to the course
- Add a Quiz to the course
- Enrol user to the course
- Create a Certificate
3.1. Add a User
There are two ways to add a user in LMS:
- Use the “Create a user” tab to add one user.
- Upload a CSV. file to add bulk users at once.


Step 1: Go to “Users” and click on “Upload users”.
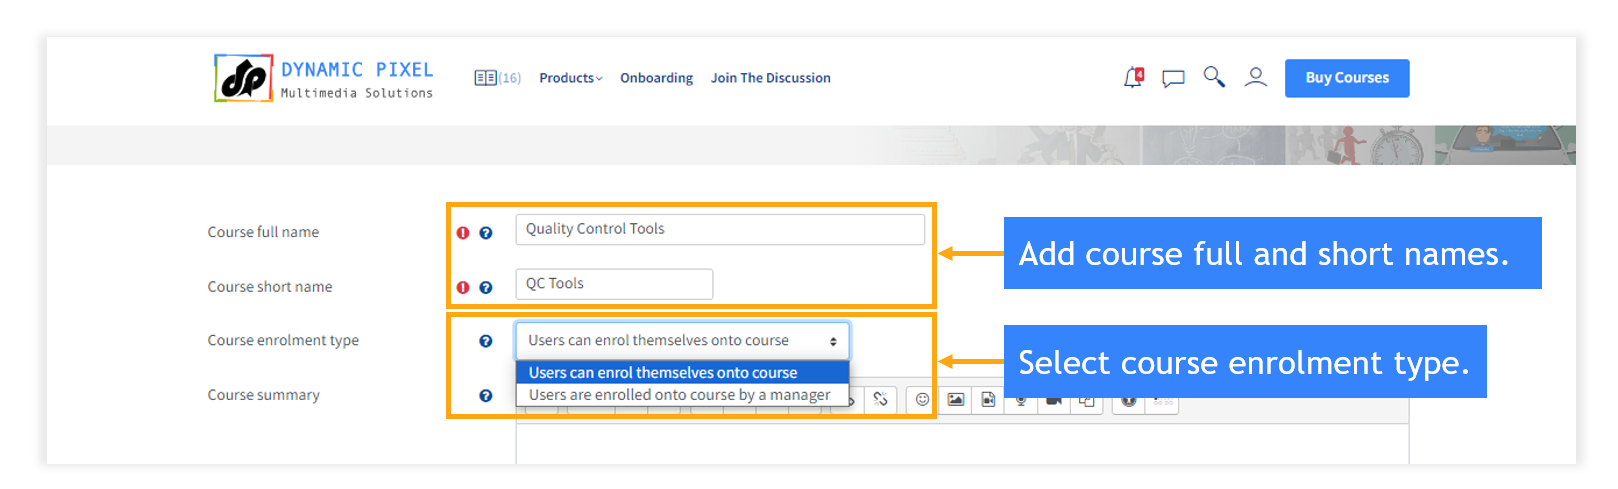
3.2. Create a Course
Step 1: Click on the “Courses” tab and go to the “Create course”.

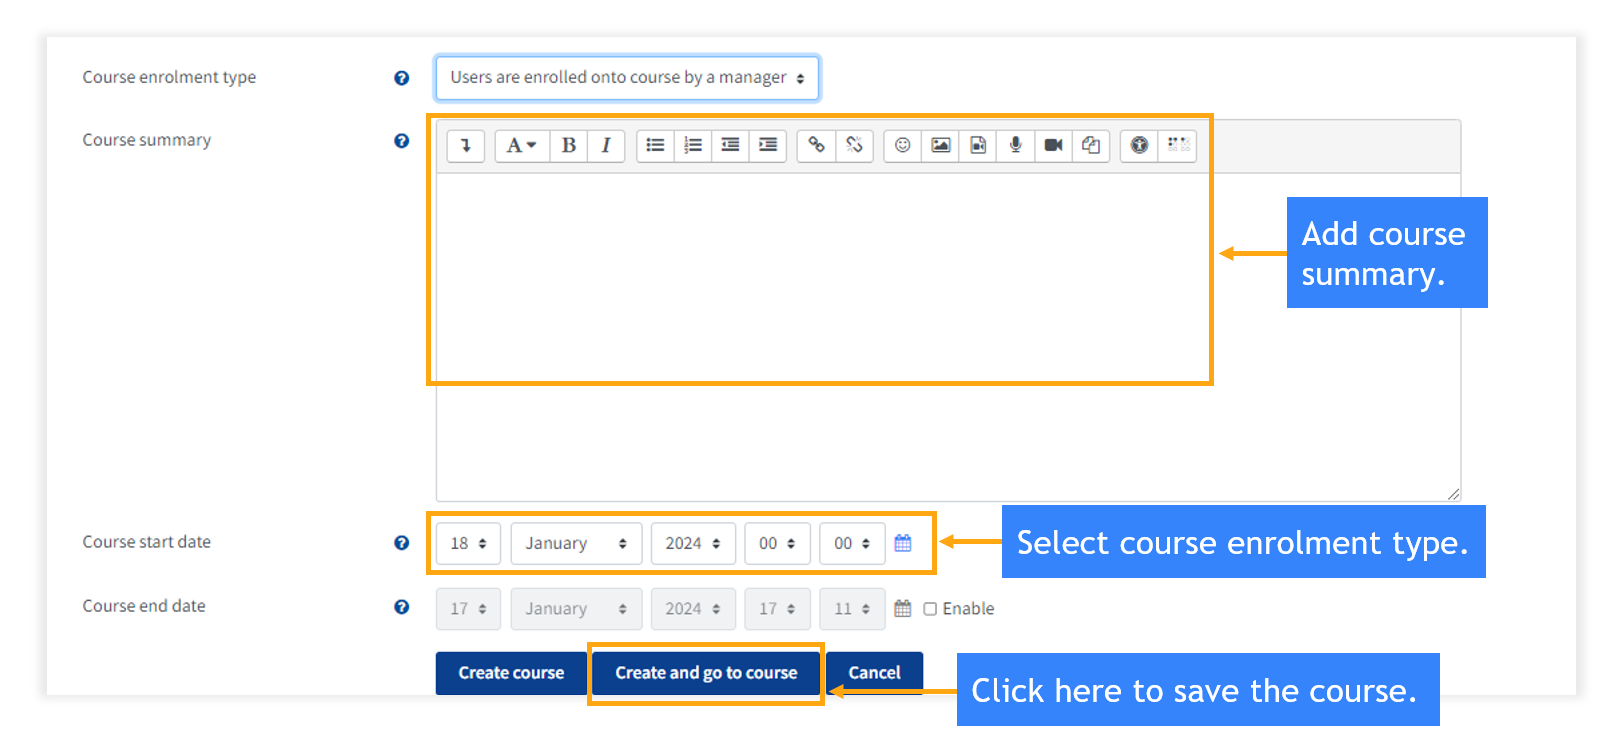
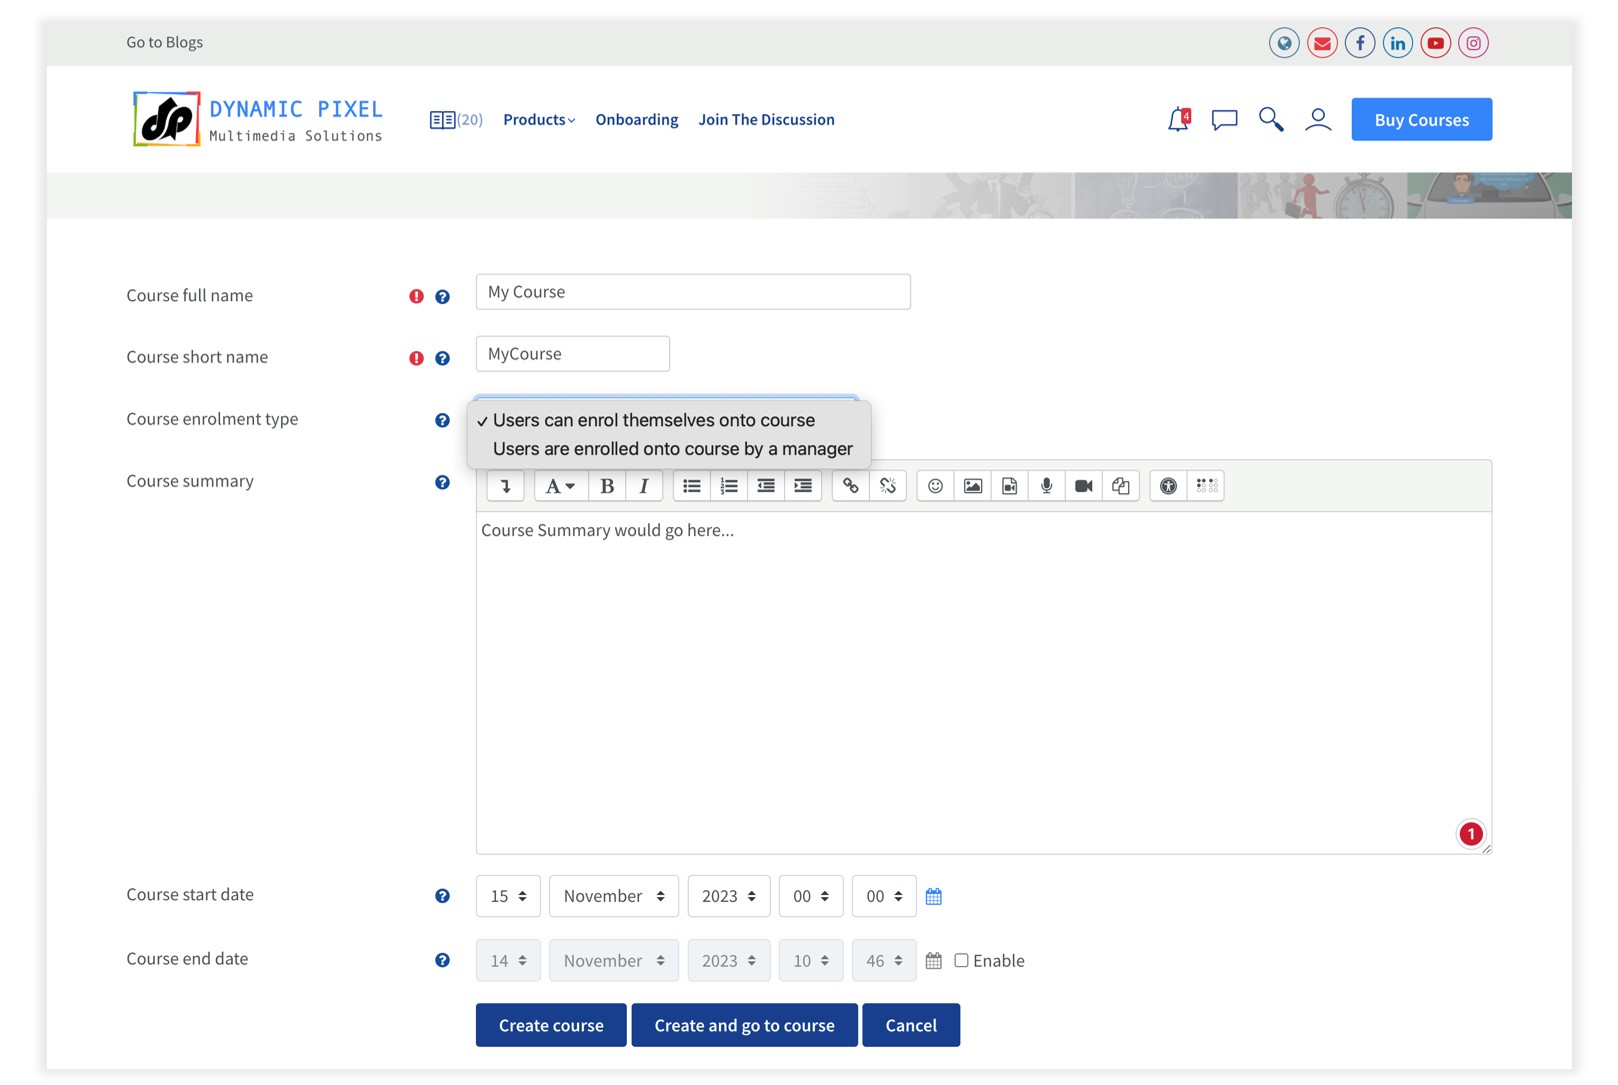
Step 2: Fill out this form.
Step 3: Add course summary and select the “start and end dates” of the course.
3.3. Add content to the course
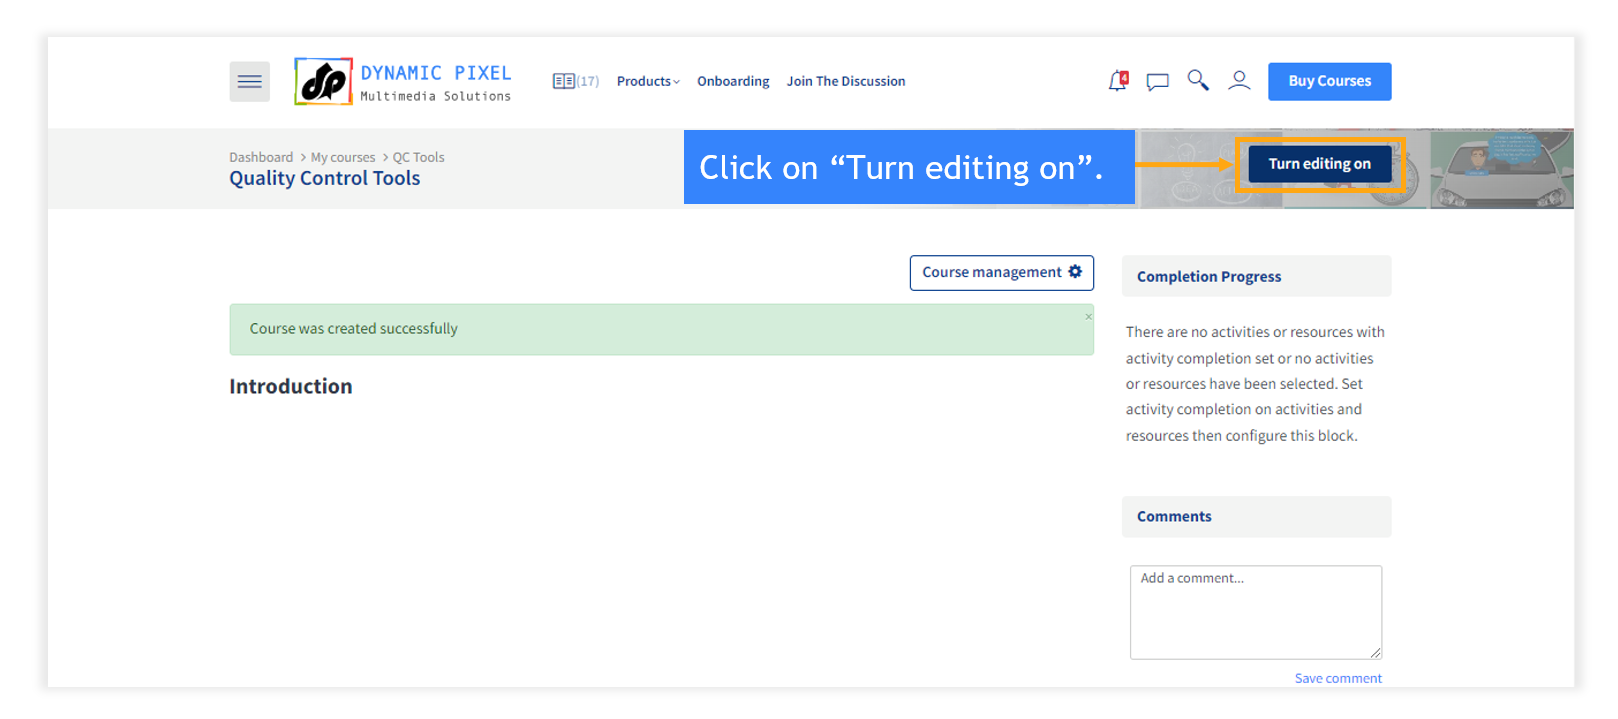
Step 1: Click on “Turn editing on” to add content or activities to the course.
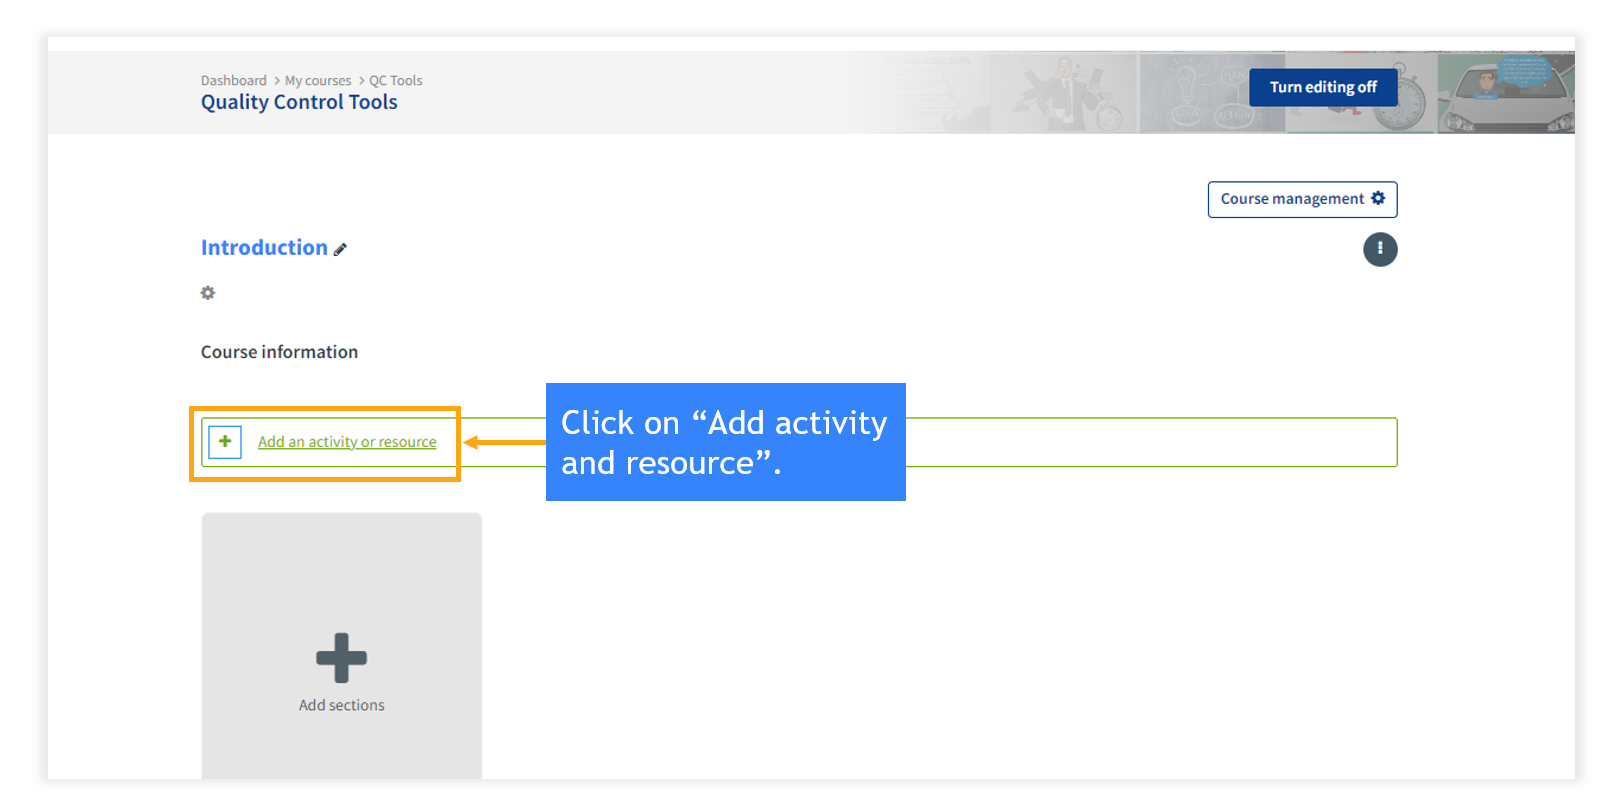
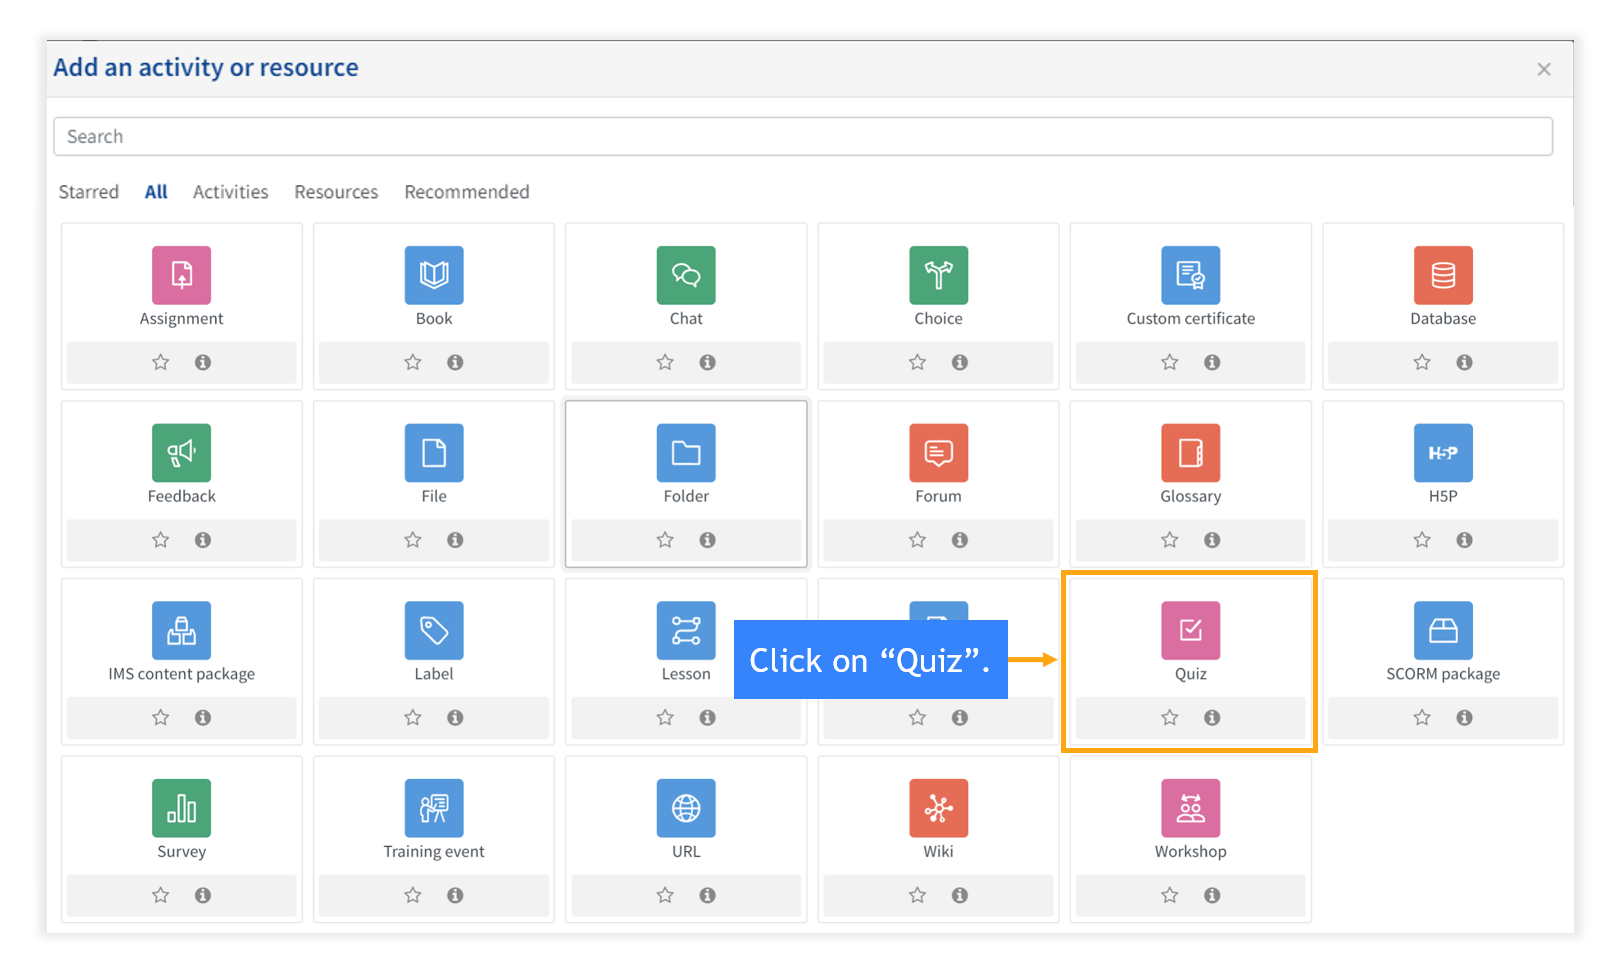
Step 2: Click on “Add activity and resource” to select an activity you want to add to the course.
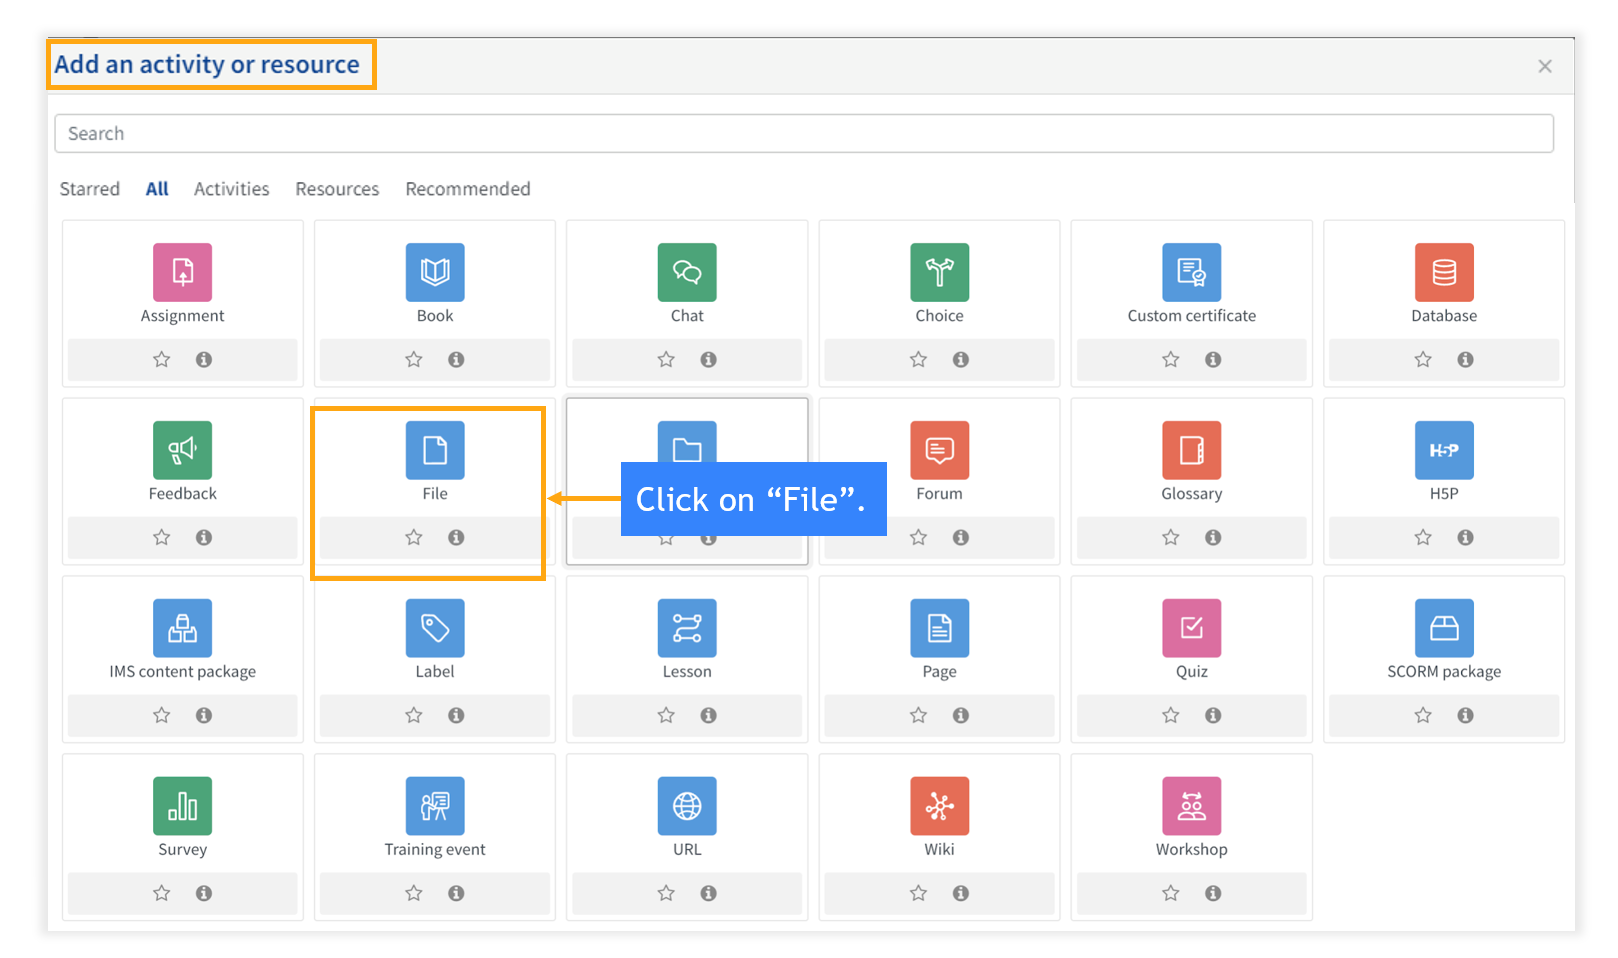
Step 3: There are 23 activities you can add to a course. If you want to add PDF (reference material for the course) then click on a file.
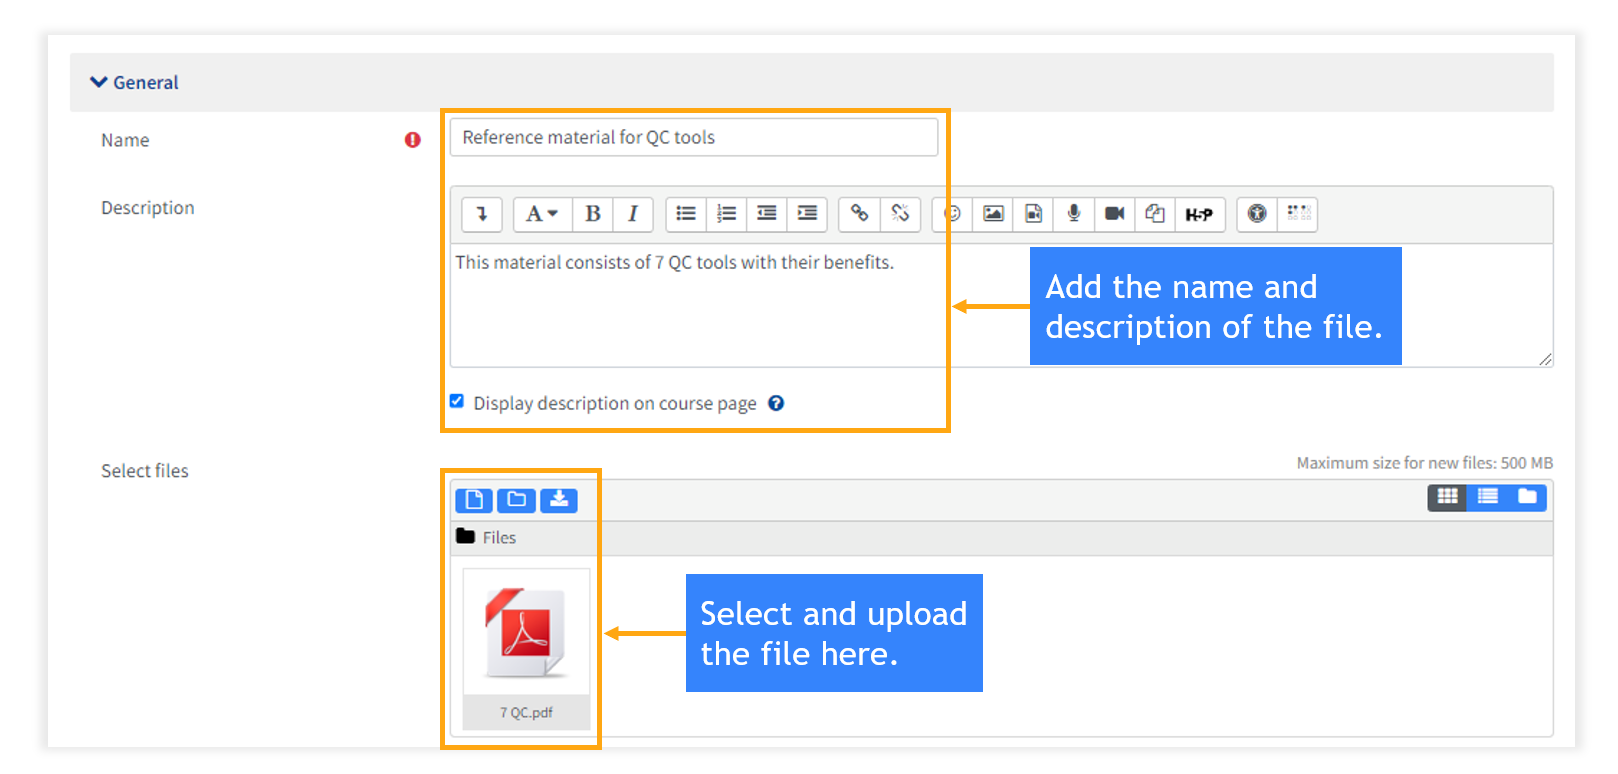
Step 4: Add a PDF file to a course.
Step 5: Go back to the course and click on “Add activity and resource” to add a SCORM file.
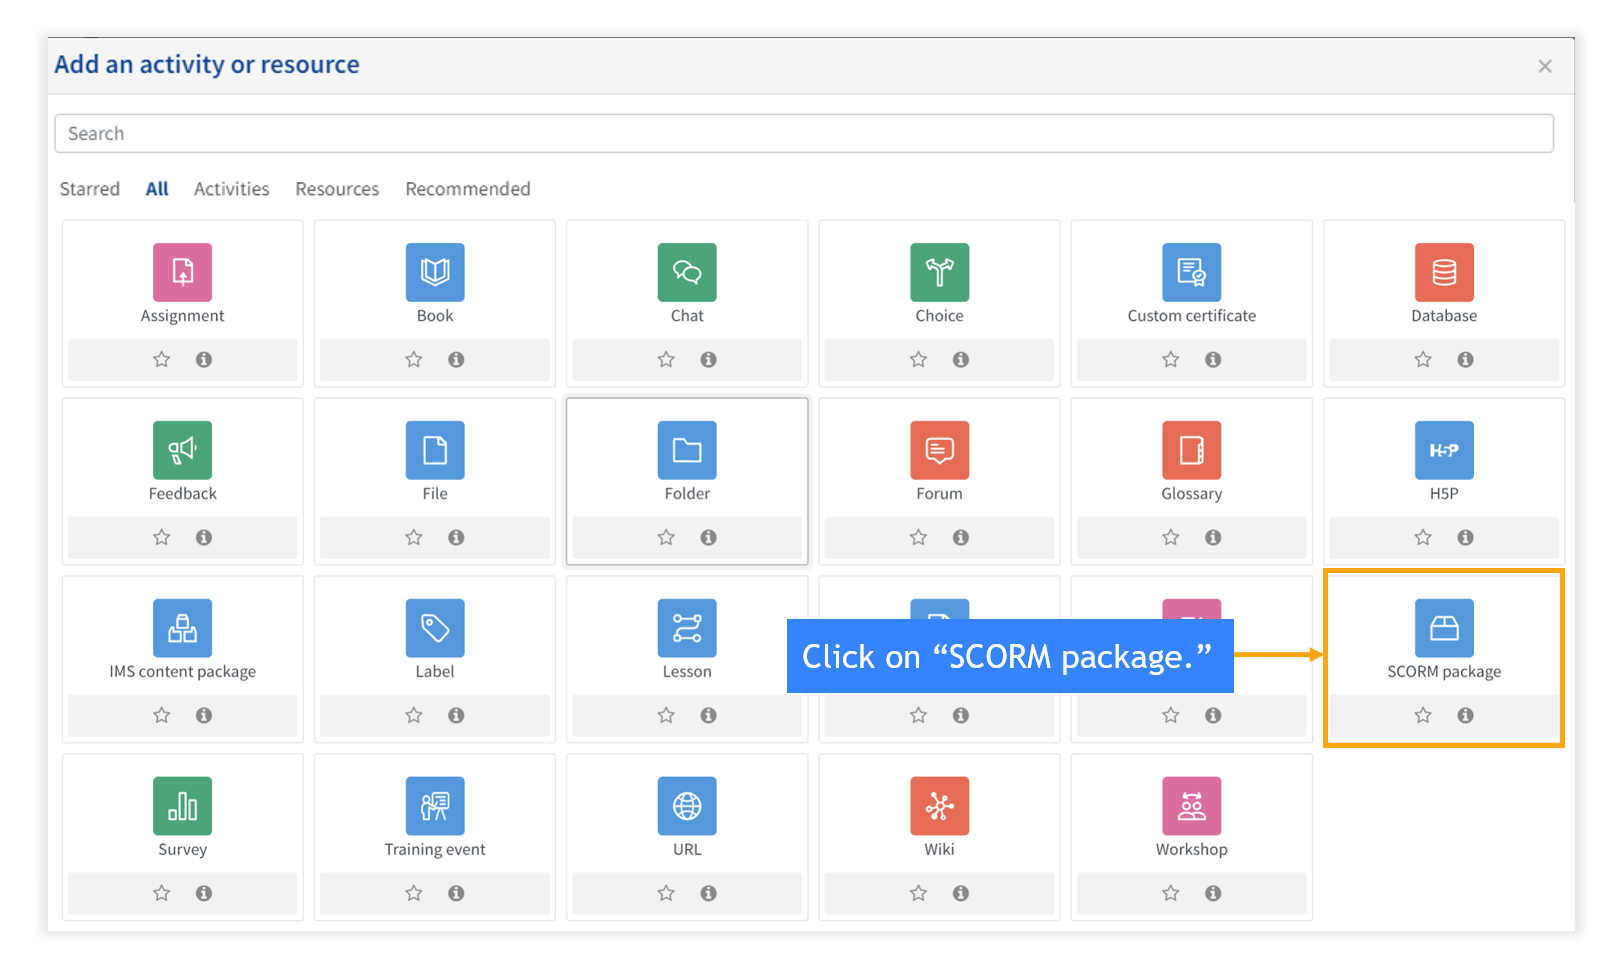
Step 6: Upload the SCORM package here.

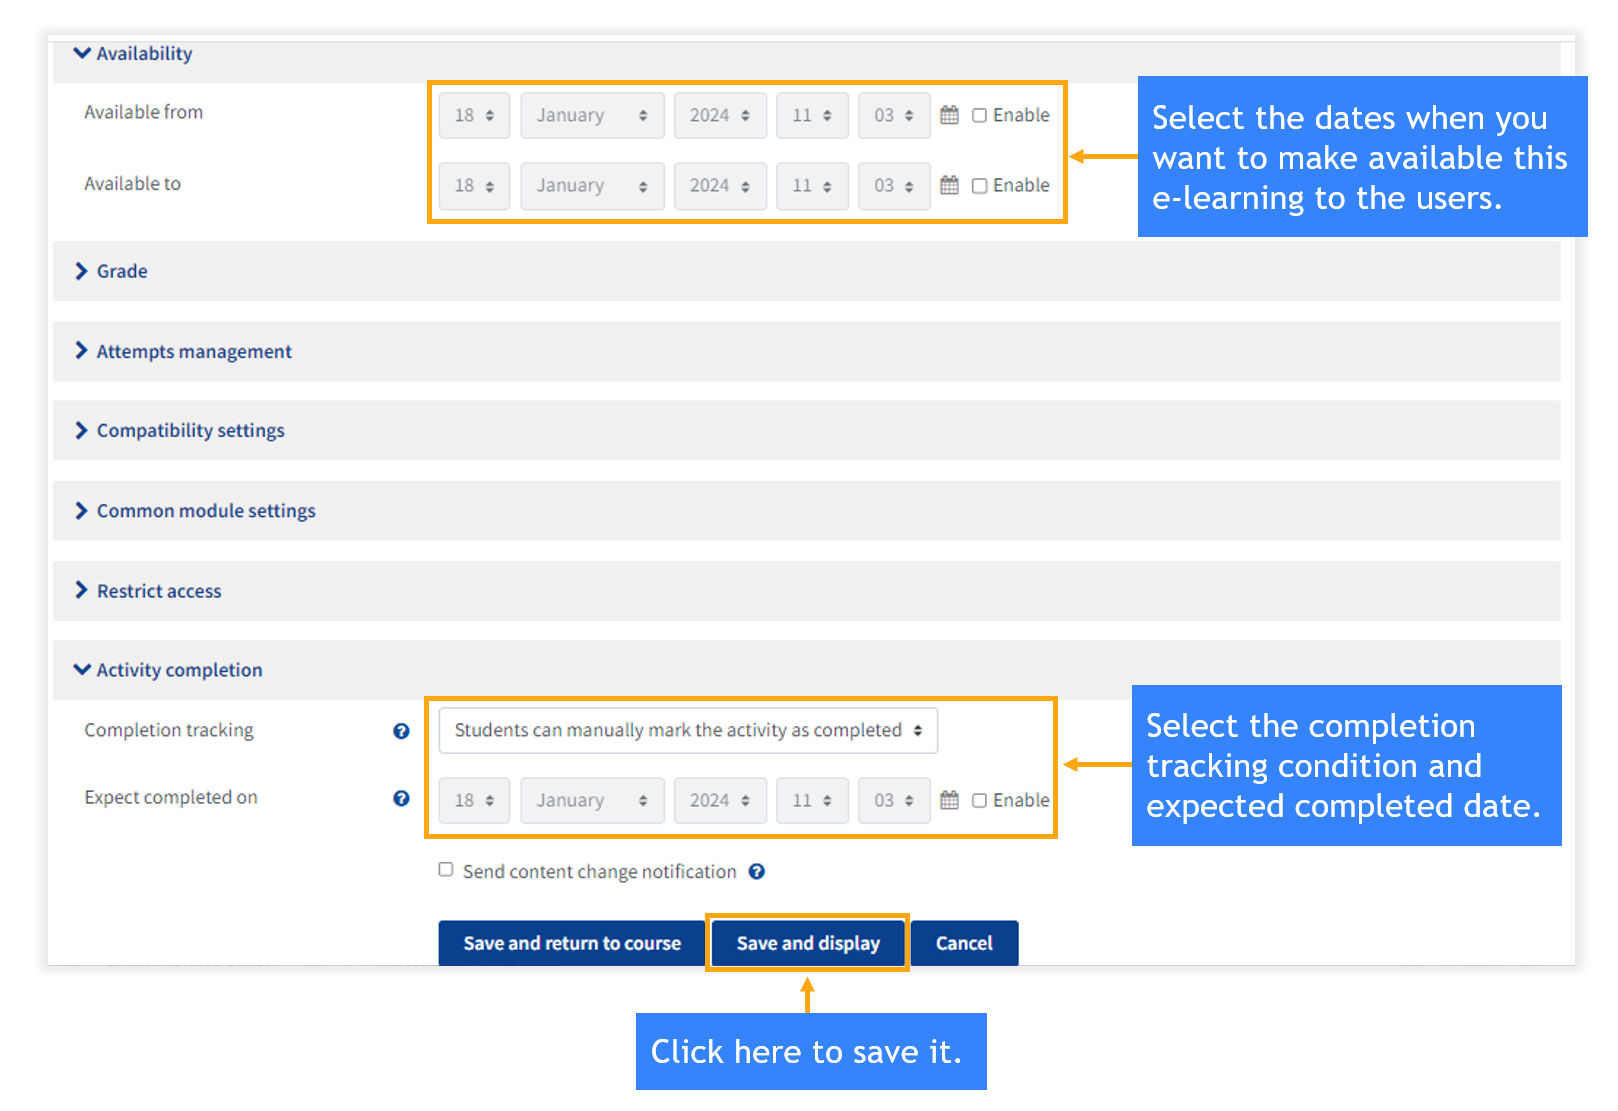
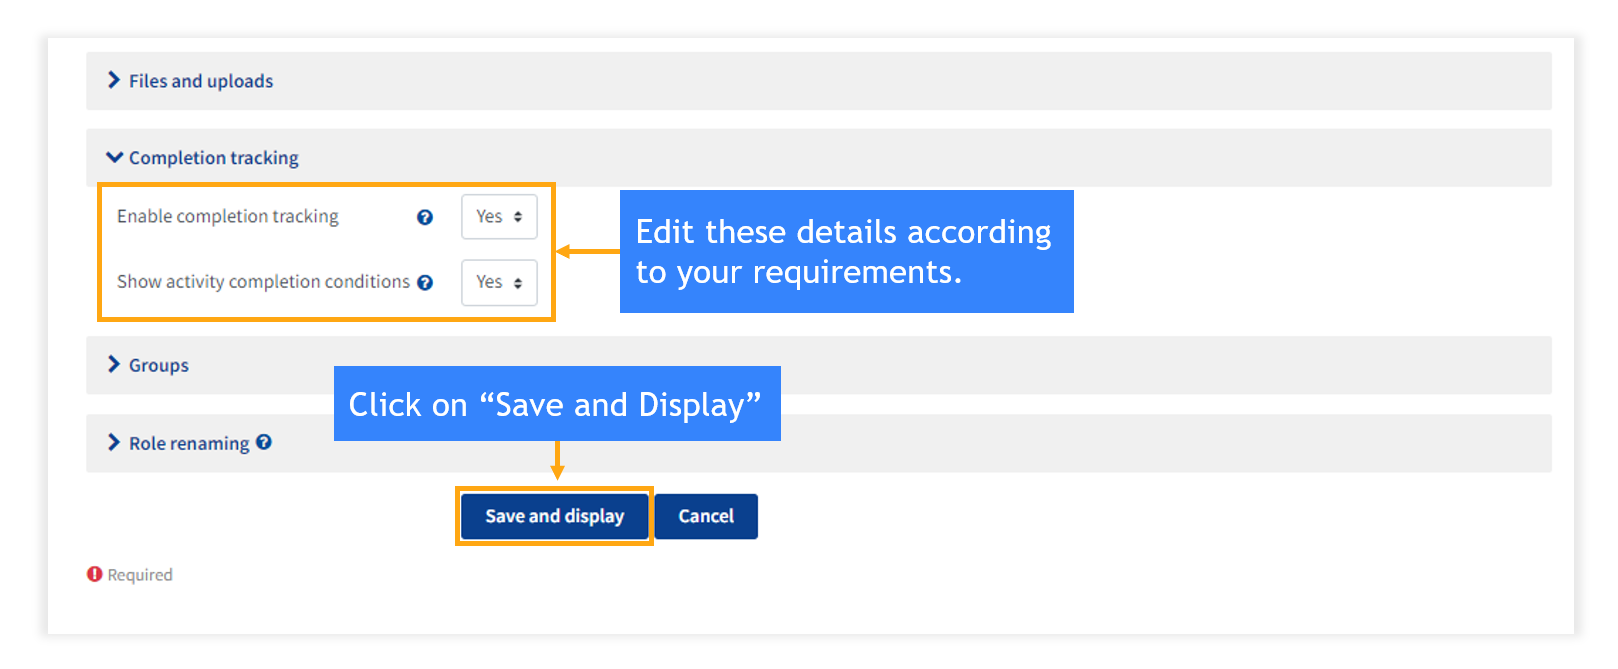
Step 7: Choose a file from the path and click on “Upload this file.”

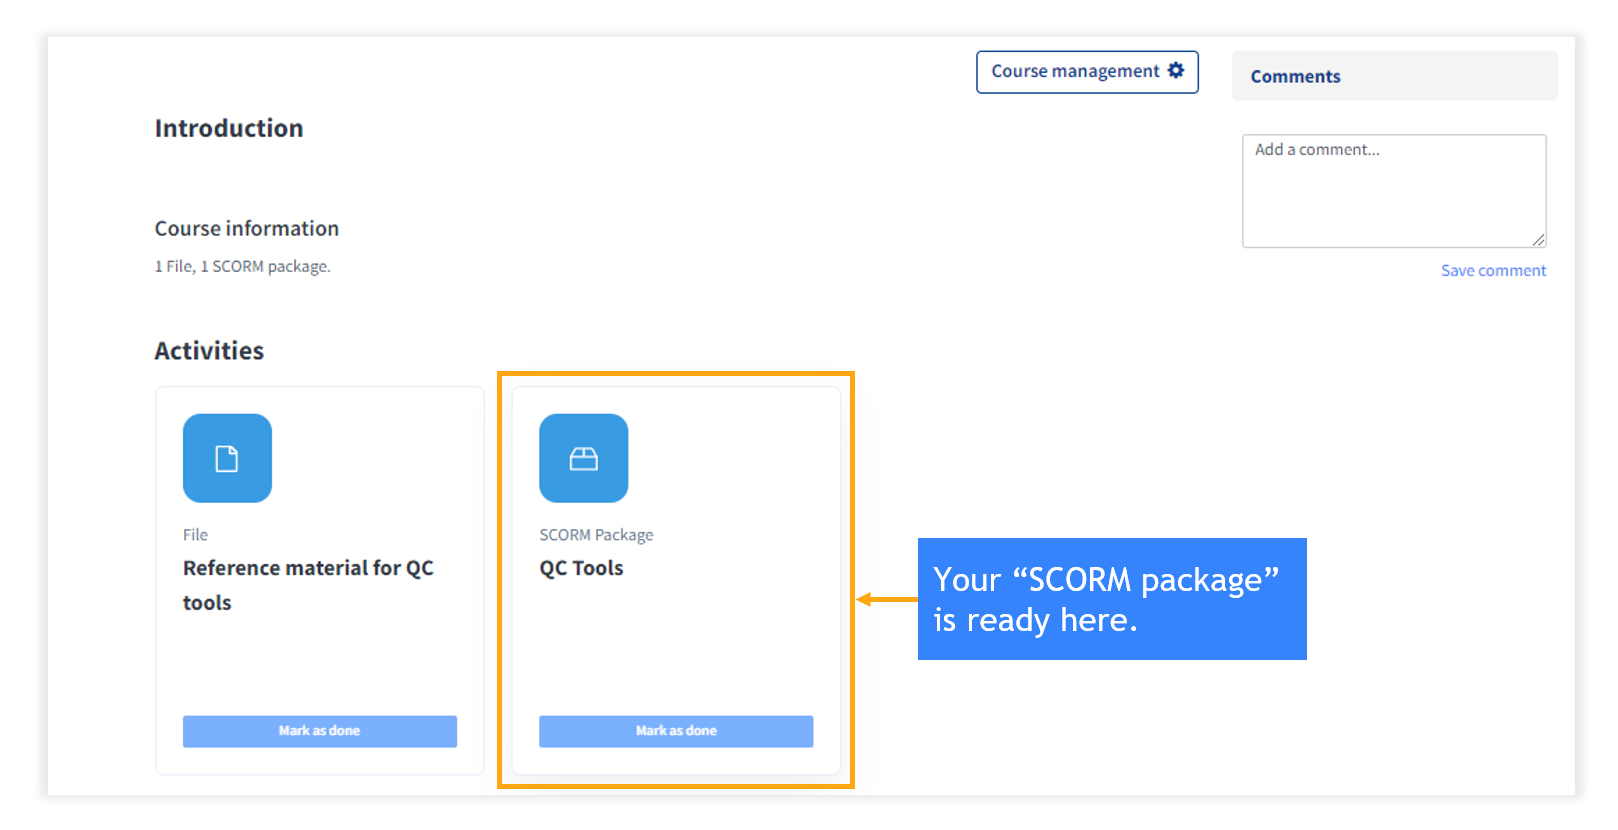
Step 8: Select the dates for the availability of the file for the users and select the completion tracking conditions according to your requirements. Click on “Save and Display” to save it.
Step 9: Here is the SCORM package.
3.4. Add a Quiz to the course
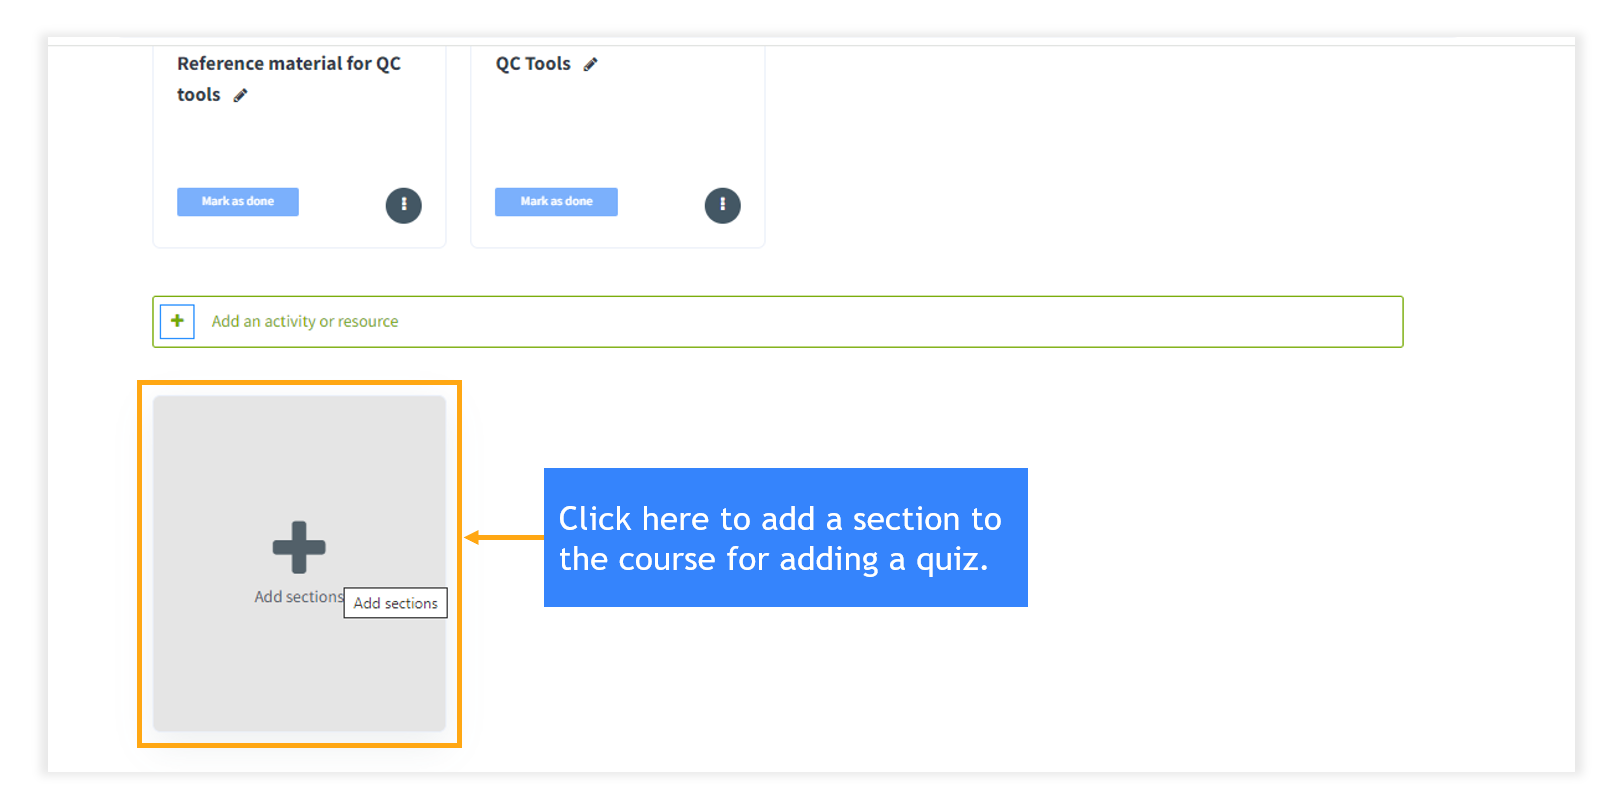
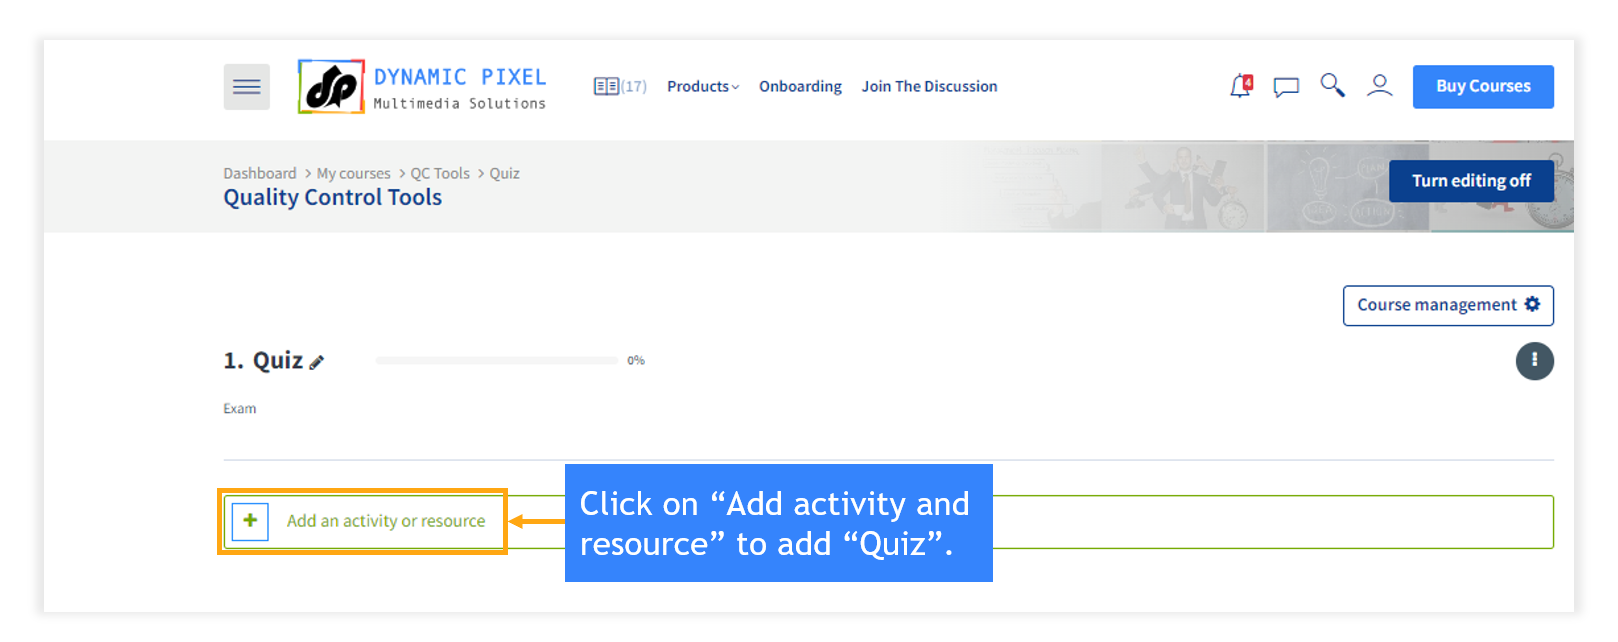
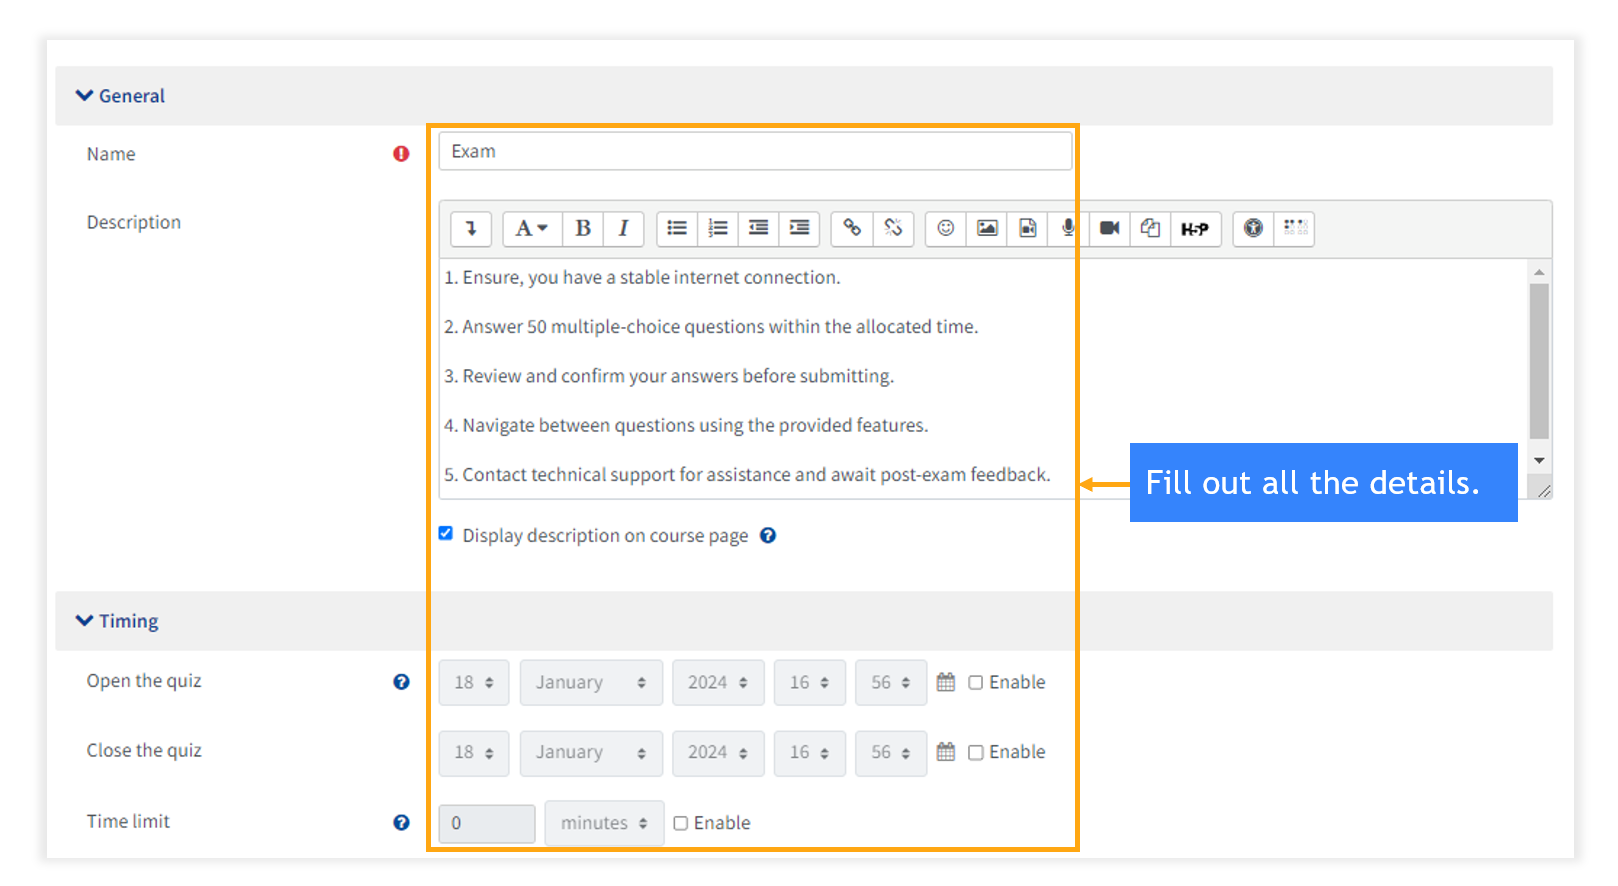
Step 1: Go back to the course in which you want to add a quiz. Click on “Add section” to add a “Quiz or Exam”.
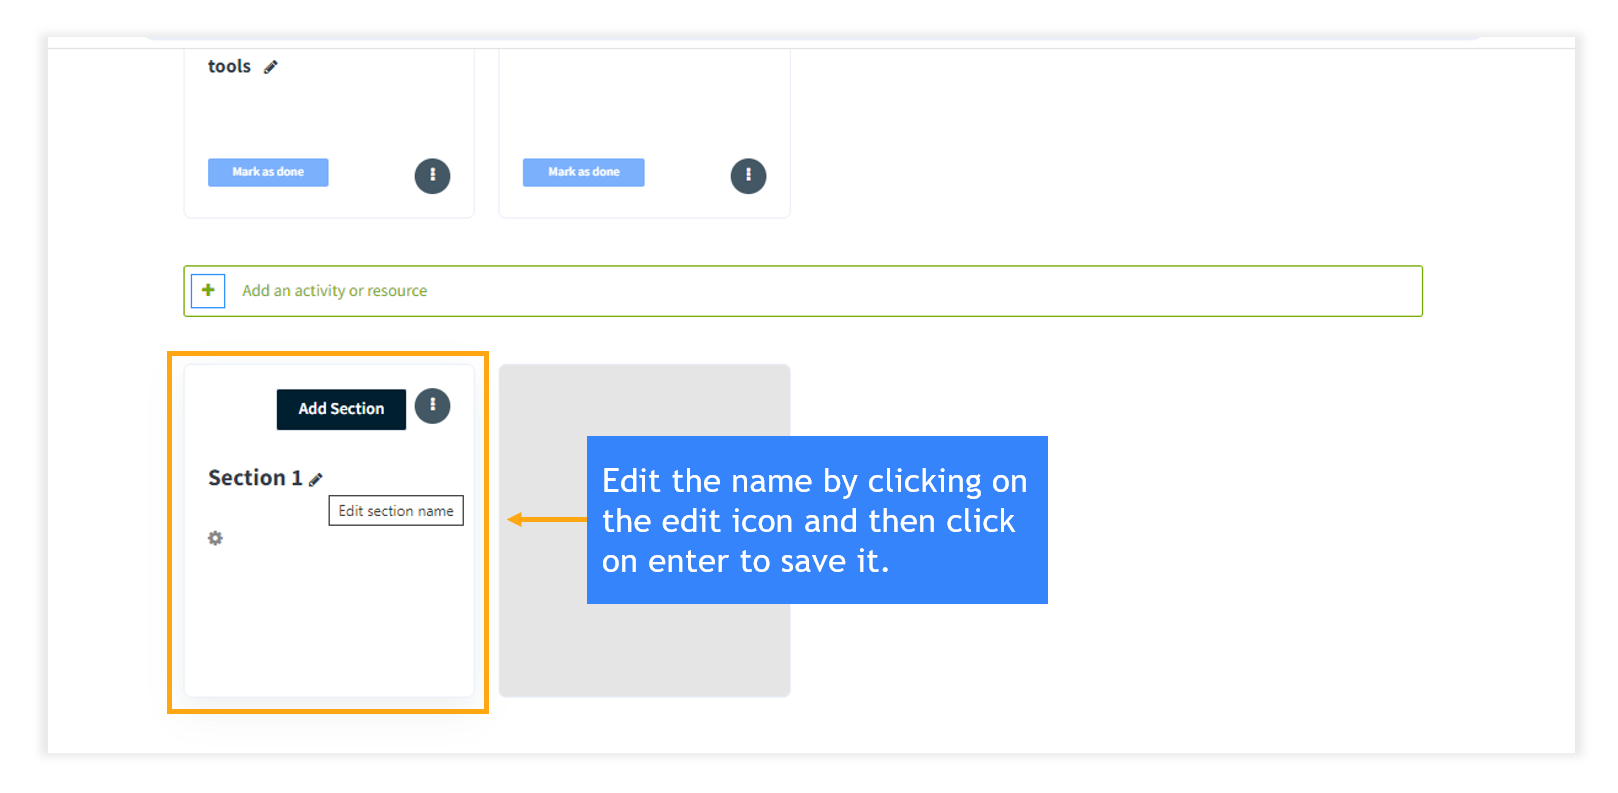
Step 2: Edit the name of the section by clicking on the edit icon.
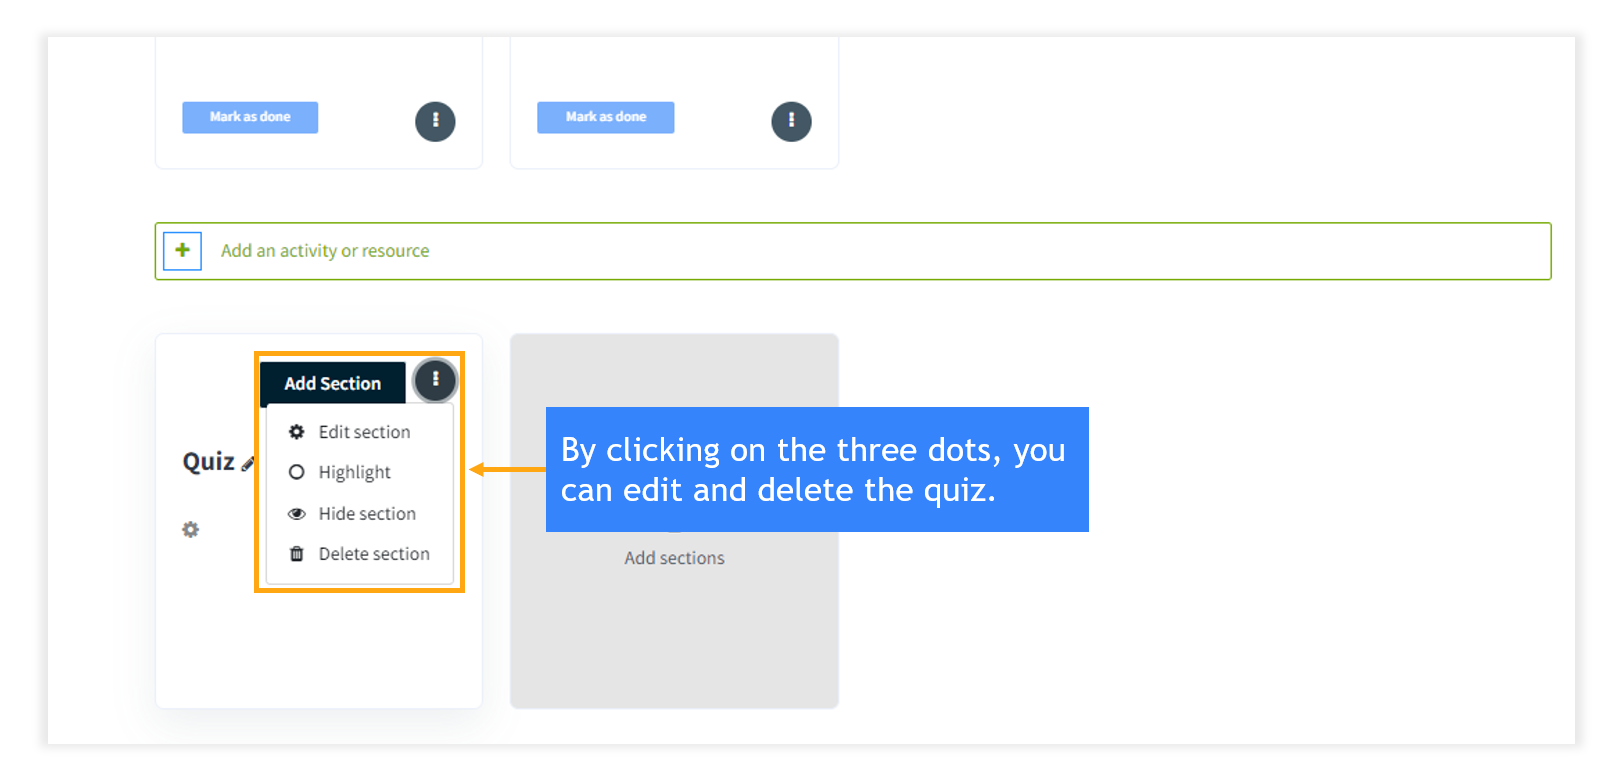
Step 3: Click on the three dots and then click on “Edit section” to add restrictions to the Quiz.
Step 4: You can add conditions or restrictions to the quiz according to your requirements.
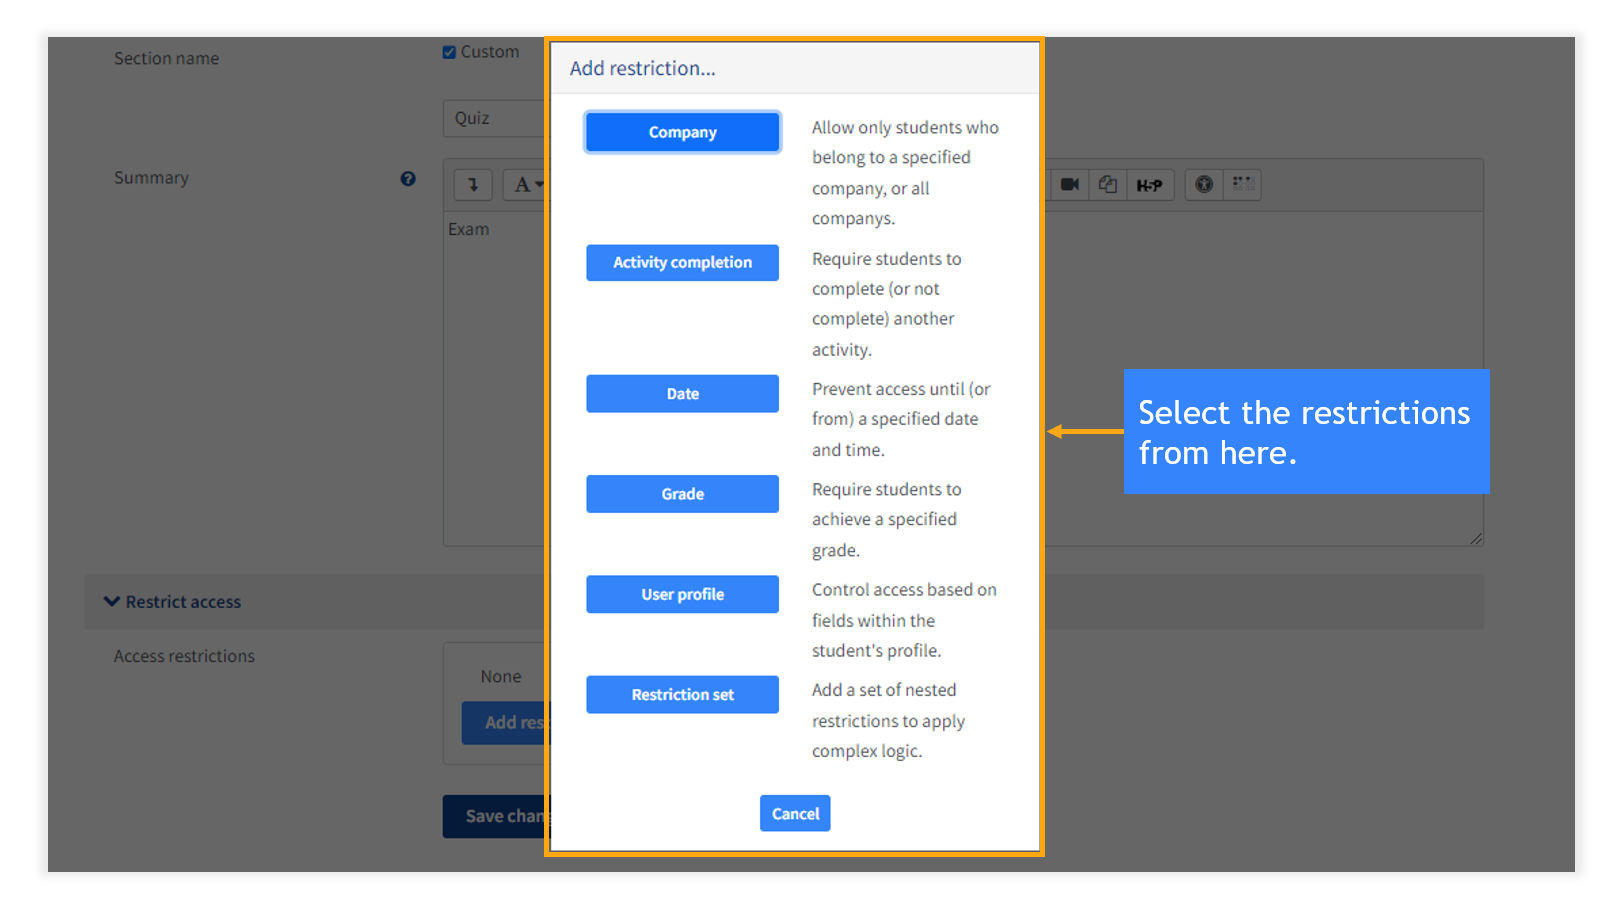
Step 5: You can select the conditions by clicking on the drop-down.

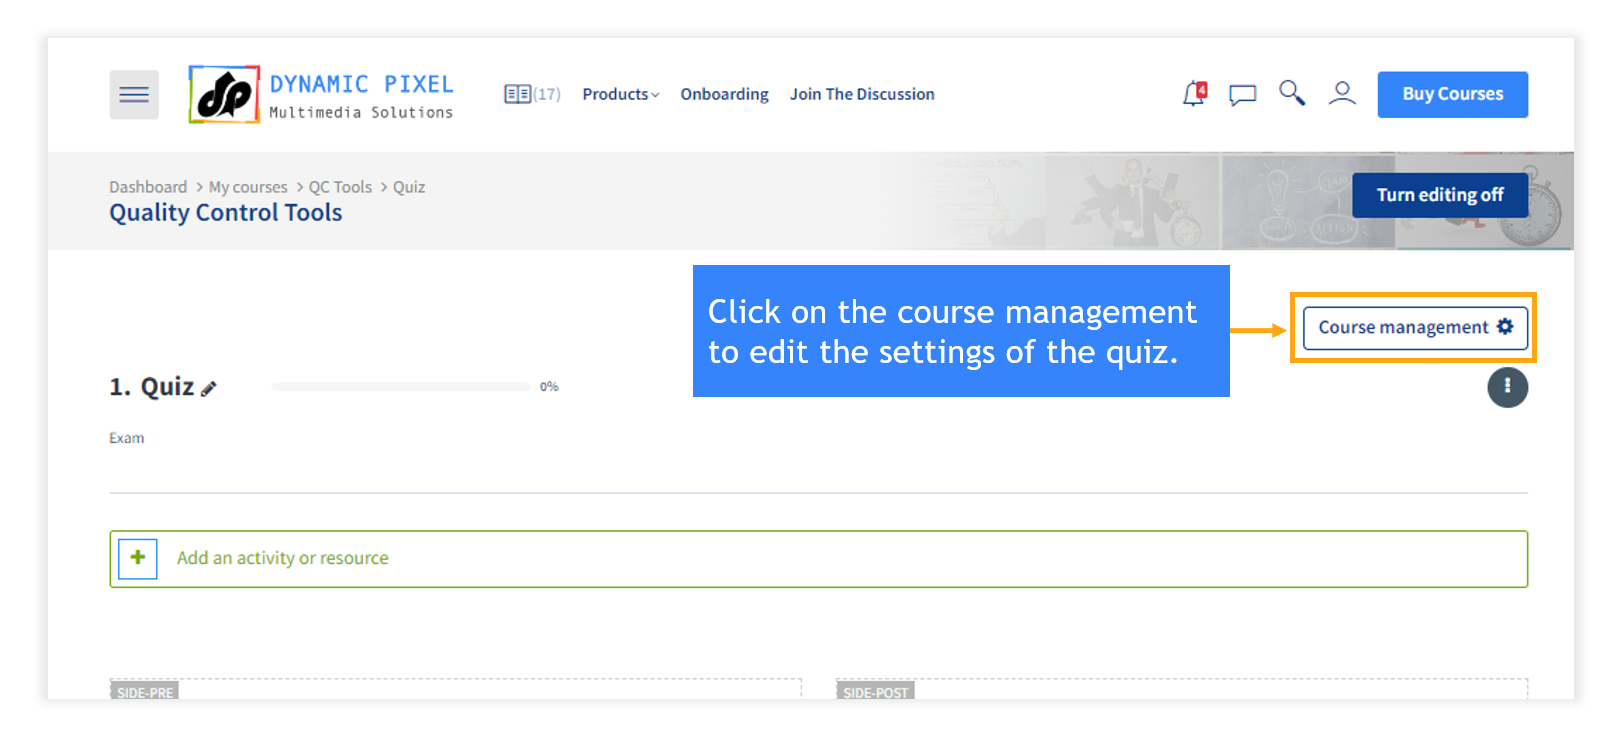
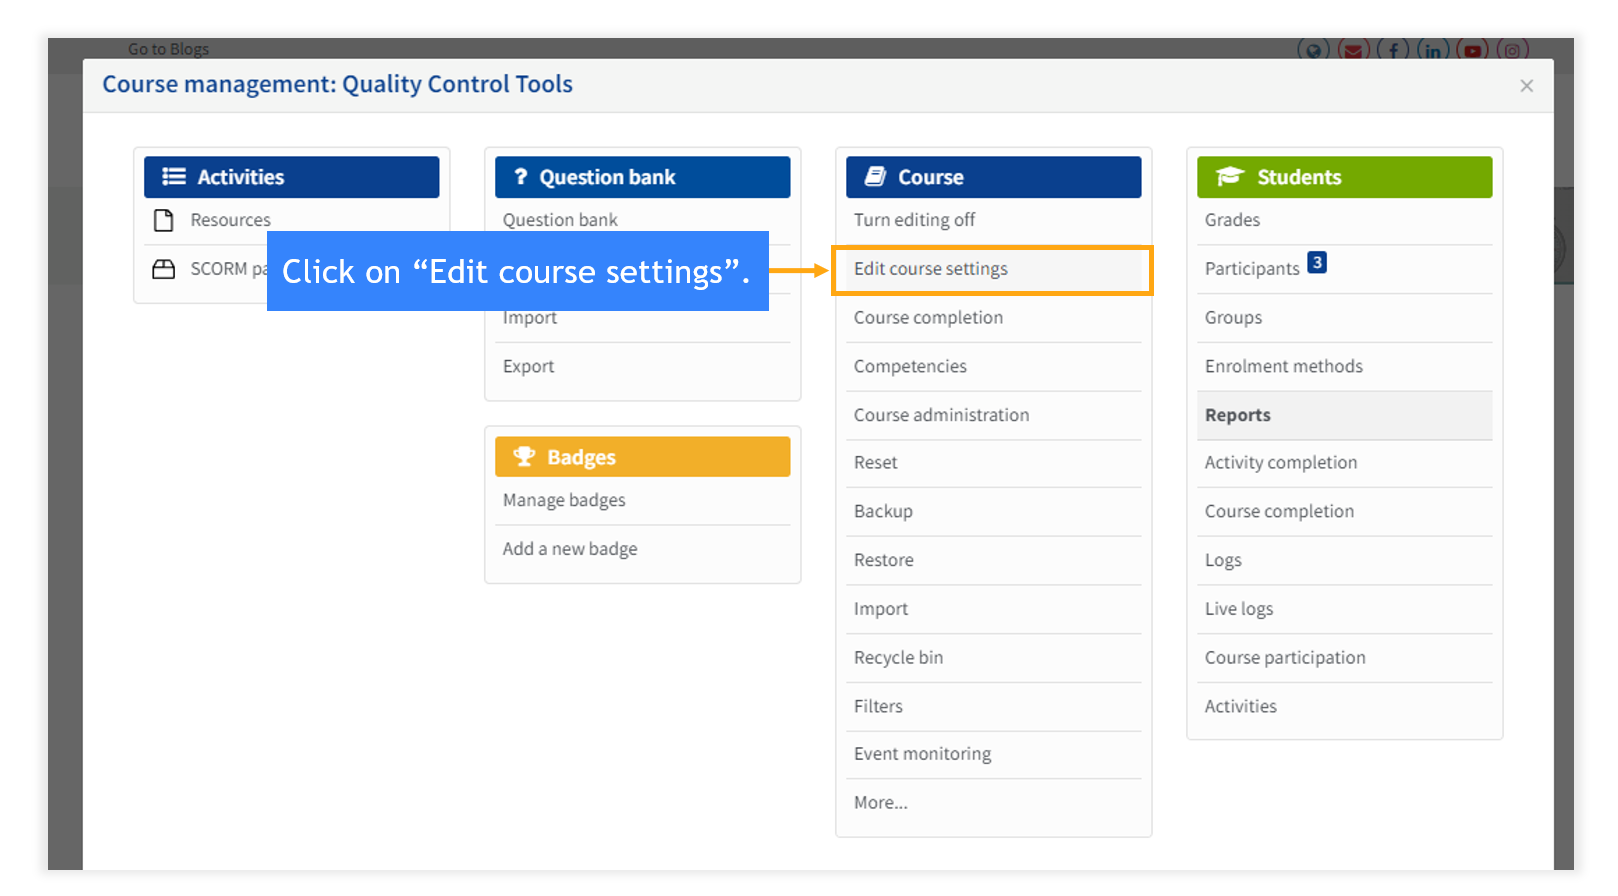
Step 6: Click on the course management to edit the settings of the quiz.
Step 7: Click on “Edit course settings” to change the settings for a quiz.
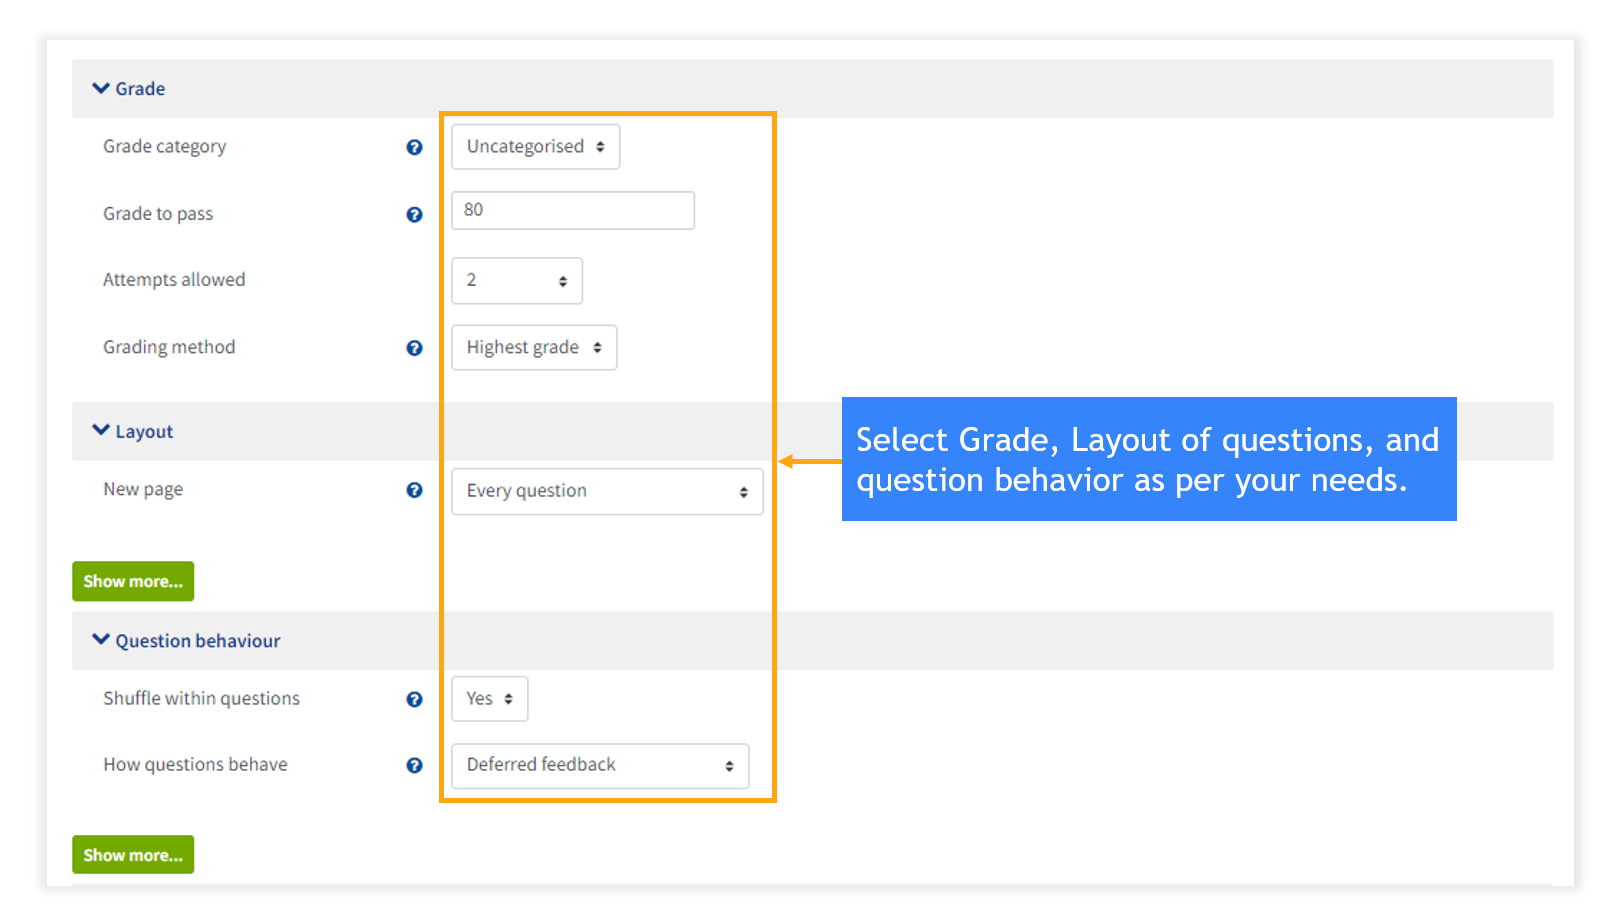
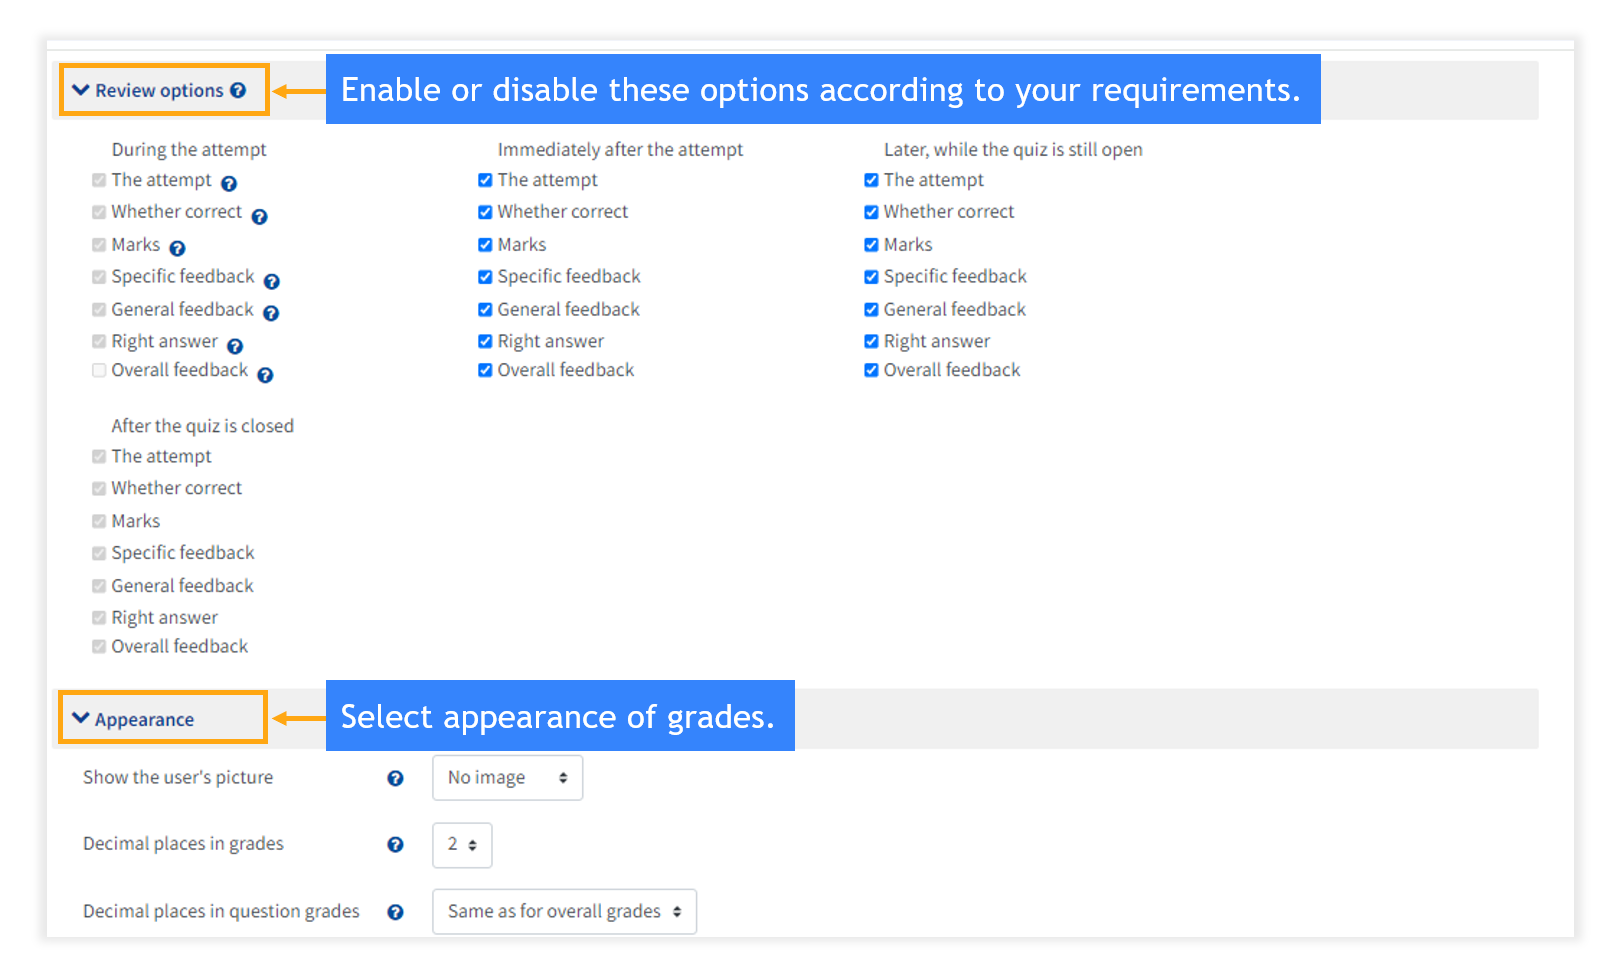
Step 8: Edit the settings in the “Appearance” tab according to your requirements:
- Here you can decide whether to allow students to see the link to grades in the Administration block.
- If your course doesn't use graded activities, it makes sense to disable this.
- If grades are used and this link is disabled, students can still see their grades from the actual activity itself, such as a quiz.

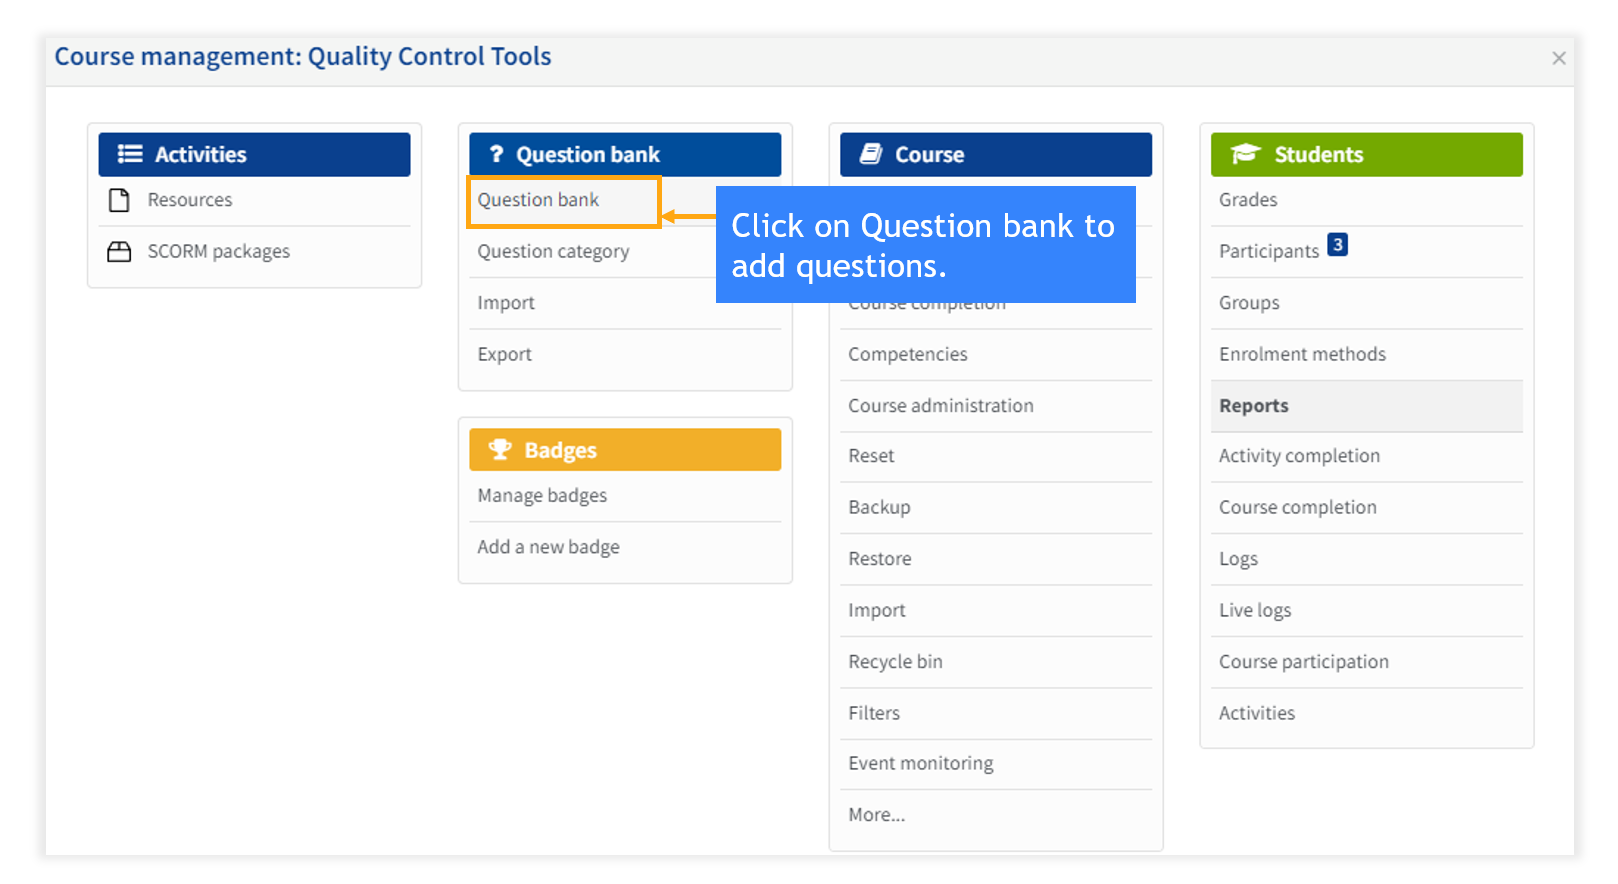
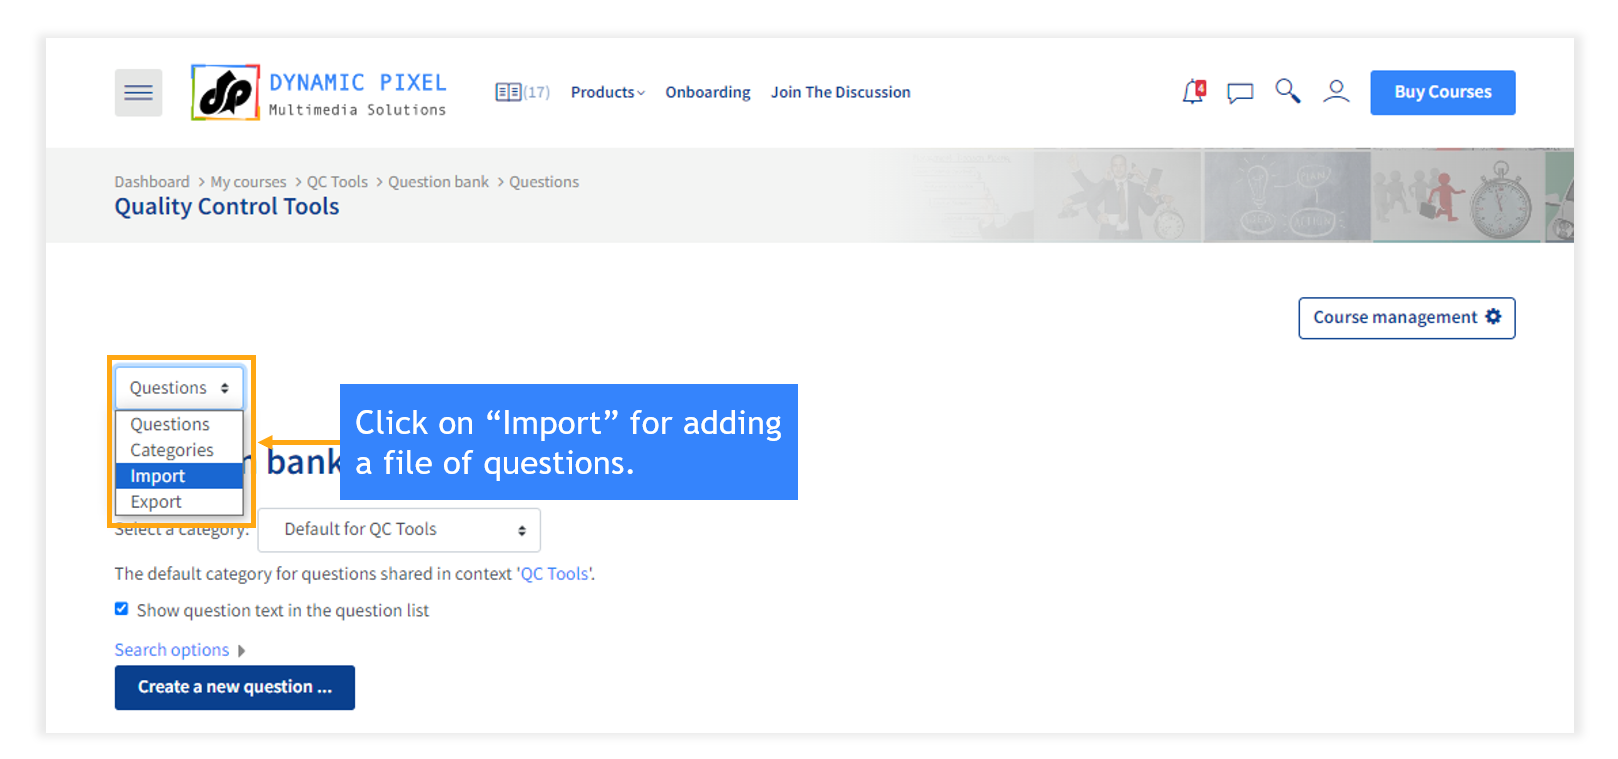
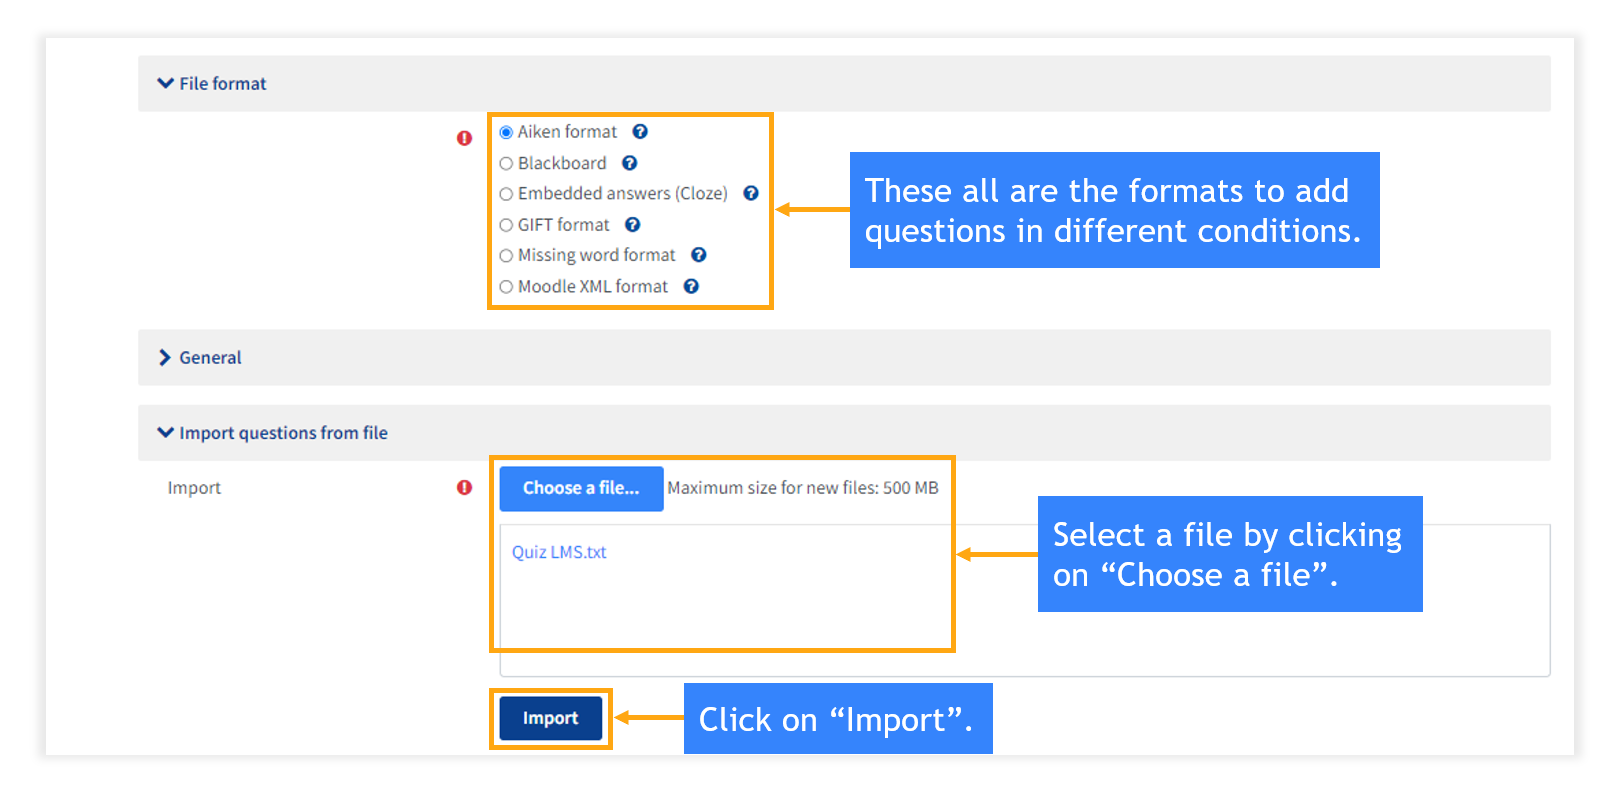
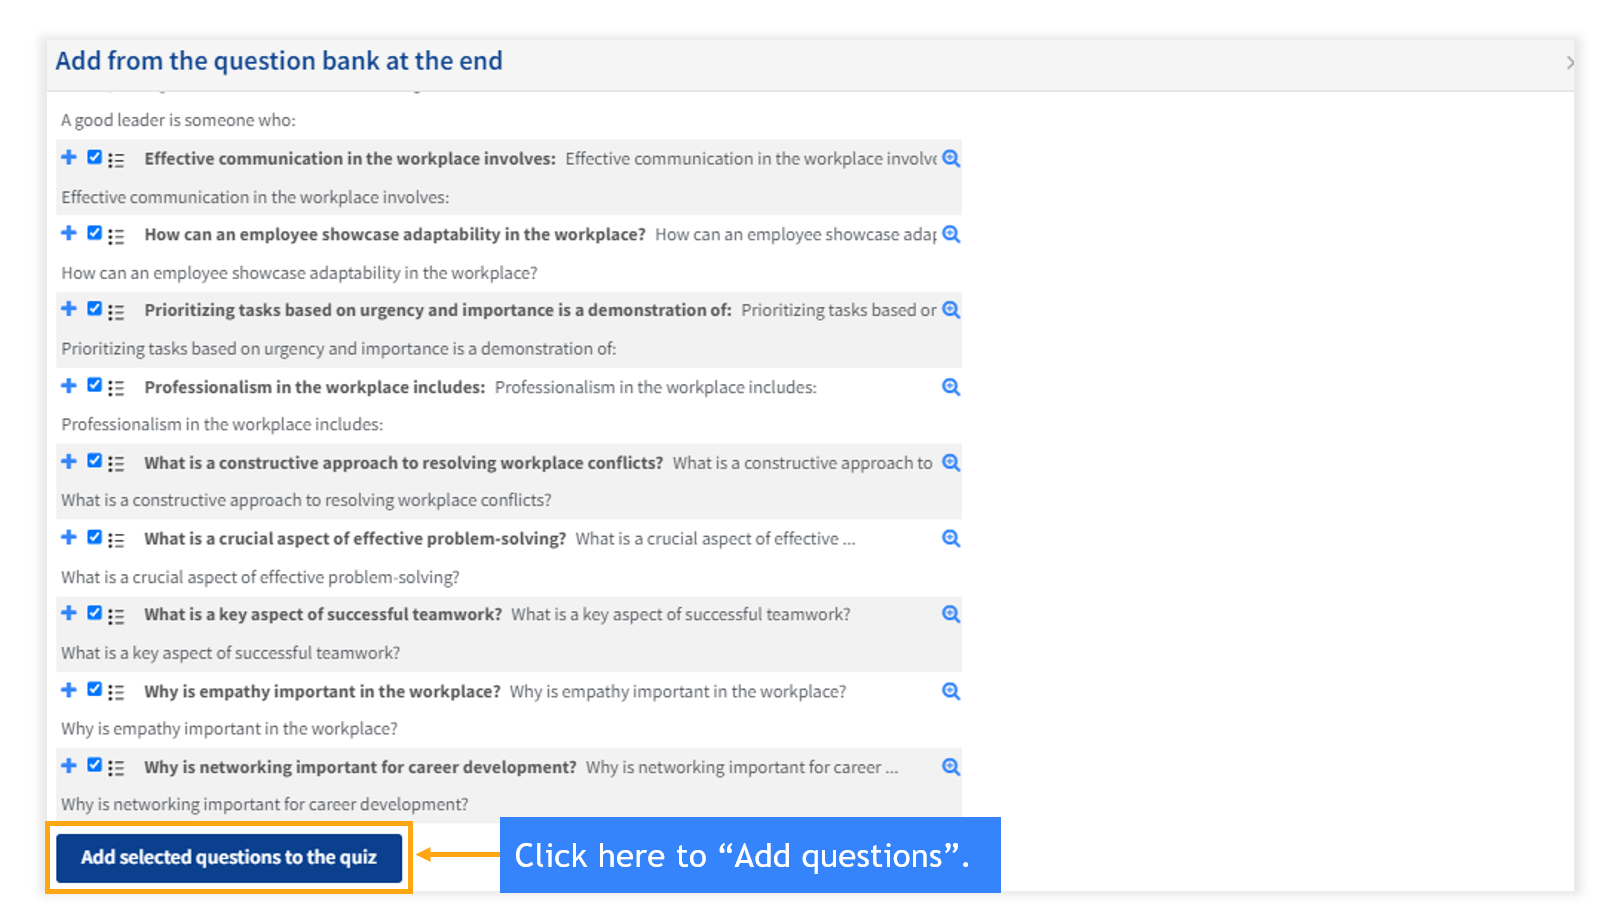
Click on the drop-down to import questions in the question bank.
Step 12:


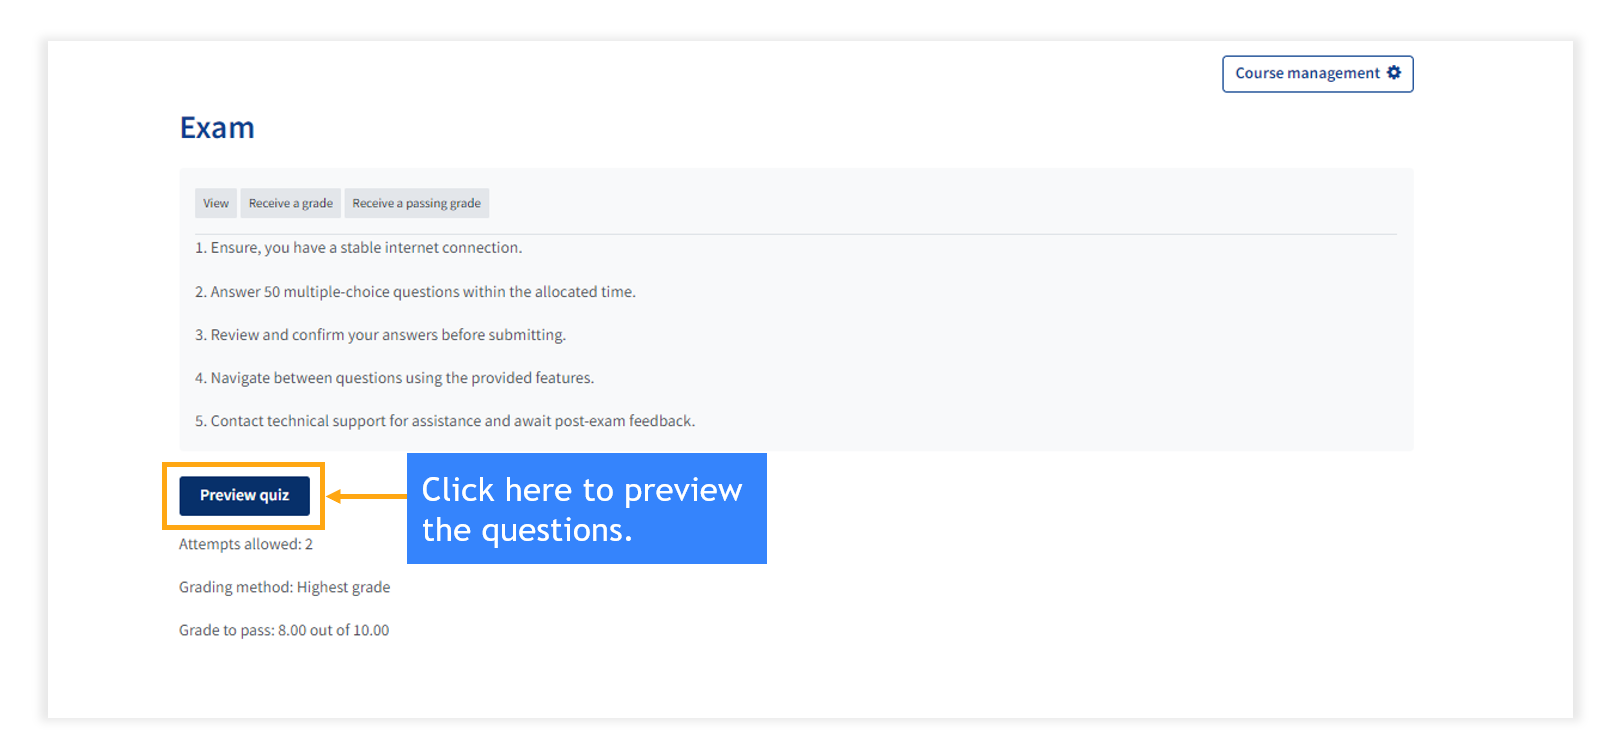
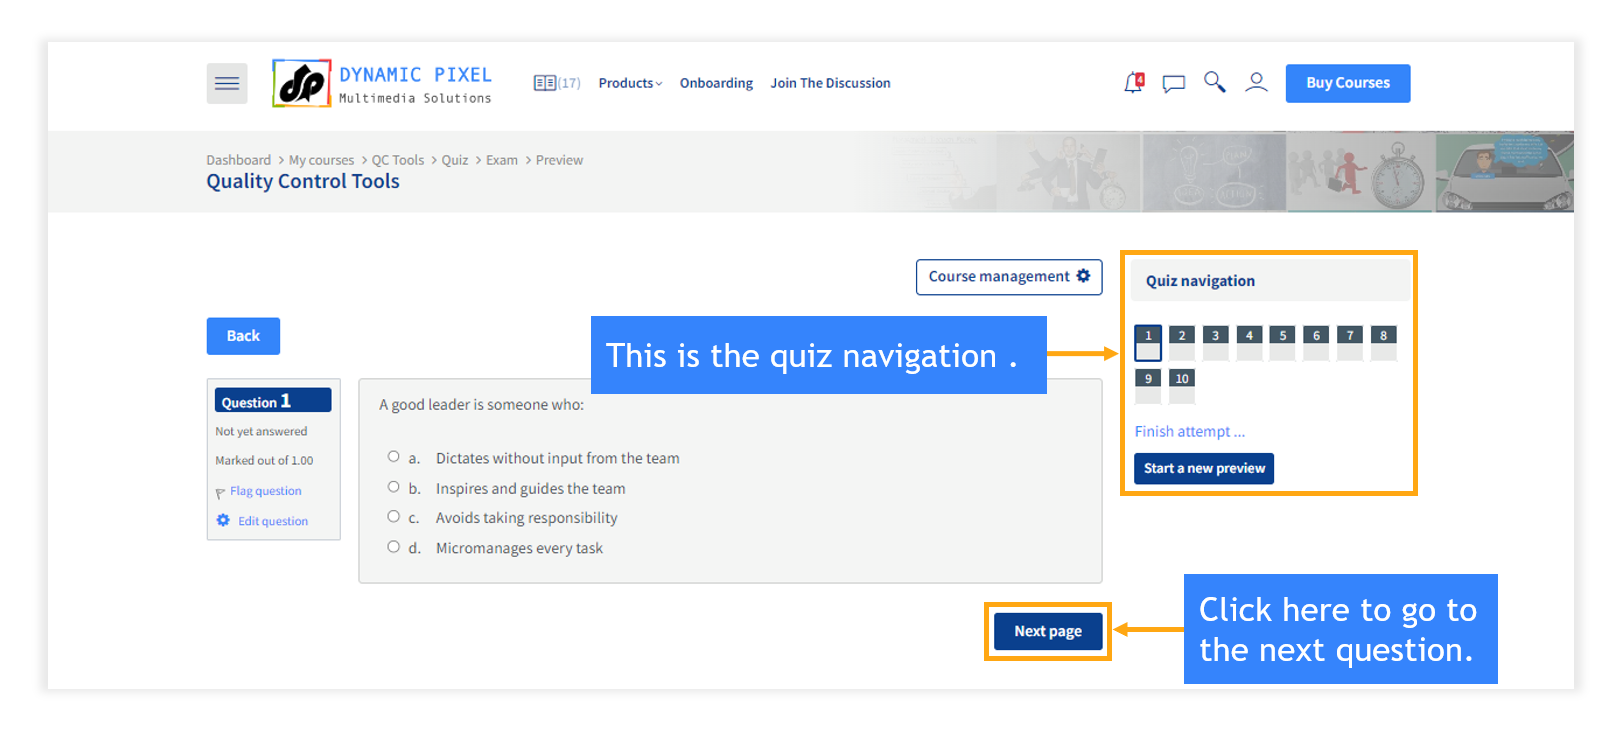
Step 24: Here is the quiz.
3.5. Enrol user to the course
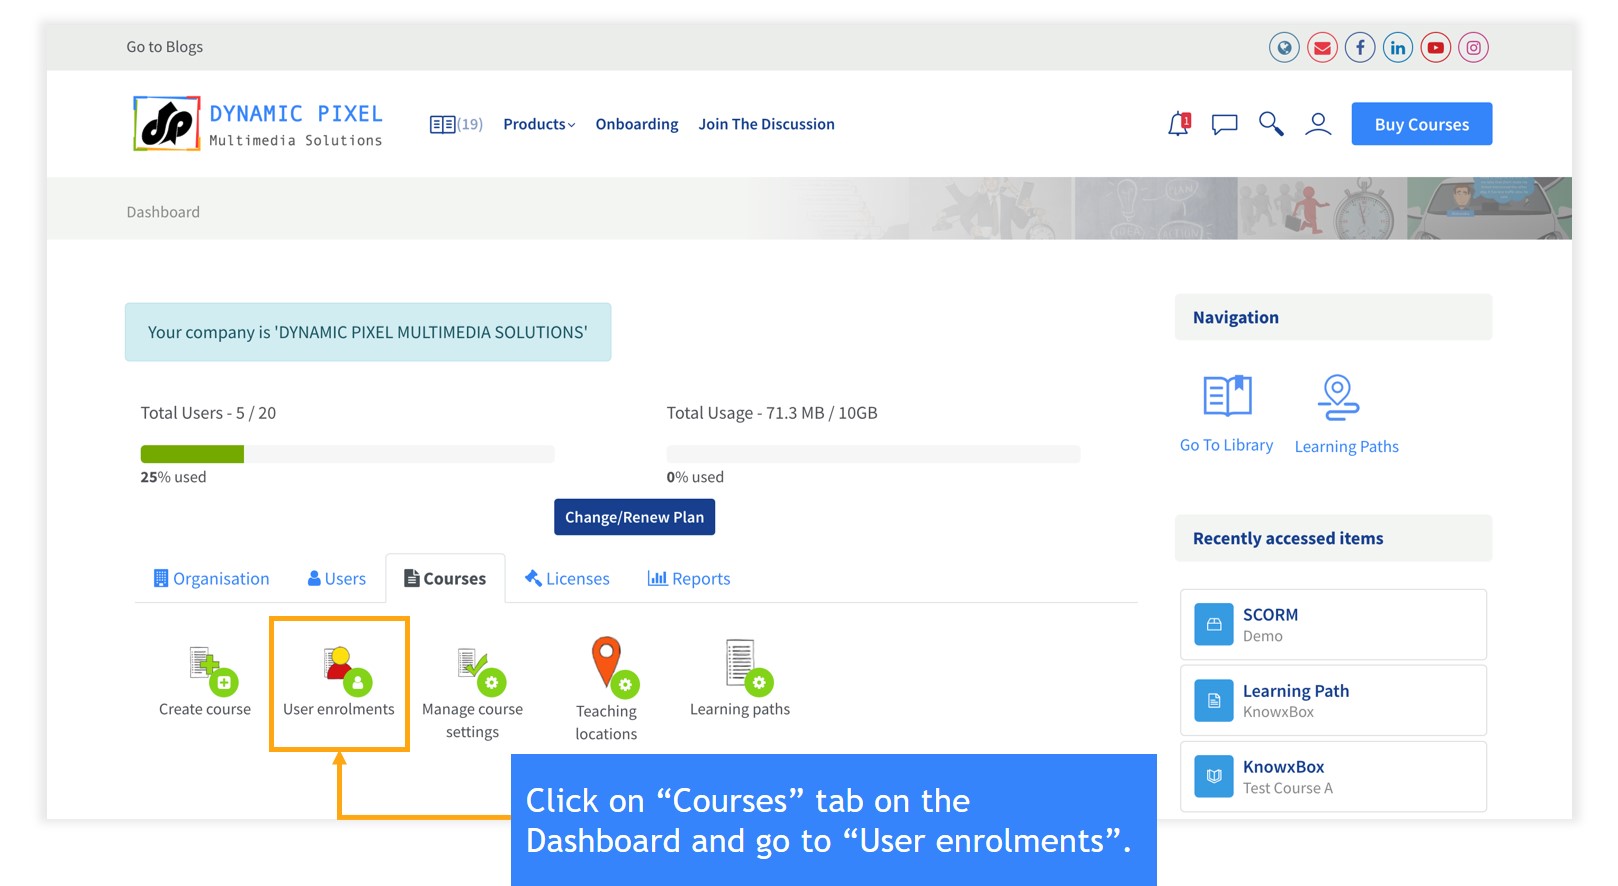
Step 1: Go to the “Courses” and then click on “User enrolments”.

Step 2: Select the course in which you want to enrol the users.
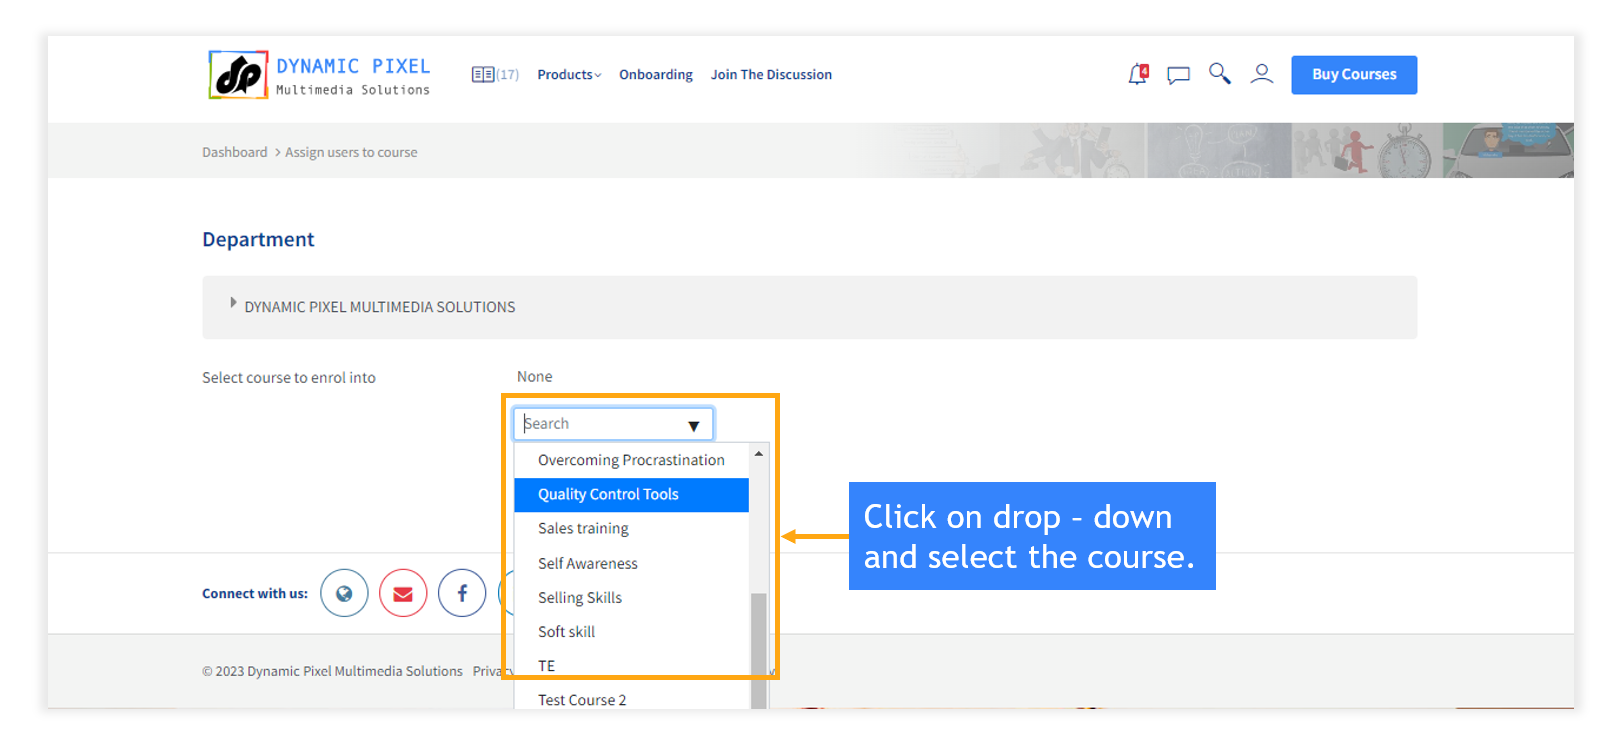
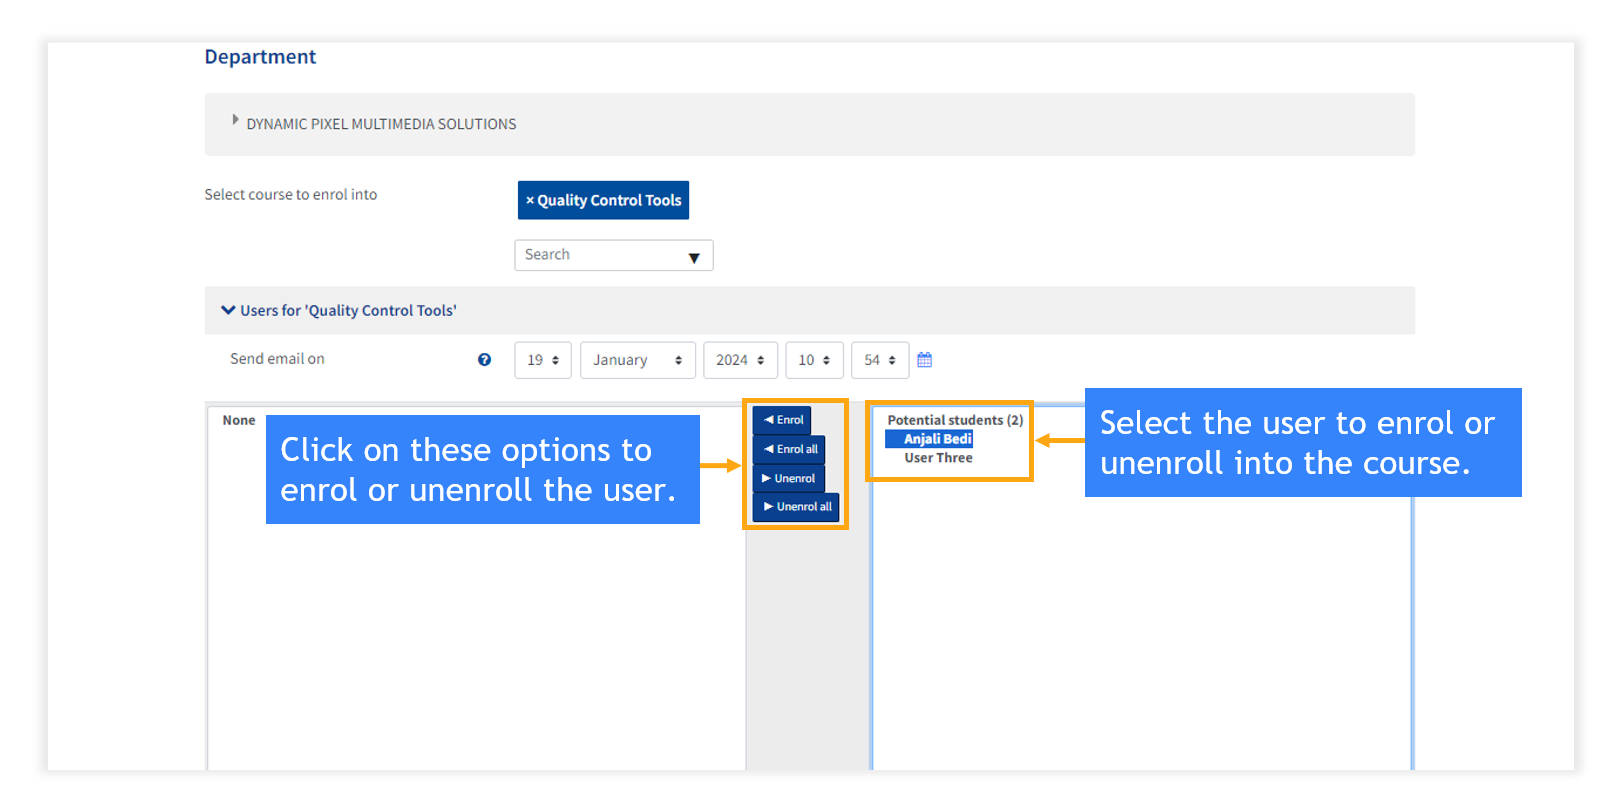
Step 3: There are two methods to enrol the user into the course.
- Select the user from the right-hand side column and then click on ‘enrol user’.
- Simply click "Enrol all" to enroll everyone in this course at once.

3.6. Create a Certificate
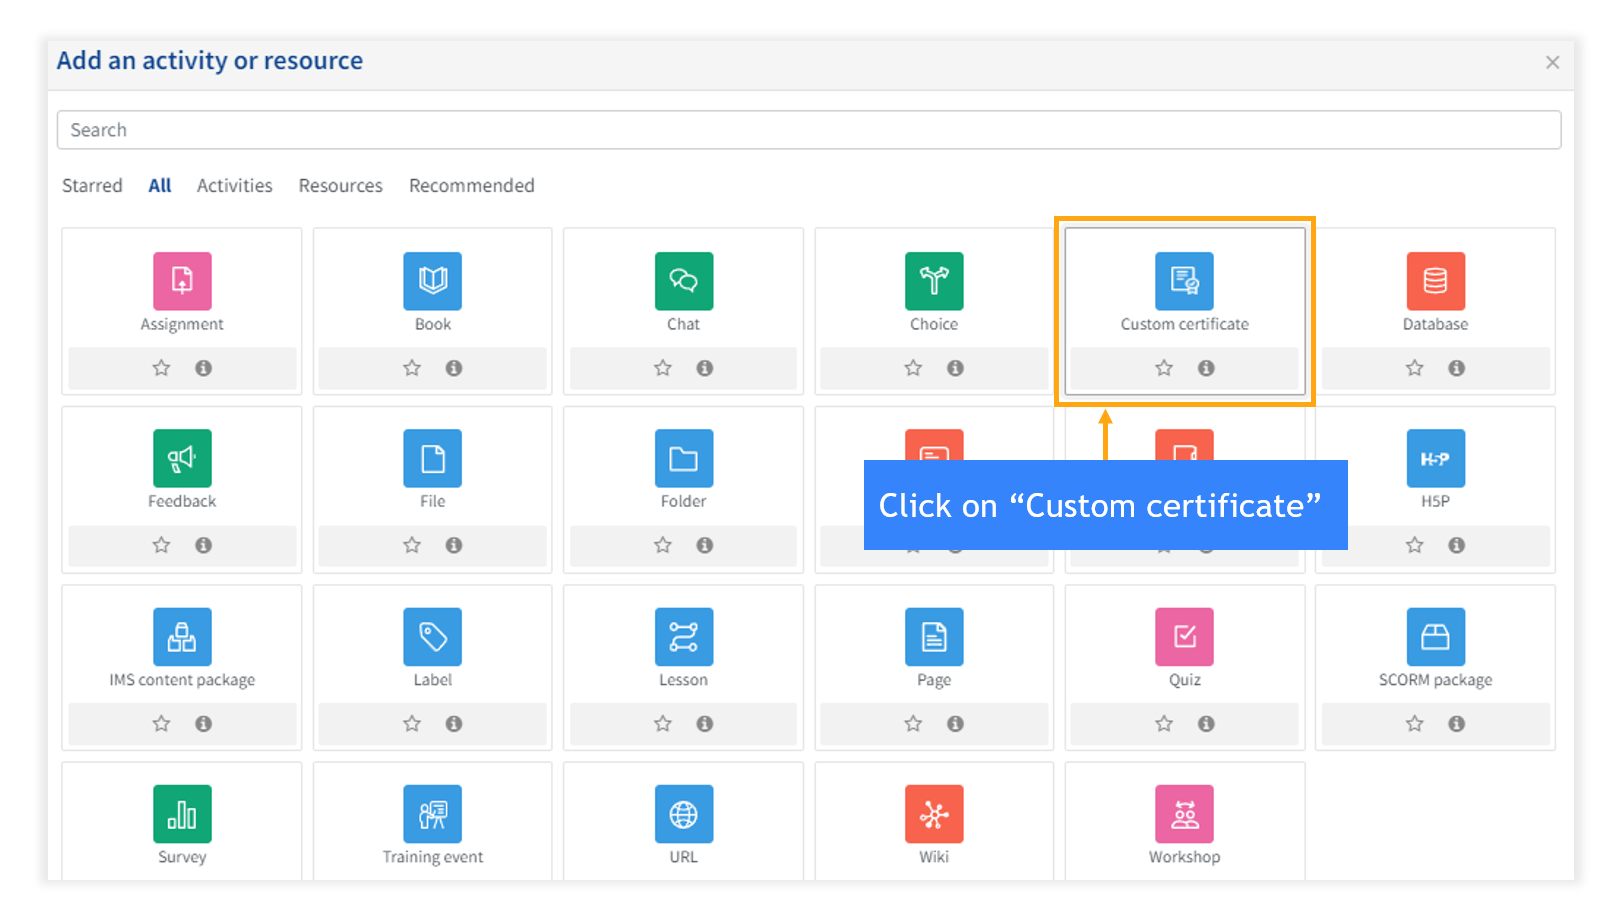
Step 1: Click on “Add an activity and resource”. Select “Custom certificate”.
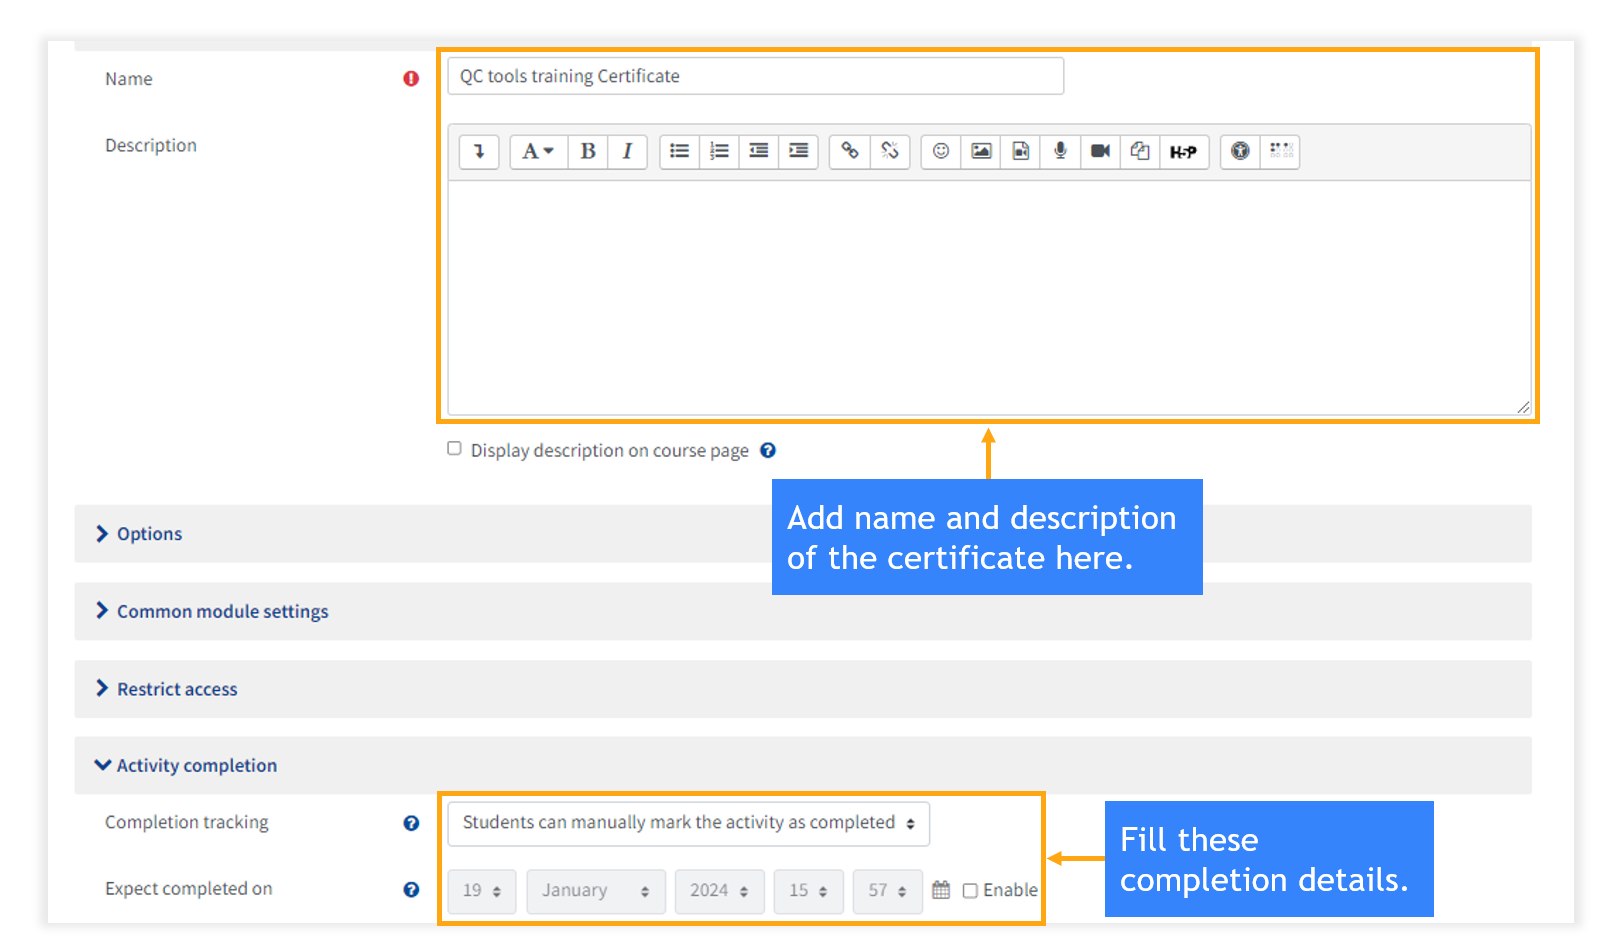
Step 2: Add the name of the certificate. You can also select the completion tracking according to your requirements.
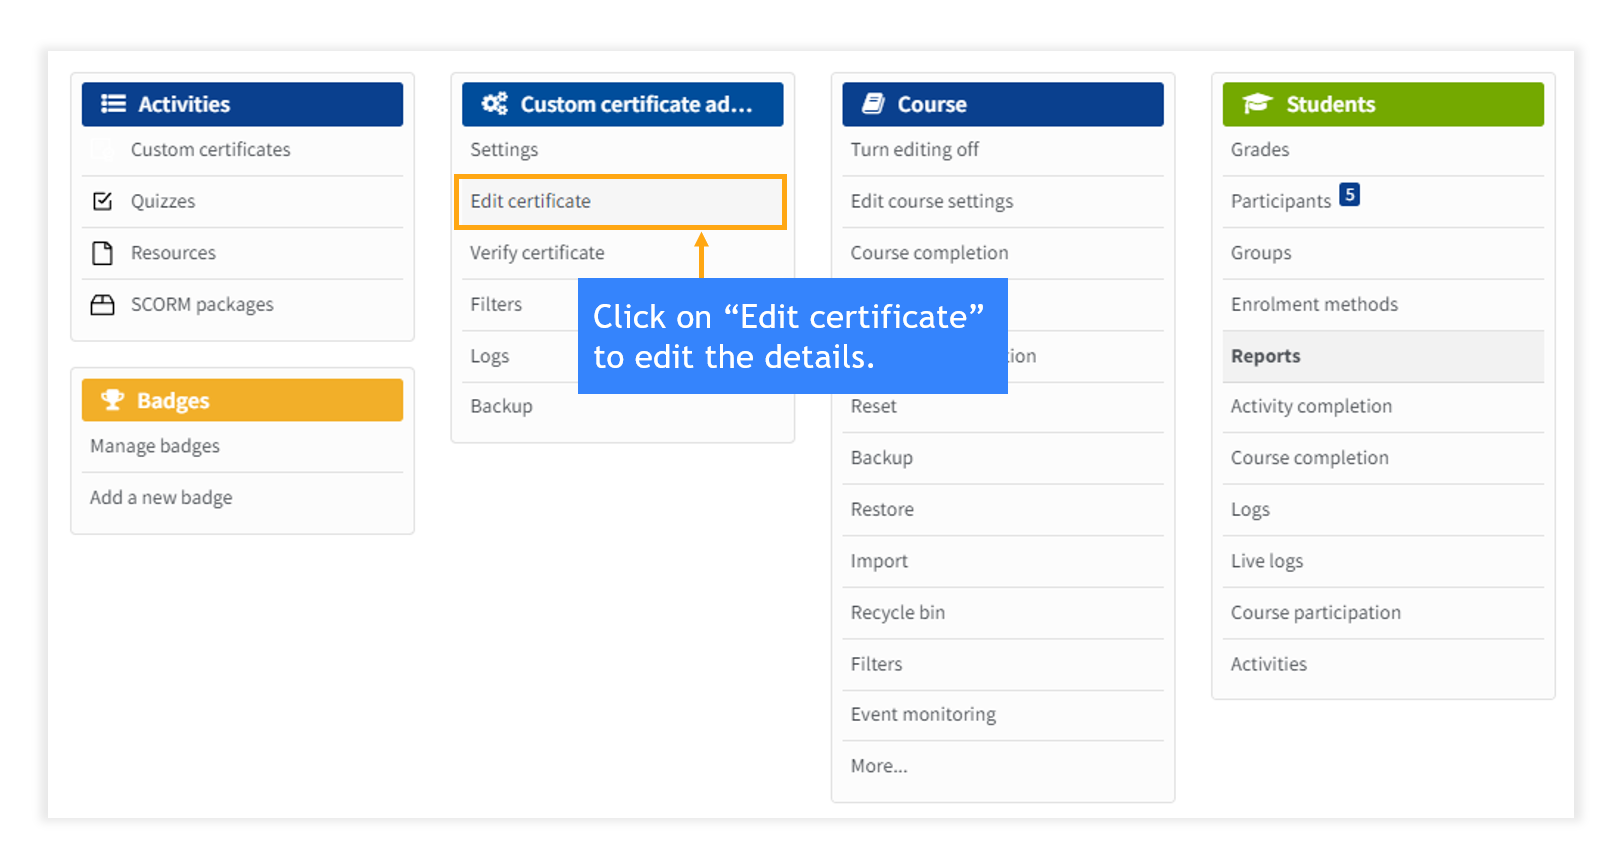
Step 3: Customize certificate by clicking on “Course management” and then click on “Edit certificate”.
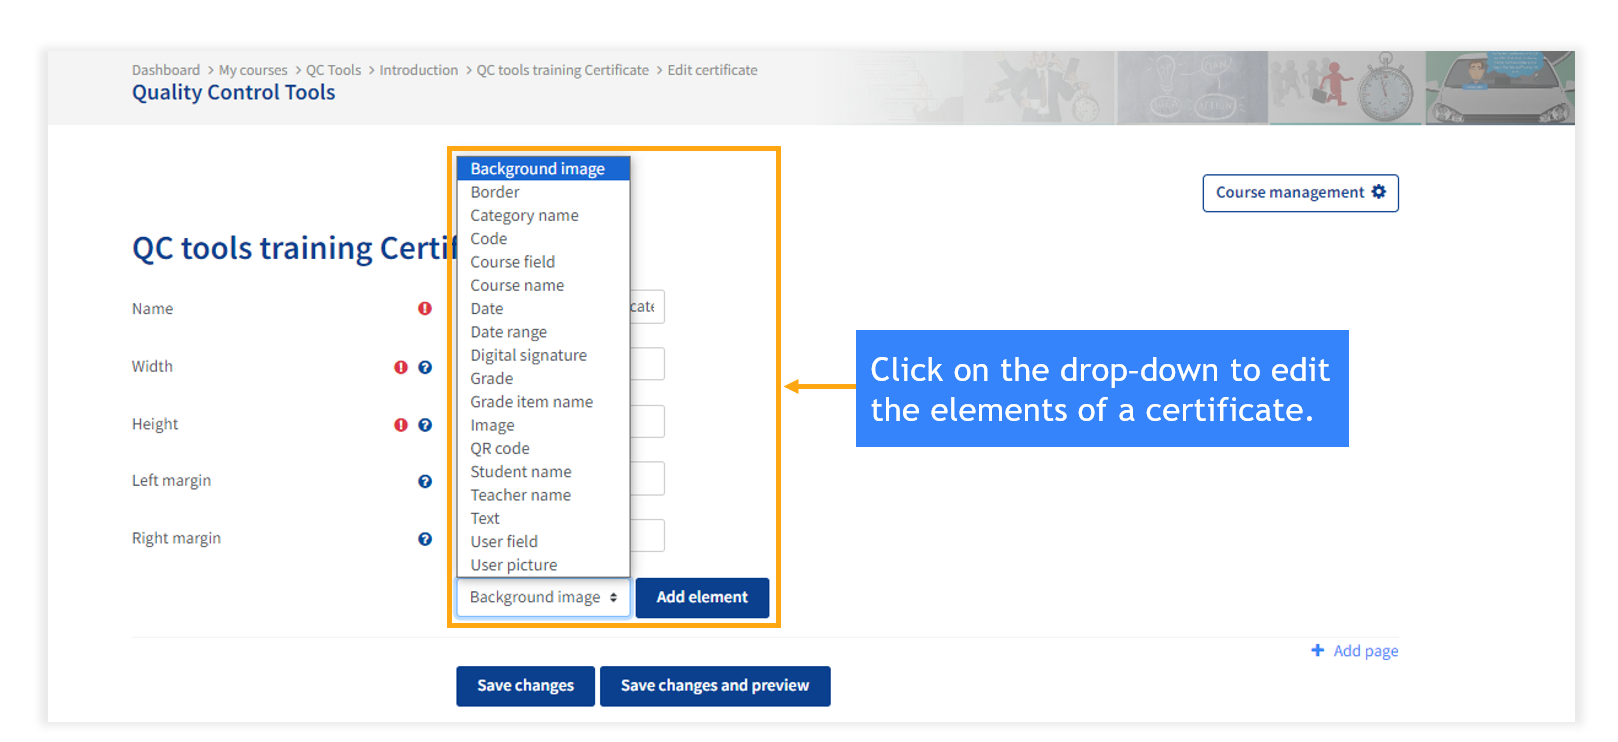
Step 4: Modify the certificate by selecting elements of the certificate. When you click on “Save changes”, it will save all the details you have edited.
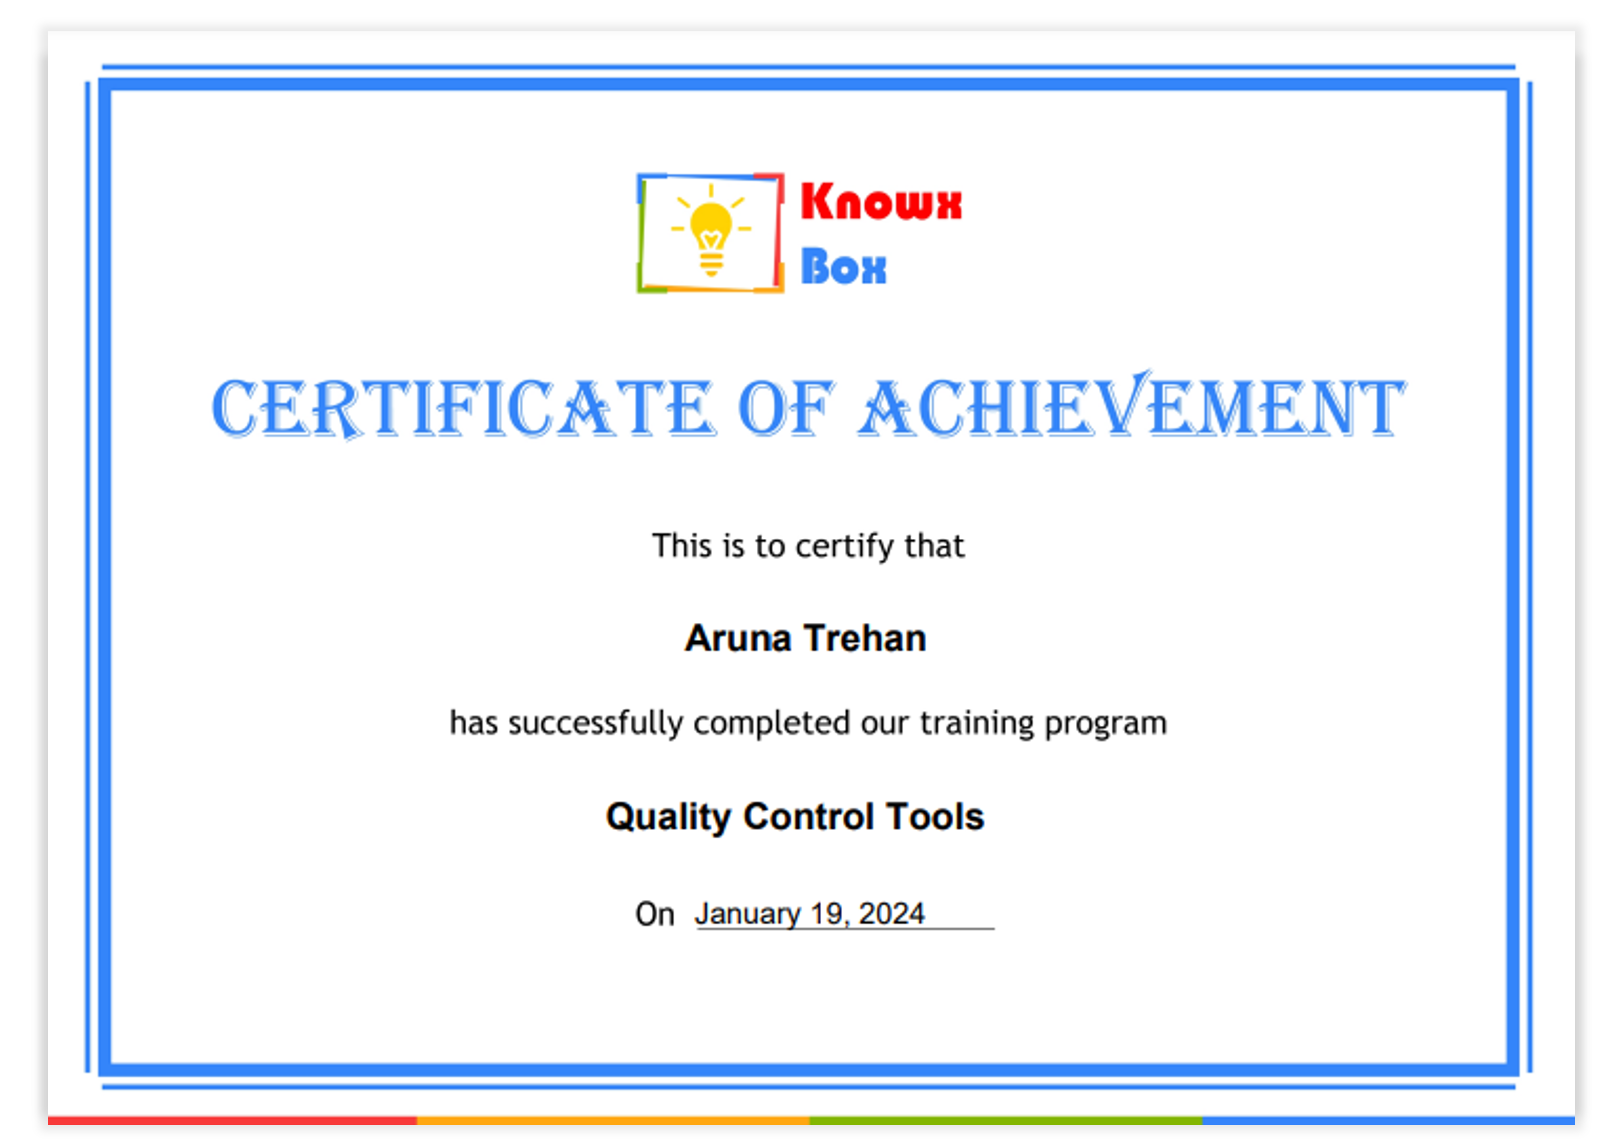
Step 5: After clicking on “Save changes and preview”, you will view the certificate. Here is the certificate of the user.
4. Course Components/Activites
Dashboard < Courses
Design and manage courses to meet various requirements.
Different course formats.
Track completion.
Create Gamified Courses.
Manage enrollment of employees.
Create your own learning path.
Upload your course.
4.1. Assignments
It is an activity that learners are required to complete as part of their training. It analyzes the learner's learning, provides effective feedback, and promotes active learning. Assignments can take many forms, such as essays, quizzes, projects, or presentations.
Learners can submit any digital content (files), such as word-processed documents, spreadsheets, images, or audio and video clips. Alternatively, or in addition, the assignment may require learners to type text directly into the text editor. An assignment can also be used to remind learners of 'real-world' assignments they need to complete offline, such as artwork, and thus not require any digital content. Learners can submit work individually or as a member of a group.
When reviewing assignments, instructors can leave feedback comments and upload files, such as marked-up learner submissions, documents with comments, or spoken audio feedback. Assignments can be graded using a numerical or custom scale or an advanced grading method such as a rubric. Final grades are recorded in the gradebook.
In organisations, you can use assignments for your “Performance review” or conduct any exam.
4.2. Book
The book module enables an instructor to create a multi-page resource in a book-like format, with chapters and subchapters. Books can contain media files as well as text and are useful for displaying lengthy passages of information that can be broken down into sections.
- To display reading material for individual modules of study
- As a staff departmental handbook
- As a showcase portfolio of learner work
In organisations, it can be used to create a “Code of Conduct” or “User manual of anything” or “Induction program” and many more things. Add any e-book up to 500 MB. It helps learners to get access to e-books.
4.3. Chat
The chat activity module enables participants to have text-based, real-time synchronous discussions.The chat may be a one-time activity or it may be repeated at the same time each day or each week. Chat sessions are saved and can be made available for everyone to view or restricted to users with the capability to view chat session logs.
- Regular meetings of learners participating in online courses to enable them to share experiences with others in the same course but in a different location
- A learner temporarily unable to attend in person chatting with their instructor to catch up with work
- Learners out on work experience getting together to discuss their experiences with each other and their instructor
- Younger children use the chat at home in the evenings as a controlled (monitored) introduction to the world of social networking
- A question-and-answer session with an invited speaker in a different location
- Sessions to help learners prepare for tests where the instructor, or other learners, would pose sample questions
4.4. Choice
The choice activity module enables an instructor to ask a single question and offer a selection of possible responses.Choice results may be published after learners have answered, after a certain date, or not at all. Results may be published with learner names or anonymously (though instructors always see learner names and their responses).
- A choice activity may be used
- As a quick poll to stimulate thinking about a topic
- To quickly test learners' understanding
- To facilitate learner decision-making, for example allowing learners to vote on a direction for the course
4.5. Certificate
This module allows for the dynamic generation of PDF certificates.
In organisations, the learners get a certificate after the completion of training. The best part is that the certificate is customizable by the organisation.
4.6. Database
The database enables participants to create, maintain, and search a collection of entries.The structure of the entries is defined using different types of fields, such as short text, dropdown list, text area, URL, image, or file.
As an instructor, you can comment and rate entries. You can also allow learners to rate and comment on entries (peer evaluation). Ratings can be aggregated to form a final grade, which is recorded in the gradebook.
If the Database auto-linking filter is enabled, any entries in a database will be automatically linked where the words or phrases appear within the course.
You can use the Database to:
- Create a collaborative collection of links, books, book reviews, journal references, etc.
- Display learner-created photos, posters, websites, or poems for peer comment and review.
4.7. Feedback
The feedback activity enables an instructor to create a custom survey for collecting feedback from participants using a variety of question types including multiple choice, yes/no, or text input.Feedback responses may be anonymous if desired, and results may be shown to all participants or restricted to instructors only. Any feedback activities on the site home may also be completed by non-logged-in users.
Feedback activities may be used
- For course evaluations, helping improve the content for later participants
- To enable participants to sign up for course modules, events, etc.
- For guest surveys of course choices, school policies, etc.
- For anti-bullying surveys in which learners can report incidents anonymously
4.8. File
The file module enables an instructor to provide a file as a course resource. Where possible, the file will be displayed within the course interface; otherwise, learners will be prompted to download it. The file may include supporting files, for example, an HTML page may have embedded images.Note that learners need to have the appropriate software on their computers to open the file.
A file may be used
- To share presentations given in class
- To include a mini website as a course resource
- To provide draft files of software programs so learners can edit and submit them for assessment
4.9. Folder
The folder module enables an instructor to display several related files inside a single folder, reducing scrolling on the course page. A zipped folder may be uploaded and unzipped for display, or an empty folder created and files uploaded into it.- For a series of files on one topic, for example, a set of past examination papers in PDF format or a collection of image files for use in learner projects
- To provide a shared uploading space for instructors on the course page (keeping the folder hidden so that only instructors can see it)
4.10. Forum
The forum activity module enables participants to have asynchronous discussions i.e., discussions that take place over an extended period.There are several forum types to choose from, such as a standard forum where anyone can start a new discussion at any time; a forum where each learner can post exactly one discussion; or a question-and-answer forum where learners must first post before being able to view other learners' posts. An instructor can allow files to be attached to forum posts. The attached images are displayed in the forum post.
Participants can subscribe to a forum to receive notifications of new forum posts. An instructor can set the subscription mode to optional, forced, or auto, or prevent subscription completely. If required, learners can be blocked from posting more than a given number of posts in a given period; this can prevent individuals from dominating discussions.
Forum posts can be rated by instructors or learners (peer evaluation). Ratings can be aggregated to form a final grade which is recorded in the gradebook.
Forums have many uses, such as
- A social space for learners to get to know each other
- For course announcements (using a news forum with a forced subscription)
- For discussing course content or reading materials
- For continuing online an issue raised previously in a face-to-face session
- For instructor-only discussions (using a hidden forum)
- A help center where tutors and learners can give advice
- A one-on-one support area for private learner-instructor communications (using a forum with separate groups and with one learner per group)
- For extension activities, for example, ‘brain teasers’ for learners to ponder and suggest solutions to
4.11. Glossary
The glossary activity module enables participants to create and maintain a list of definitions, like a dictionary, or to collect and organise resources or information.An instructor can allow files to be attached to glossary entries. The attached images are displayed in the entry. Entries can be searched or browsed alphabetically or by category, date, or author. Entries can be approved by default or require approval by an instructor before they are viewable by everyone.
If the glossary auto-linking filter is enabled, entries will be automatically linked where the concept words and/or phrases appear within the course.
An instructor can allow comments on entries. Entries can also be rated by instructors or learners (peer evaluation). Ratings can be aggregated to form a final grade which is recorded in the gradebook.
Glossaries have many uses, such as
- A collaborative bank of key terms
- A ‘getting to know you’ space where new learners add their names and personal details
- A ‘handy tips’ resource of best practice in a practical subject
- A sharing area of useful videos, images or sound files
- A revision resource of facts to remember
4.12. H5P
H5P is an abbreviation for HTML5 Package - interactive content such as presentations, videos and other multimedia, questions, quizzes, games, and more. The H5P activity enables H5P to be uploaded and added to a course.
The organisation can create its content according to its requirements.
Any question attempts are marked automatically, and the grade is recorded in the gradebook.
4.13. IMS Content Package
An IMS content package is a collection of files that are packaged according to an agreed standard so they can be reused in different systems. The IMS content package module enables such content packages to be uploaded as a zip file and added to a course as a resource.
Content is usually displayed over several pages, with navigation between the pages. There are various options for displaying content in a pop-up window, with a navigation menu or buttons, etc.
An IMS content package may be used for presenting multimedia content and animations.
4.14. Label
The label module enables text and multimedia to be inserted into the course page in between links to other resources and activities. Labels are very versatile and can help to improve the appearance of a course if used thoughtfully.Labels may be used
- To split up a long list of activities with a subheading or an image
- To display an embedded sound file or video directly on the course page
- To add a short description to a course section
4.15. Lesson
The lesson activity module enables an instructor to deliver content and/or practice activities in interesting and flexible ways. An instructor can use the lesson to create a linear set of content pages or instructional activities that offer a variety of paths or options for the learner. In either case, instructors can choose to increase engagement and ensure understanding by including a variety of questions, such as multiple choice, matching, and short answer. Depending on the learner's choice of answer and how the instructor develops the lesson, learners may progress to the next page, be taken back to a previous page, or be redirected down a different path entirely.A lesson may be graded, with the grade recorded in the gradebook.
Lessons may be used
- For self-directed learning of a new topic
- For scenarios or simulations/decision-making exercises
- For differentiated revision, with different sets of revision questions depending upon answers given to initial questions
4.16. Page
The page module enables an instructor to create a web page resource using the text editor. A page can display text, images, sound, video, web links, and embedded code, such as Google Maps.Advantages of using the page module rather than the file module include the resource being more accessible (for example to users of mobile devices) and easier to update.
For large amounts of content, it's recommended that a book is used rather than a page.
A page may be used
- To present the terms and conditions of a course or a summary of the course syllabus
- To embed several videos or sound files together with some explanatory text
4.17. Quiz
The quiz activity enables an instructor to create quizzes comprising questions of various types, including multiple-choice, matching, short-answer, and numerical.The instructor can allow the quiz to be attempted multiple times, with the questions shuffled or randomly selected from the question bank. A time limit may be set.
Each attempt is marked automatically, except for essay questions, and the grade is recorded in the gradebook.
The instructor can choose when and if hints, feedback, and correct answers are shown to learners.
Quizzes may be used
- As course or interview exams
- As mini-tests for reading assignments or at the end of a topic
- As exam practice using questions from past exams
- To deliver immediate feedback about performance
- For self-assessment
4.18. SCORM Package
A SCORM package is a collection of files which are packaged according to an agreed standard for learning objects. The SCORM activity module enables SCORM or AICC packages to be uploaded as a zip file and added to a course.Content is usually displayed over several pages, with navigation between the pages. There are various options for displaying content in a pop-up window, with a table of contents, navigation buttons, etc. SCORM activities generally include questions, with grades being recorded in the gradebook.
SCORM activities may be used
- For presenting multimedia content and animations
4.19. Survey
The survey activity module provides several verified survey instruments that have been found useful in assessing and stimulating learning in online environments. An instructor can use these to gather data from their learners that will help them learn about their class and reflect on their teaching.
Note that these survey tools are pre-populated with questions. Instructors who wish to create their survey should use the feedback activity module.
In organizations, the survey allows course educators to create surveys for their learners. This can be used to collect feedback on several topics, such as course content, teaching methods, or learner satisfaction.
4.20. Training Event
A training event allows for face-to-face training workshops to be added to a course. It uses company-defined training locations and can have a complex booking and approval method to allow access for users.
4.21. URL
The URL module enables an instructor to provide a web link as a course resource. Anything that is freely available online, such as documents or images, can be linked to; the URL doesn’t have to be the home page of a website. The URL of a particular web page may be copied and pasted or an instructor can use the file picker and choose a link from a repository such as Flickr, YouTube, or Wikimedia (depending upon which repositories are enabled for the site).
There are several display options for the URL, such as embedded or opening in a new window, and advanced options for passing information, such as a learner's name, to the URL if required.
Note that URLs can also be added to any other resource or activity type through the text editor.
4.22. Wiki
The wiki activity module enables participants to add and edit a collection of web pages. A wiki can be collaborative, with everyone being able to edit it, or individual, where everyone has their wiki which only they can edit.A history of previous versions of each page in the wiki is kept, listing the edits made by each participant.
Wikis have many uses, such as
- For group lecture notes or study guides
- For members of a faculty to plan a scheme of work or meeting agenda together
- For learners to collaboratively author an online book, creating content on a topic set by their tutor
- For collaborative storytelling or poetry creation, where each participant writes a line or verse
- As a personal journal for examination notes or revision (using an individual wiki)
4.23. Workshop
The workshop activity module enables the collection, review, and peer assessment of learners' work.
Learners can submit any digital content (files), such as word-processed documents or spreadsheets, and can also type text directly into a field using the text editor.
Submissions are assessed using a multi-criteria assessment form defined by the instructor. The process of peer assessment and understanding the assessment form can be practiced in advance with example submissions provided by the instructor, together with a reference assessment. Learners are allowed to assess one or more of their peers' submissions. Submissions and reviewers may be anonymous if required.
Learners obtain two grades in a workshop activity - a grade for their submission and a grade for their assessment of their peers' submissions. Both grades are recorded in the gradebook.
5. Course Management
A. Create Course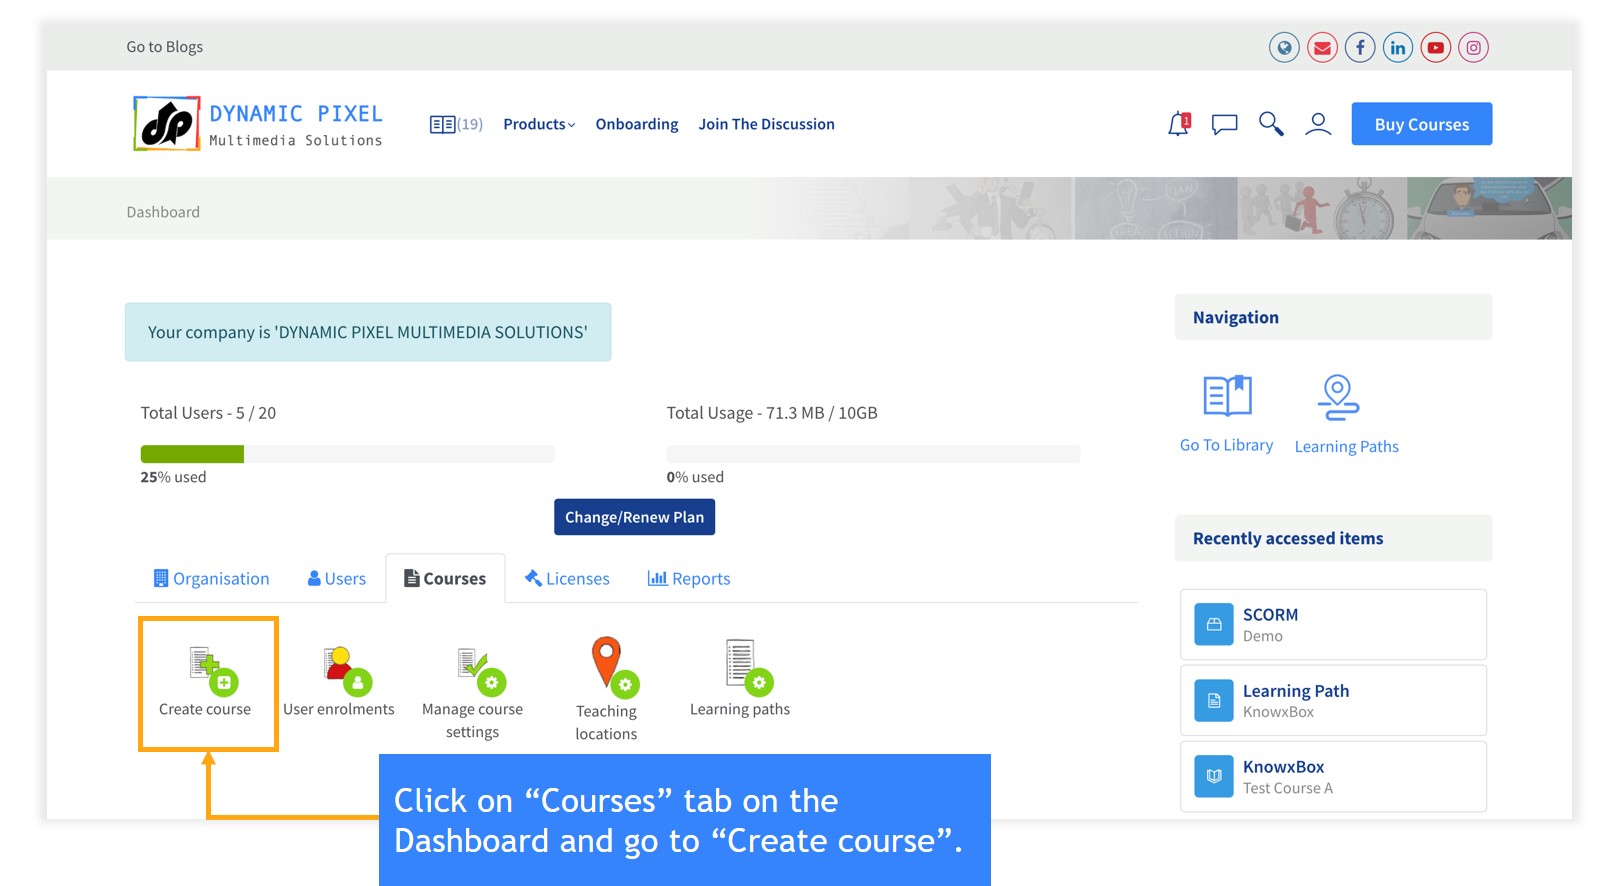
- Create your own course.
- Edit course start and end date.
- The person who creates the course is the “Course educator” who has the right to edit the course.
- These following are the fields that are required to create a course.
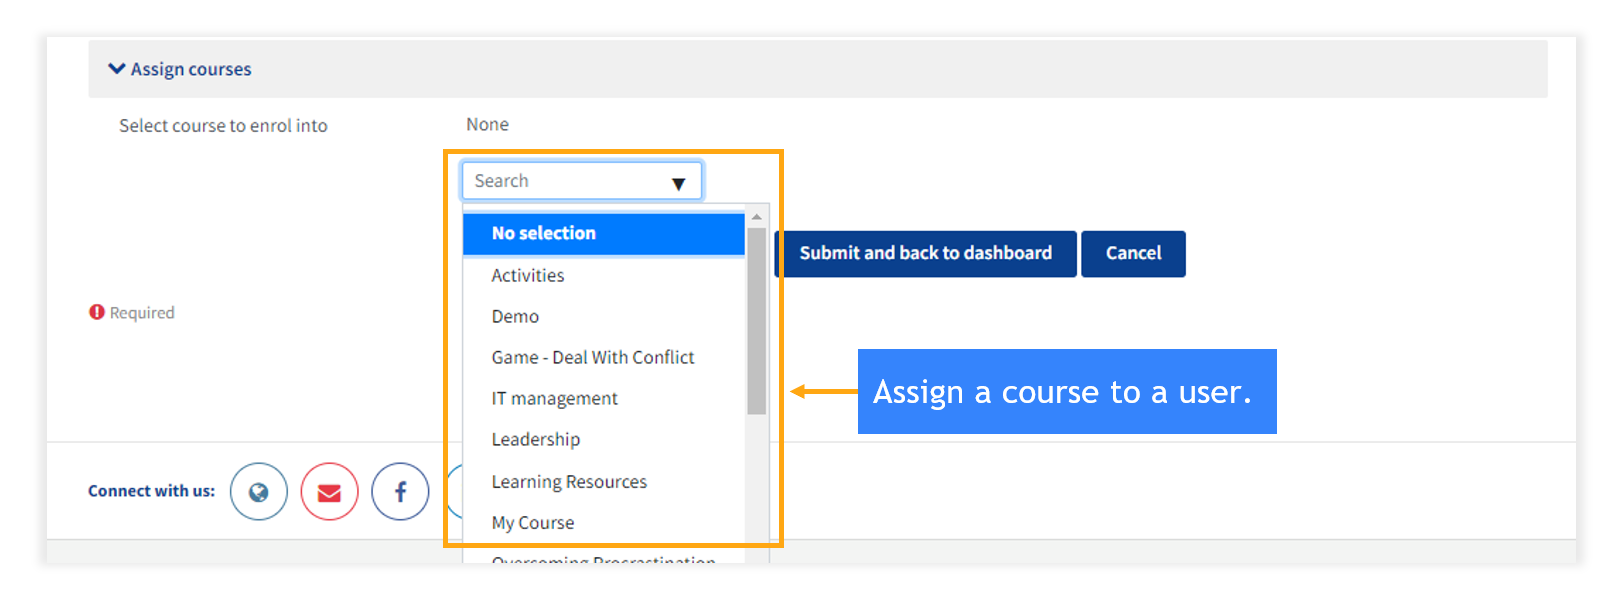
- Assign courses to users.
- Select the course in which you would like to enroll the user.
- Select the date of the course enrollment email that is sent to the users.
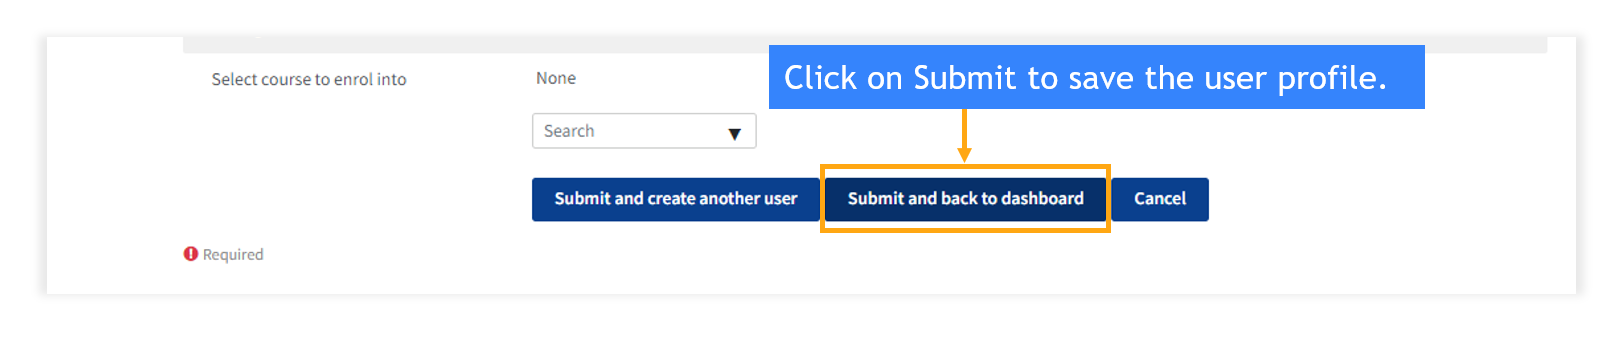
- Easy way to enroll and unenroll the users by clicking on “Select” and “Enro
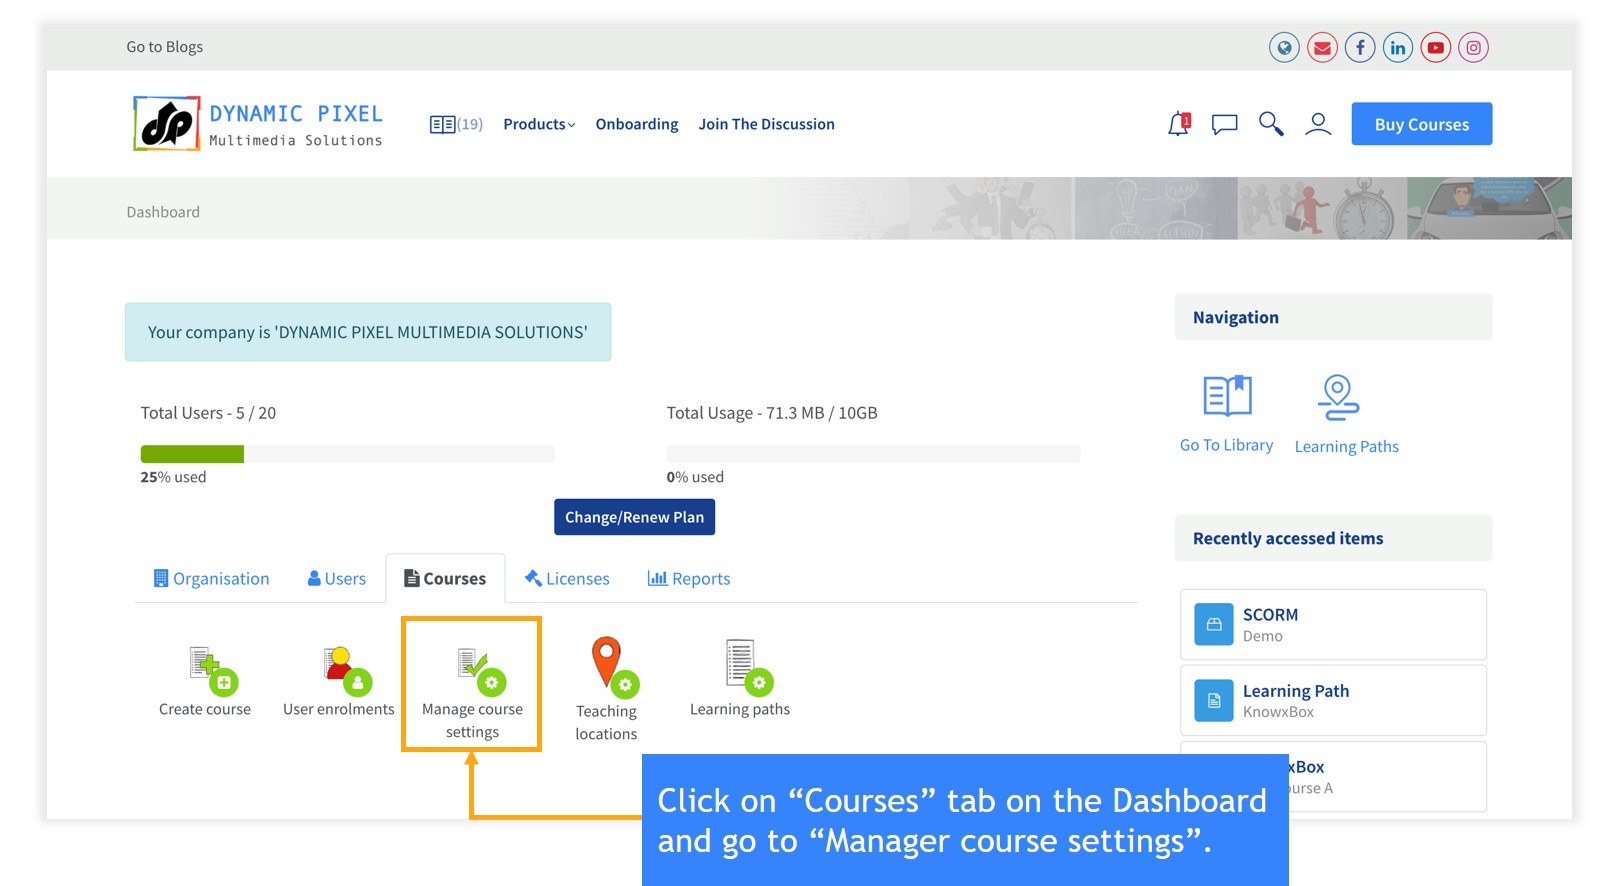
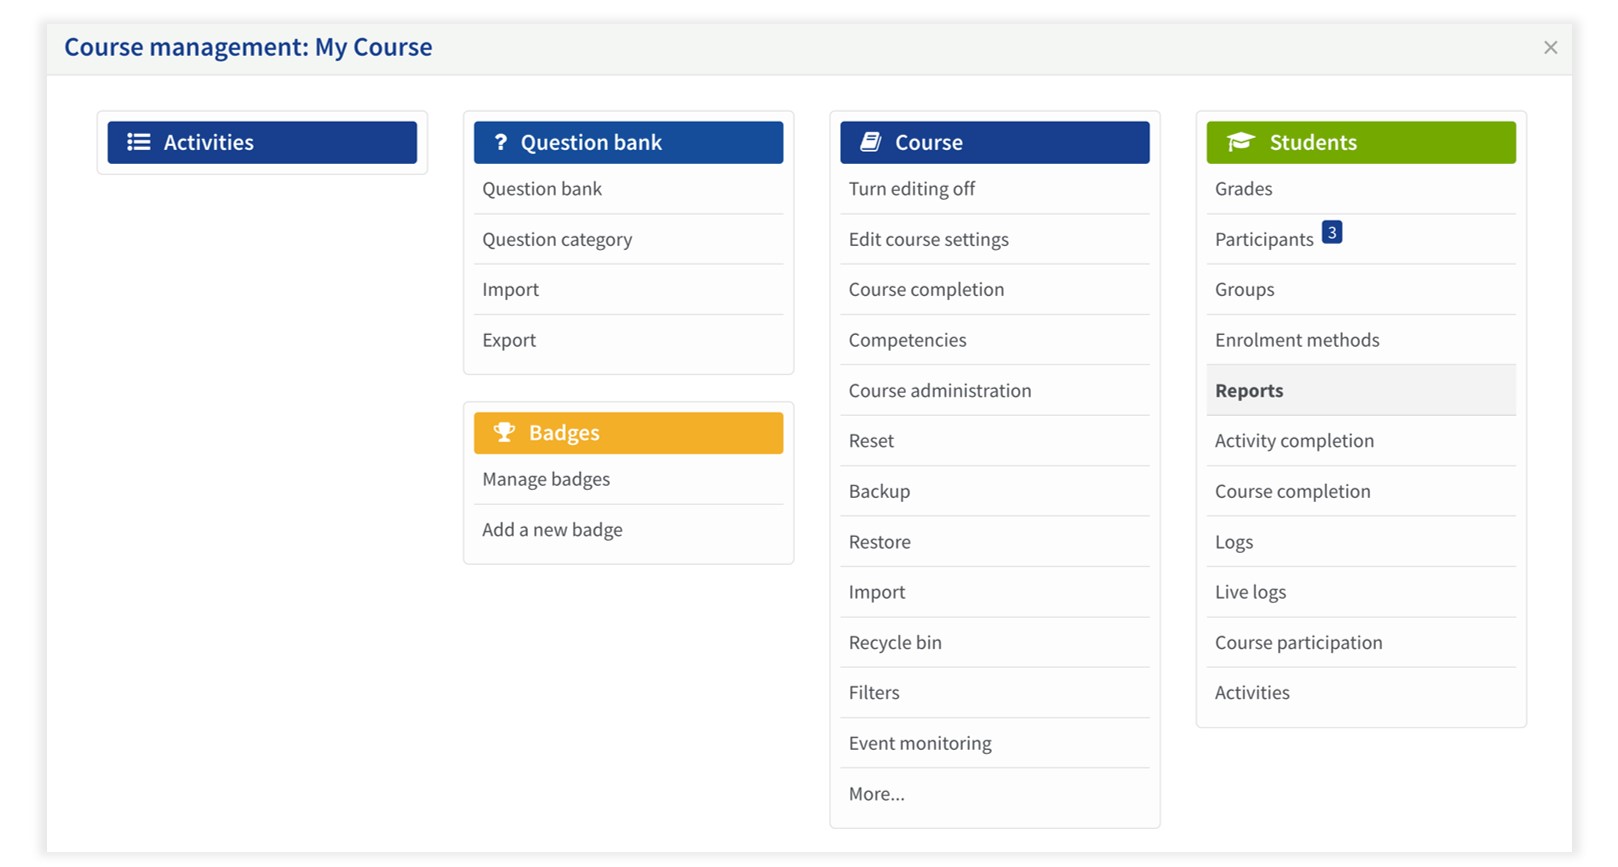
Dashboard < Courses < Manage Course Settings
- The course educator can edit the course by clicking on “Turn editing on”.
- Find all your courses in one go.
- Search by course name.
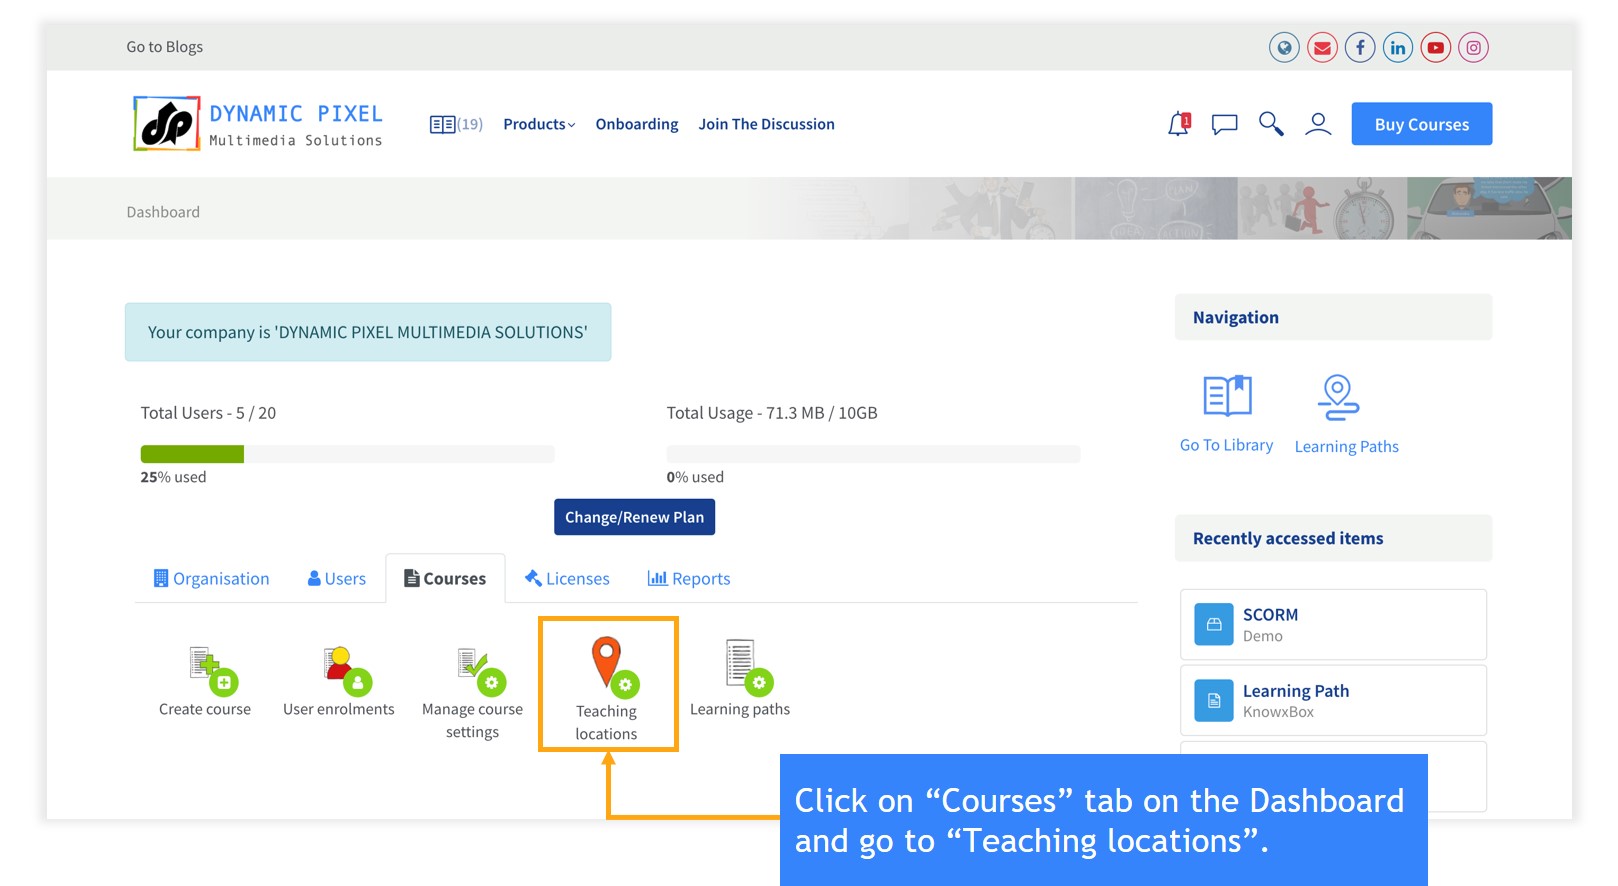
Dashboard < Courses < Teaching locations
- Let your learners know about the training locations available to them.
- Note that you have to add a location before creating a training event.
Dashboard < Courses < Learning Paths

- Users can create their own learning path.
6. Reports
Dashboard < Reports

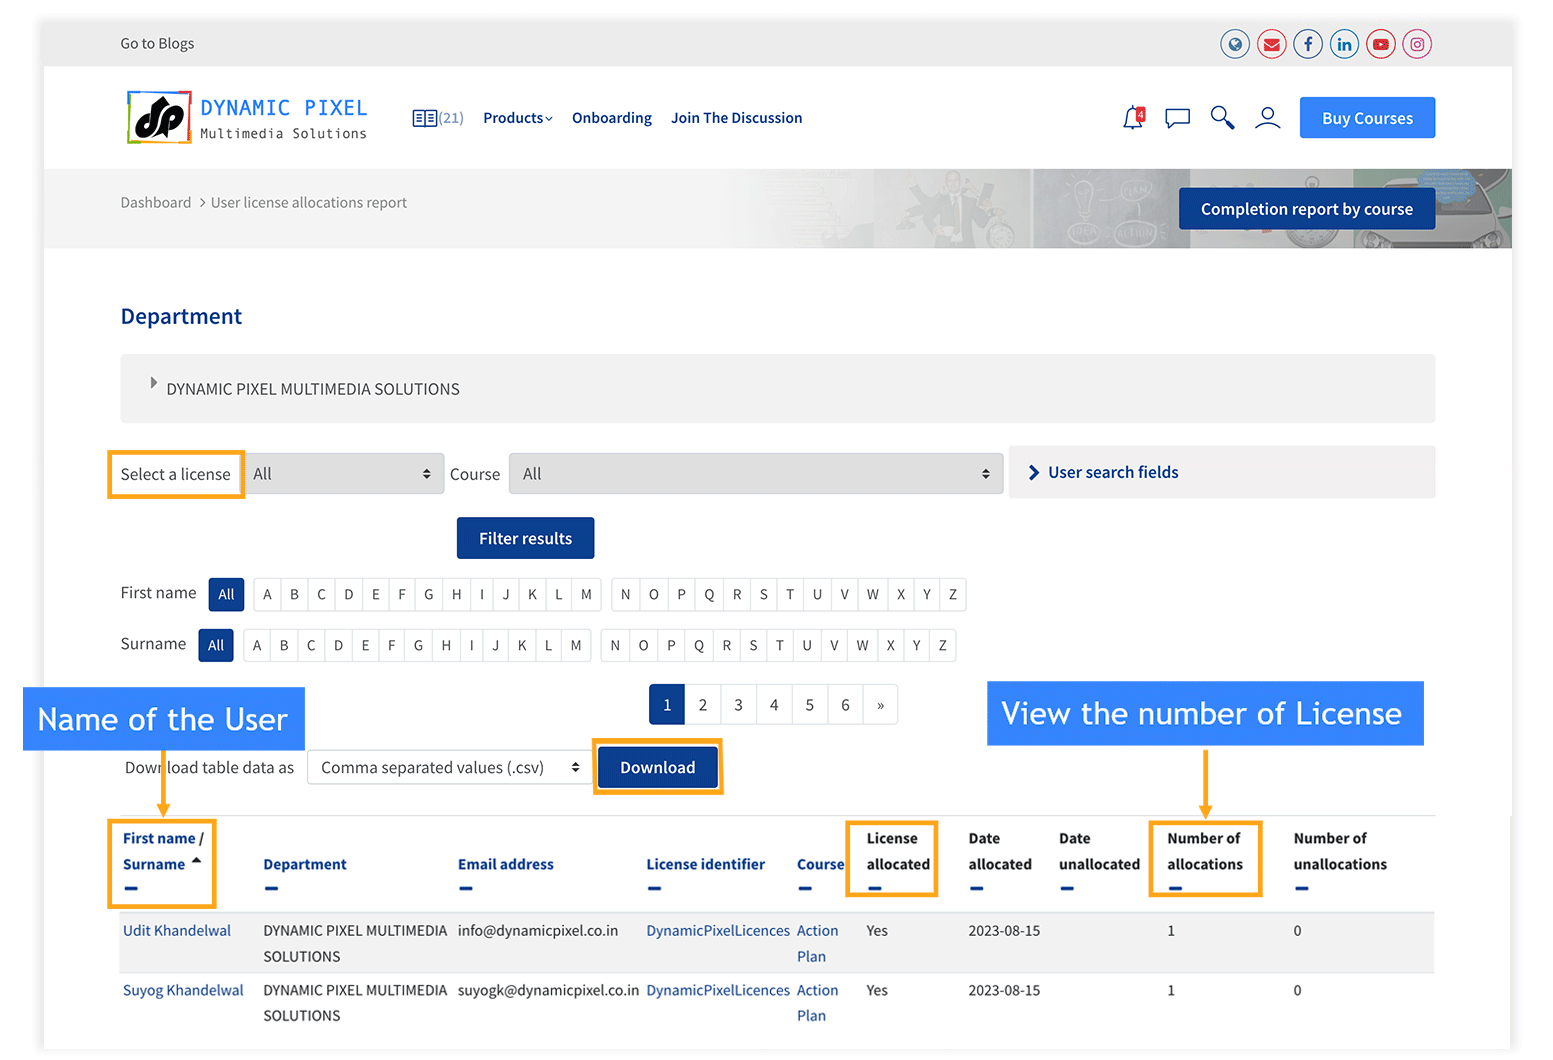
D. User License Allocations Report
The organisation manager can view the license allocated to the user. Here is the screenshot for your reference.
- Attendance report
- Completion report by course or month
- User log-in report
- Users report
- User license allocations report
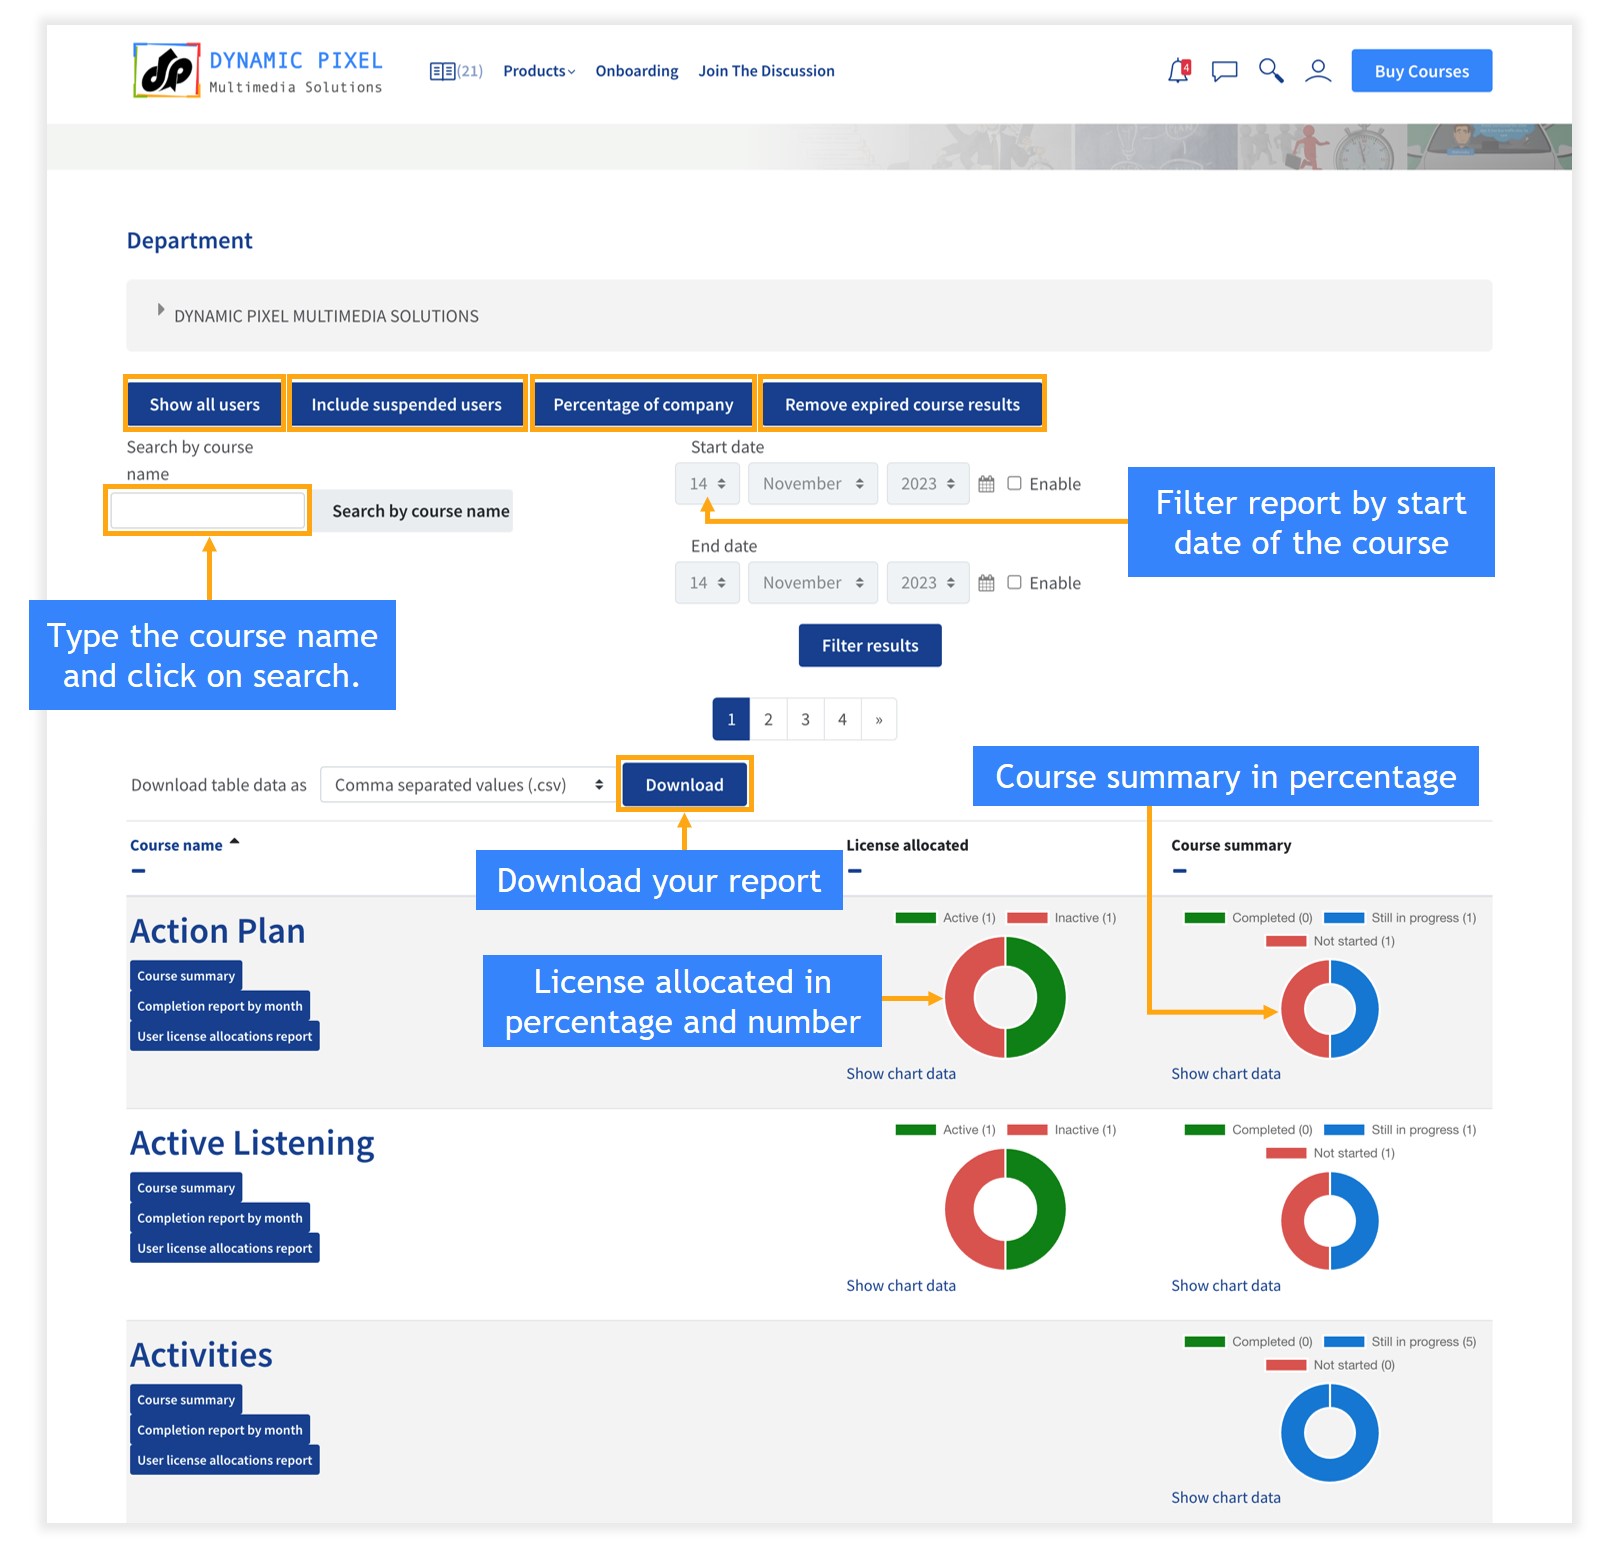
A. Completion Report by course
The manager can view the completion report for any course. Here is the screenshot for your reference.
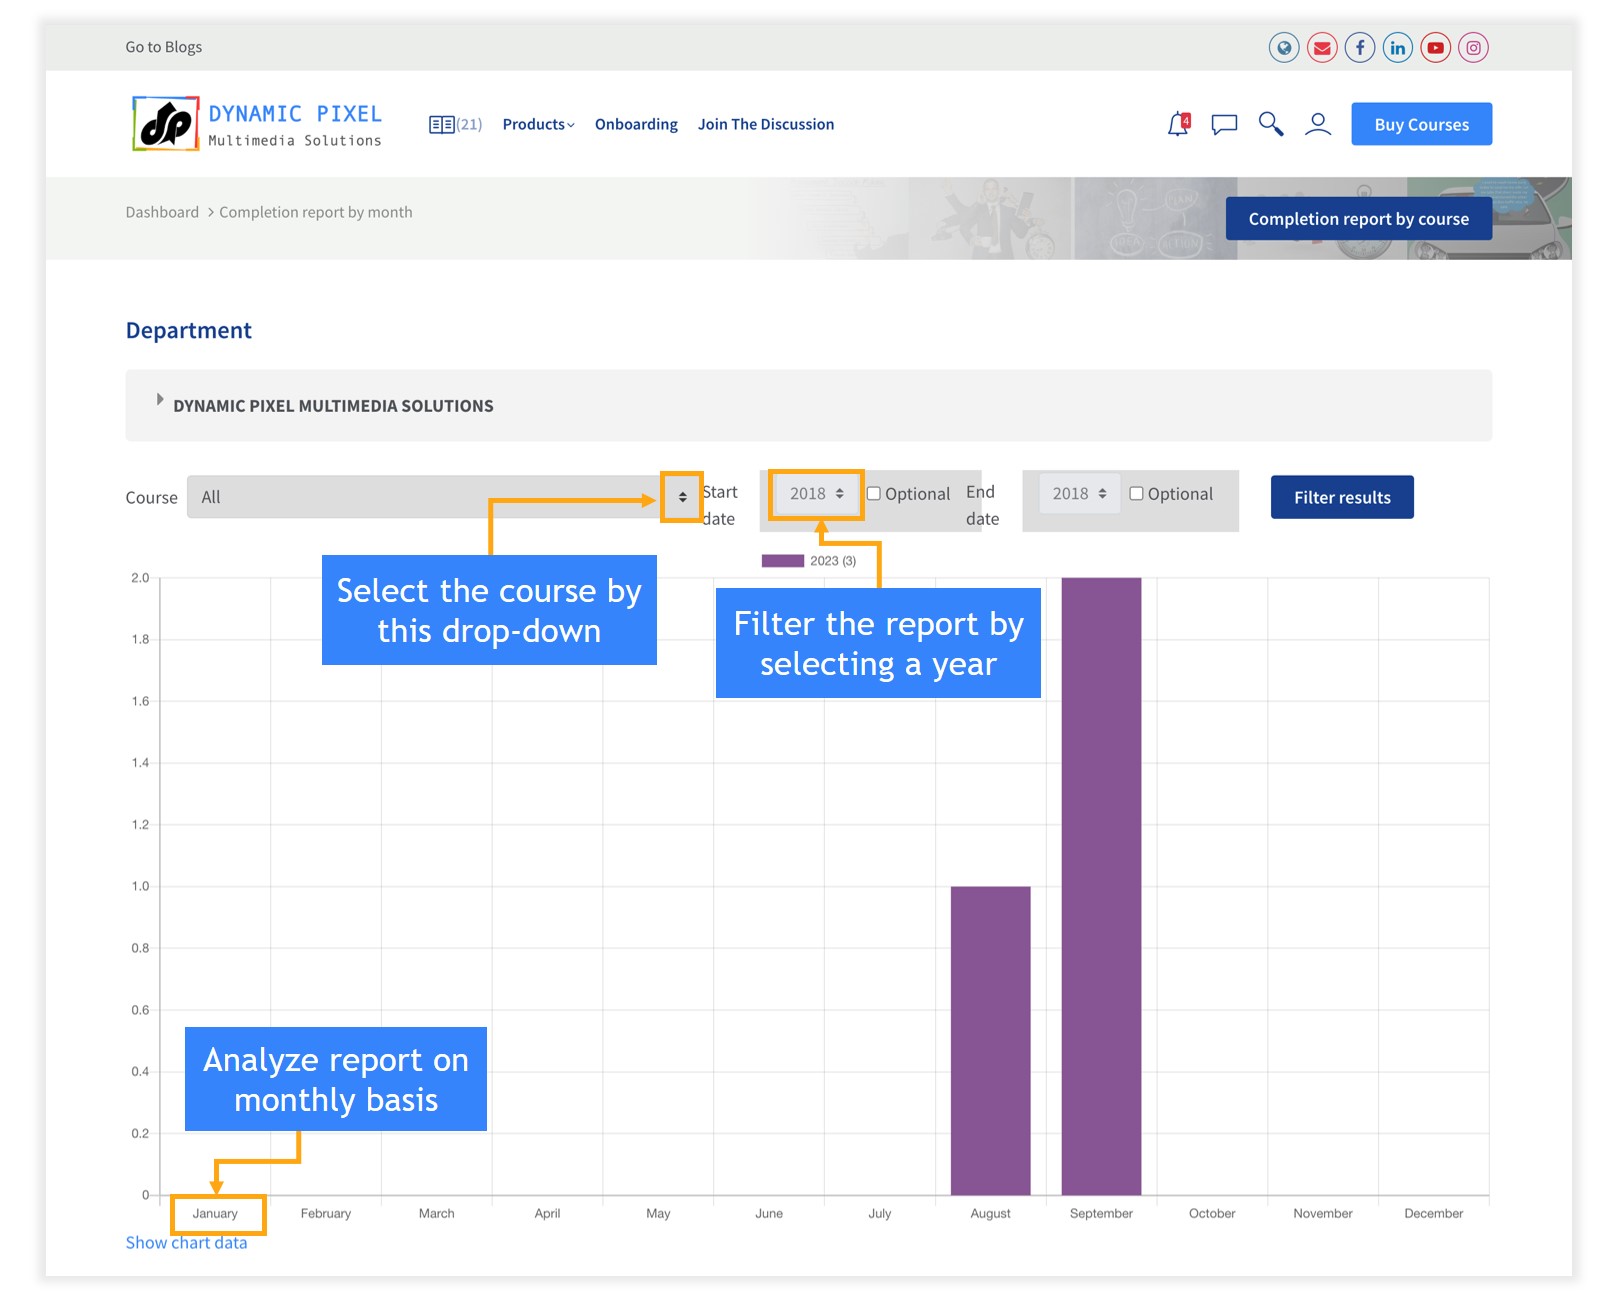
B. Completion Report by Month
The manager can view the completion report for any month. Here is the screenshot for your reference.
C. License Allocations Report
The organisation manager can view the license allocated to the organisation. Here is the screenshot for your reference.